45: PBL Dilemmas & Resolutions

1-sources


2-what


Screen Shot 2016-05-09 at 11.10.24 PM


The dilemmas facing educators trying out the backwards design approach to unit planning are shared by educators trying out Project Based Learning (PBL).  The following lists some possible resolutions that can be used to confront naysayers (both outside and inside our own brains.)


Misconception: We have to teach to the test
Possible Resolutions:
  • Design authentic projects that are aligned to test standards
  • Use test blueprints to streamline curriculum so there is time to go for depth in key standards


Misconception: We have too much content to cover
Possible Resolutions:
  • Use projects to have students solve complex problems that make the connections between ideas and skills explicit and vital
  • Remember that teaching is not the same thing as learning
  • Use standards to streamline (not extend) the curriculum so there is time for depth
  • Use textbooks as references, not as the syllabus


Misconception: This work is hard and I don’t have the time.


3-sowhat
Standardized tests are limited measures of understanding.  Training for the tests is like training for a doctor’s physical instead of aiming for better health.  Research has shown that authentic assessments and pedagogy better prepare students for high stakes assessments than drill and kill methods.


The textbook is not the curriculum.  The TIMS test has shown that curricula that aim for depth over breadth teach more math concepts and skills.


It’s OK to start small.  Cook one gourmet per year or per semester and do it in collaboration with other teacher stakeholders.  Build with the help of other educators and refine using feedback from students.


4-nowwhat
Preparation Steps
  • Analyze and prioritize standards
  • Identify which standards clusters lend themselves well to authentic tasks and pedagogy
  • Design a project aground standards using backwards design template and standards.  If possible, collaborate with other teachers on this design.
  • If possible, review design with a student panel before launching project.
 
Early Implementation Steps
  • Launch and facilitate entire project.
  • Take notes on what’s working and not working during the project.  Use these tips to refine project.  Generalize this feedback in order to apply them to future projects.
  • If full blown projects are too intimidating, try designing and implementing inquiry based lessons.
Advanced Implementation Steps
  • Collaborate with other educators to build and refine a database of projects.
  • Design a PBL course that uncovers most standards using projects
5-relatedstuff

44: Project design: multiple entry points

1-sources


2-what


Screen Shot 2016-05-09 at 11.14.53 PM


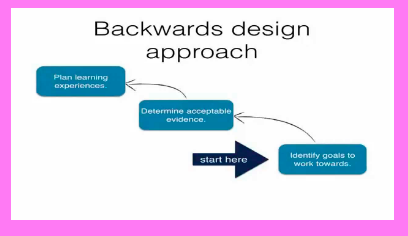
3 Stages of Backwards Design:
  1. Identify Desired End Results:
    • study standards and learning goals
    • identify learning goals and desired enduring understandings
    • prioritize learning goals
  2. Determine Acceptable Evidence:
    • determine what evidence we will accept to show that students have achieved mastery of goal
  3. Plan Learning Experiences and Instruction:
    • what foundational skills will students need to reach goals?
    • purposefully design and analyze learning tasks: how will formative assessments be used to develop student learning? what tasks will help students develop a deep understanding of learning goals?
    • Avoid common errors (see pitfalls above)
 
NOTE:  These steps do not need to occur in the order above.  The models below will show other ways to design projects.


Begin with Content Standards:
  • Analyze nouns in standards and connect these big ideas

  • Identify key knowledge and skills in standard

  • What essential questions follow from standard?

  • Analyze verbs and connect these to performance assmts

  • List learning activities

  • Refine unit to insure alignment across all phases


Begin by considering real world applications:
  • Clarify larger purposes and connections between applications and content.

  • Identify specific real world tasks that embody goals

  • Determine enabling knowledge & skills needed for tasks

  • Sketch learning plan that enables practice to mastery

  • Infer questions learners need to frequently consider as they learn

  • Identify content standards that explicitly tie to tasks
  • Revise to align design elements as needed


Begin with an important skill:
  • What complex worthy task does this skill support? How does this skill connect to other relevant skills?

  • Identify related content standards

  • Determine what assessments are implied or explicit in standard

  • Identify strategies for using skills effectively

  • Identify big ideas and essential questions that undergird the skill

  • Devise learning activities.

  • Revise for alignment.


Begin with key resource or learning activity
  • Start with winning activity or sanctioned resource

  • Consider: Why does this activity matter?  What big ideas does this activity help us understand?

  • Clarify essential questions that will point to these big ideas

  • Identify the skills, facts, and understandings the activity is meant to yield

  • Tie activity to relevant standards and infer key concepts and skills in these
  • Revise assessments and learning activities as needed.


Begin with a key assessment
  • Clarify goals and levels of transferability built into assessment

  • Identify standards that address these goals

  • Infer relevant big ideas, understandings, essential questions required to pass assessment

  • Develop and refine performance assessment tasks that parallel the required assessment

  • Craft and modify learning activities to ensure effective and purposeful performance.

  • Revise to align design elements as needed


Begin with an existing unit
  • Place elements into template and look for alignment across 3 phases.  Do the goals match the assessments?

  • Do lessons relate to richest aspects of goals?

  • Clarify big ideas and long term performance goals related to standards

  • Ask often: What should students come away understanding?

  • Revise assessments and lessons to do justice to Stage 1 elements

  • Revise to align design elements as needed


3-sowhat
Because the inspiration for projects can be varied, it is helpful to see different processes for designing projects that start from different entry points.  The key thing about the 3 phases is not that they occur in order, but that a fully designed project addresses all the key points in ALL 3 phases, i.e. clear aligned picture of learning goals, valid assessments, and good scaffolding.  The color coding above illustrates how the 3 different phases arise in different models for designing projects.


4-nowwhat
Preparation steps
  • Develop a Year at a Glance (Scope & Sequence)
  • Prioritize standards in scope and sequence
  • Use one of the strategies above to develop a project that goes with a unit cluster of standards
  • Use Understanding by Design template and related standards to guide and evaluate project development
Early implementation steps
  • Use design criteria to evaluate project elements as they are implemented in project
  • Document evaluations of projects and extract generalizable tips and ideas that can be applied to future project designs
Advanced implementation steps
  • Use the multiple entry point models to help students design their own investigations and projects
5-relatedstuff

43: Backwards Design Template & Standards

1-sources


2-what
Stage 1 Template
udb1
 
Stage 1 Evaluation standards
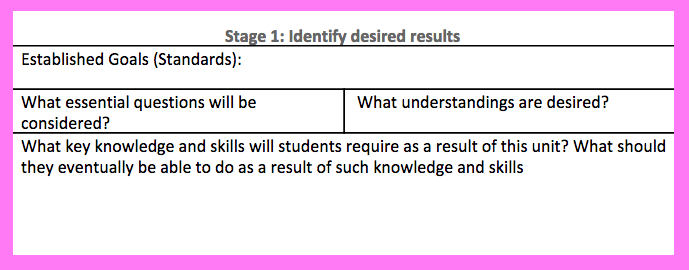
To what extend does the design focus on the big ideas of targeted content?
  • Are the targeted understandings
    • enduring, based on transferable, big ideas at the heart of the discipline and in need of uncoverage?

    • framed by questions that spark meaningful connections, provoke genuine inquiry and deep thought, and encourage transfer?

  • Are the essential questions provocative, arguable, and likely to generate inquiry around the central ideas (rather than just a pat answer)?

  • Are appropriate goals (i.e. SWLO, content standards) identified?

  • Are valid and unit-relevant knowledge and skills identified?
Stage 2 Template
ubd2
Stage 2 Evaluation Standards
To what extent do the assessments provide fair, valid, reliable and sufficient measures of the desired results?
  • Are students asked to exhibit their understanding through authentic performance tasks?

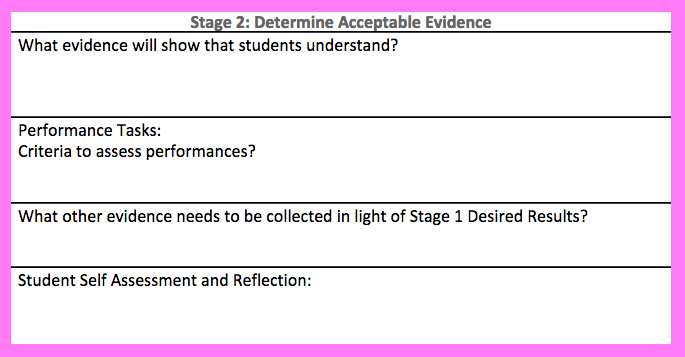
  • Are appropriate criterion-based scoring tools used to evaluate student products and performances?

  • Are various appropriate assessment formats used to provide additional evidence of learning?

  • Are the assessments used as feedback for students and teachers, as well as evaluation?

  • Are students encouraged to self assess?
Stage 3 Template
ubd3
Stage 3 Evaluation Standards
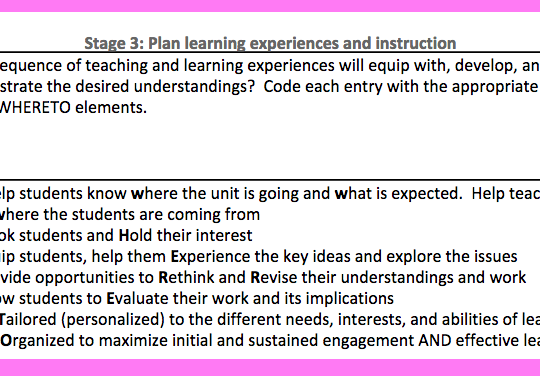
To what extent is the learning plan effective and engaging?
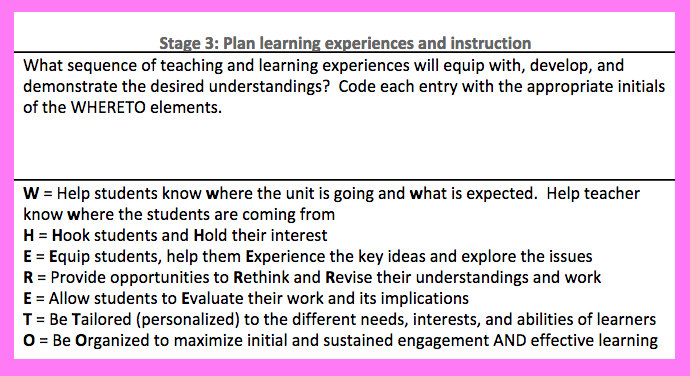
  • Will the students know where they’re going (learning goals), why the material is important, what is required of them (unit goals, performance requirements,etc ..)

  • Will the students be hooked – engaged in digging into the big ideas (through research, inquiry, experimentation, problem solving ..)

  • Will the students have adequate opportunities to explore and experience big ideas and receive instruction to equip them for the required performance?

  • Will the students have sufficient opportunities to rethink, rehearse, revise, and refine their work based upon timely feedback?

  • Will the students have an opportunity to evaluate their work, reflect on their learning, and set goals?

  • Is the learning plan tailored and flexible to address the interests and learning styles of all students?

  • Is the learning plan organized and sequenced to maximize engagement and effectiveness?
Holistic Criteria 
To what extent is the entire unit coherent, with all the elements of all 3 stages aligned?


3-sowhat
The Backwards Design Template and Standards summarizes all the components and criteria in the backwards design process.  This process aims to design and implement units (projects) that avoid 2 pitfalls common in traditional units: 1) hands-on without being minds-on and 2) coverage instead of uncoverage.


Phase 1 aims to guide teachers to develop a clear, prioritized picture of a unit’s learning goals.  Phase 2 aims to guide teachers to think deeply about what portfolio of assessments will count as a valid system for seeing evidence of student mastery of learning goals.  Phase 3 focuses on developing scaffolding that aligns to learning goals and assessments.


NOTE:  Although these phases are numbered, they do not always need to be completed in number order.  They key thing is that all phases are completed and well considered prior to project launch.  To see multiple orders for completing this template, based on different ideation processes, see this article.


4-nowwhat
Preparation Steps
  • Recruit teacher sounding boards who will trial this template and standards with you
  • Use this template and standards to plan projects
  • Use backwards design standards to reflect upon and to refine project template form
  • Run critical friends with other teachers that is influenced by the backwards design standards.  Refine template form as needed.
  • Gather and create resources that are outlined in completed template.
Early Implementation Processes
  • Implement project plan outlined in project template.
  • Gather notes on how well each phase is working during the project.
  • Use reflection prompts and facilitated discussions to gather more student data as to whether or not the plan is helping student stay engaged and dig deeper into their learning.
Advanced Implementation Processes
  • Use student data to plan better for remediations and to better align hooks to student interests
  • Create a simplified version, student friendly version of standards.  Show student panel your template and have them evaluate the project outline in the form using the standards.  If you don’t want to reveal the hook early, you can ask former students to serve on your evaluation panel.
  • Use simplified (or not) version of template and standards to guide students to design their own projects and independent inquiries.
  • Integrate some components from Human Centered Design into template and standards


 5-relatedstuff

19: Reflective Research Process

1-sources


2-what


Screen Shot 2016-05-10 at 12.42.39 PM


Reflective Research Process:
  • Formulate a specific question: What do I want or need to know?
  • Collect and document data: How will I find out?
  • Discuss and analyze data: What did I find? What does it mean?
  • Take action: What will I do as a result of my findings?
  • Reflect and evaluate: What did I learn?
3-sowhat

Teachers gather a lot of data due to grading expectations.  Since a lot of time is spent gathering and analyzing this data, this time can be used efficiently if grading is also used to answer questions that can be use to improve student learning.  Also, using a reflective research process can be used to test and revise new projects and new lesson plan designs.

4-nowwhat
Preparation Steps
  • Identify a question worth asking and that can be answered by gathering data
  • Decide what data can be gathered to simultaneously serve as formative assessment and as research data sources
  • Recruit data partner(s) who can help you make sense of your data interpretations
Early Implementation Steps
  • Gather and interpret data.
  • Share interpretations with data partner and see if they can see the plausibility in your interpretations and notice other connections
  • Make lesson plan or project revisions in response to lessons learned
  • Generalize lessons learned so they can be applied to future projects and lesson plans
Advanced Implementation Steps
  • Include students as data sounding boards
  • Ask and investigate questions that develop more empathy for students and deeper understanding for how they learn
  • Integrate reflective research process with human centered design process
  • Use reflective research process to evaluate classroom systems and routines and improve them


5-relatedstuff

15: Understanding by Design Project Planning Form

1-sources


2-what


Screen Shot 2016-05-10 at 12.21.51 PM


  • The following project planning form was inspired by the backwards design process in Understanding by Design:
    • Blank project planning form: link
    • Sample completed planning form: ink
  • Section 1: Standards: This section is used to highlight key concepts and verbs in standards.
    • Underline nouns and bold verbs in the standards
  • Section 2: Essential Questions: This section is used to brainstorm authentic project contexts that relate to standards.
    • WHAT concepts will student learn? See NOUNS in standards.
    • HOW will students interact with concepts? See VERBS in standards.
    • WHO will do the WHAT and WHO? Brainstorm list of experts who have a reason to do the NOUNS and VERBS.
    • WHERE will the pros perform the skills and use the knowledge? Brainstorm contexts where experts will apply NOUNS and VERBS in standards.
    • WHEN will the pros perform the skills and use the knowledge? Brainstorm instances and events that cause experts to apply NOUNS and VERBS in standards.
    • WHY will the pros perform the skills and use the knowledge? Brainstorm lists of probable causes for pros call to action to apply  NOUNS and VERBS in standards.
  • Section 3: Problem Statement: Select a specific project context by choosing from the lists above to populate a sentence stem for a problem statement that includes the WHAT, HOW, WHO, WHERE, WHEN, and WHY
  • Section 4: 21st Century Skills & Products: Brainstorm project projects that align to standards and are expressions of 21st century skills: critical thinking, written communication, oral communication, agency, and collaboration.
  • Section 5: Rubric:  Design a three-level rubric.  Level 1 has Foundational skills, prerequisite skills needed to achieve mastery in targeted standards.  Level 2 has Mastery skills, skills embedded in the standards as written.  Level 3 has Transfer skills, skills that transfer knowledge and skills in standards to authentic contexts.  The WHAT & HOW responses to Section 2 make-up part of the Mastery rubric criteria.  The WHO, WHEN, WHY, & WHERE responses to Section 2 can inspire the Transfer rubric criteria.
  • Section 6: Assessments: List Foundational, Mastery, and Transfer level skills.  Brainstorm assessments that will produce evidence of student mastery of each of the skills.
  • Section 7: Scaffolding: List Foundational, Mastery, and Transfer level skills.  Brainstorm learning tasks that will help students achieve mastery of each of the skills.


3-sowhat

The project planning form can used to make sure design of project is based on an analysis of standards and based on contexts (professionals, settings, events) that plausibly relate to the standards.   This form helps teachers design products that are expressions of 21st century skills.  It uses essential questions to facilitate brainstorming that can help one write the Proficient section and the harder-to-write Advanced section of the project rubric.  Breaking skills into Foundation, Mastery, and Transfers levels helps teachers develop sequences of learning tasks and assessments that build from low to high rigor skills.


4-nowwhat
Preparation Steps
  • Study sample project planning form to learn how to complete project planning form
  • Use blank project planning form  to analyze standards, brainstorm project contexts, project products, assessments and scaffolding
  • Create scaffolding and assessment resources
  • Create a project calendar that contains time slots for all scaffolding and assessments
Early Implementation Steps
  • Implement scaffolding and formative assessments
  • Use formative assessment results to evaluate success of learning tasks and to make adjustments as needed
  • Use formative assessments results to give timely feedback to students that they can use to improve their understanding and products
Advanced Implementation Steps
  • Integrate elements of Human-Centered design into design of project.  See HCD resources below.
  • Integrate 6 facets of understanding into design of project.  See 14: Six Facets of Understanding.


5-relatedstuff

14: Six Facets of Understanding

1-sources


2-what


Screen Shot 2016-05-10 at 12.18.55 PM


  1. Explanation: 
    • Can describe apt theories and illustrations that provide knowledgeable accounts of events, actions, and ideas
    • How does this work?  To what is this connected? What does this imply?  How did this happen?
  2. Interpretation:
    • Can offer up narratives and translations that provide meaning
    • What does it mean? Why does it matter?  What does it illustrate?  Why does this make sense?  How does this relate to me?
  3. Application:
    • Ability to use knowledge in varied and novel contexts
    • How and where can I use this skill, process or idea? How should my thinking be modified to meet the constraints of the situation?
  4. Perspective:
    • Critical, insightful and multiple points of view
    • From whose point of view?  What is assumed? What is justified or warranted? is there adequate evidence? Is it reasonable? What are the strengths and weaknesses of an idea? What are the limitation of an idea?  Is idea plausible?
  5. Empathy: 
    • Getting inside another’s feelings and worldview
    • How does it seem to you? What do they see that I don’t? What do I need to experience if I am to understand? What was the author feeling and trying to make me feel?
  6. Self knowledge:
    • knowing what one knows and doesn’t know
    • knowing how one’s thought patterns inform and also limit/prejudice understanding
    • How does who I am shape my views? What are the limits of my understanding? What are my blind spots? What am I prone to misunderstand because of my habits and prejudices?


3-sowhat

The 6 facets of understanding can be used to investigate what understanding specific learning goals really means.  Knowing what facets of understanding apply to specific learning goals can help one design the right questions, appropriate assessments and learning tasks to scaffold and assess these goals.  The 6 facets can be used to evaluate the end products of projects.  Knowing what facets are required to develop good products can help one plan the appropriate content and 21st century scaffolding and assessments.

The 6 facets can also be used to create rich project contexts and scaffolding sequences that get students to understand learning goals at many levels.  These can also be used to get more ideas for the Advanced section of project rubrics.  The Proficient section could cover the standard as written.  The Advanced section could require the student to demonstrate concepts using 1 or more of the 6 facets listed above.

4-nowwhat
PREPARATION STEPS
  • Analyze targeted standards – analyze nouns, verbs, and contexts in the standards
  • Determine which of the 6 facets best align / relate to targeted standards
  • Brainstorm what assessments and learning tasks go with the standards interpreted as written and interpreted through the lenses of the 6 facets that make the most sense
  • Design assessments and learning tasks that are aligned to standards and have high rigor level (involve several facets of understanding)
EARLY IMPLEMENTATION STEPS
  • Implement learning tasks and assessments that are aligned to standards and employ several facets of understanding
  • Use assessments to give students feedback and make adjustments as needed
  • Gather evidence of student mastery of learning goals throughout the project
ADVANCED INTERPRETATION STEPS
  • Analyze evidence of student mastery of learning.  Divide into 3 piles – low, medium, high.  Note common characteristics within each pile and see if these relate to supports / instructions in learning tasks.  Use this analysis to improve strategies in future projects.
  • Use a project planning form inspired by Understanding by Design to brainstorm contexts that naturally create opportunities for facets of understanding.  See 15 – Understanding by Design Project Planning Form
5-relatedstuff

13: Backwards Design

1-sources


2-what


Screen Shot 2016-05-10 at 12.12.27 PM


.Why apply Backwards Design to curriculum design?
  • Curriculum needs to meet constraints such as:
    • state / national standards,
    • class size,
    • 504 and Special Ed. accommodations,
    • student interests, etc.
  • Need to deeply understand WHAT to teach, before selecting HOW to teach
  • Shift focus from Teaching first to Learning first
  • Need to deeply understand WHAT students will learn and WHY it’s important to learn it
Common Pitfalls of Traditional Design:
  • Hands on without minds on (no rigor)
  • Coverage instead of un-coverage:
    • Textbook used as a framework for ideas
    • Lack of intellectual framework for ideas means that students never learn big ideas and relevance and transfer of these ideas
 
3 Stages of Backwards Design:
  1. Identify Desired End Results:
    • Study standards and learning goals
    • Identify learning goals and desired enduring understandings
    • Prioritize learning goals
  2. Determine Acceptable Evidence:
    • Determine what evidence we will accept to show that students have achieved mastery of goal
  3. Plan Learning Experiences and Instruction:
    • What foundational skills will students need to reach goals?
    • Purposefully design and analyze learning tasks: how will formative assessments be used to develop student learning? what tasks will help students develop a deep understanding of learning goals?
    • Avoid common errors (see pitfalls above)
3-sowhat
Developing a clear picture of the end results of a project in terms of student learning is a key step in designing effective projects.  Projects present many opportunities to teach transfer and relevance of concepts, but these oppotunities rarely come about by accident.  These understandings can only emerge if projects are intentionally designed to meet constraints that directly relate to student learning.  Understanding what standards say, how the content in them is connected to a larger framework, and using that framework to make prioritizing decisions can help one design projects that focus resources on the most important ideas and skills students need to learn.


4-nowwhat
Preliminary Steps
  • Learn more about Understanding by Design’s approach – see related articles below or read the book
  • Study the standards: analyze nouns, verbs and contexts in standards; analyze standardized and performance assessments related to the standards
    • What will students need to be able to do and understand to demonstrate mastery of standards?
    • Why are these skills and understandings important?
    • How do these skills and understandings relate to the big ideas and themes in the discipline?
    • What foundational skills are needed to approach content mastery?
  • Connections to products and 21st century skills?
    • What products naturally fit with learning goals embedded in the standards?
    • What 21st century skills will students need to develop to enhance their learning and application of learning to developing products?
  • After a clear vision of learning goals is found, decide what evidence will be investigated to check if students are developing mastery.
  • After assessments are planned, select learning tasks that are aligned to learning goals, that help students develop targeted 21st skills, create products, and demonstrate mastery of goals in assessments
  • Document the key analyses in the bullets above in a project planning form
Early Implementation Steps
  • Implement learning tasks and assessments while avoiding pitfalls of hands on/minds off and coverage as opposed to un-coverage
  • Use assessments to evaluate whether or not learning tasks are effective and to make adjustments as needed
Advanced Implementation Steps
  • Integrate design principles from Understanding by Design with design principles from Human Centered Design
  • Study assessment results over time and design assessments that assess whether or not students are learning big ideas and how these are connected in a conceptual framework

.5-relatedstuff

12: HCD: Inspiration Phase

1-sources

Class 2 Readings in “Design Kit_The Course for Human-Centered Design.” Dropbox. Web. 14 Mar. 2016.


2-what


Screen Shot 2016-05-10 at 12.09.34 PM


  1. Choose a design challenge:
    • define what you know and don’t know
    • review constraints and barriers
    • brainstorm how to overcome barriers
  2. Plan research methods:
    • Learn from the people: define your audience, investigate outliers and mainstream examples, capture evidence (videos, photos, quotes), investigate environments, build trust, build recruiting tools
    • Learn from an expert: interview experts to learn about systems levels frameworks, technical advice, and new & innovative related solutions, plan/research smart interview questions, use secondary research to explore recent innovations & solutions
    • Immerse yourself in context: choose observational experiences that will yield key quantitative and qualitative data, capture many details of what’s seen, reflect on what’s observed
    • Analogous solutions: brainstorm analogous solutions and experiences, immerse oneself in experience
  3. Build Interview Guide:
    • Brainstorm questions related to objectives
    • Organize questions: start general and then go deep
    • Use open-ended questions to get more information
    • Sketch conversations – include conversation starters and interview questions
    • Assign key roles – interview, note taker
    • Establish trust with interviewee
    • Use 5 Why’s to get to root cause
    • Encourage interviewee to show as well as tell
    • Capture what you see and hear
  4. Additional Research Methods
    • Personal diaries
    • Photo essays
    • Card sort – prioritize and explain
    • Feedback on concept drawings
    • See Research & Design links at page bottom.
  5. Capture Learnings
    • Share interesting findings without interpreting them
    • Illustrate new ideas


3-sowhat
The steps in the inspiration phase of the human-centered design process can be used to investigate student experiences and needs in order to design better processes.  These steps can also be taught to students so that they can investigate the needs and experiences of project clients.  Many of the steps in this process are similar to steps in project such as: list knows and need-to-knows, gather and interpret data, and design solutions that meet constraints.  The detail in the steps in the inspiration phase can be used to deepen students’ investigations of their audiences and stakeholders prior to designing products.


4-nowwhat
Preparation Steps
  • HCD Inspiration Steps applied to Designing Better Projects
    • Apply steps in Inspiration phase (see above) to develop a deeper understanding of students who are not being reached by mainstream projects (could be struggling students or bored, gifted students)
    • Design questions that gather information on student experiences, interests, and needs
    • Develop culture of trust and experimentation that helps students feel safe while you research their experiences
  • Scaffolding HCD Inspiration Steps for Students
    • Research / design activities and tools that scaffold steps (see above and articles linked below) for students
    • Design informal / formal assessments that can assess how well students are applying steps
    • Develop empathy and scaffolding ideas by trialing inspiration steps to solve a problem (example: use steps to learn more information about students that can be used to design better projects)
Early Implementation Steps
  • HCD Inspiration Steps applied to Designing Better Projects
    • Be transparent with students on how research will be used to design better learning experiences
    • Interview students to develop deeper understanding of their needs and experiences; can also get similar information by studying responses to reflection prompts
    • Observe how students act, speak, and write during project activities and take notes
    • Can do a card sort activity to identify student preferences in activity types
    • Can investigate student journals/blog entries to learn about their thinking, needs and experiences
    • Can use challenge vs. support chart to guide students to evaluate project activities
  • Scaffolding HCD Inspiration Steps for Students
    • Implement scaffolding activities related to inspiration steps
    • Use assessments to provide timely feedback to students on their implementation of inspiration steps and to refine activities
Advanced Implementation Steps
  • HCD Inspiration Steps applied to Designing Better Projects
    • Analyze student reflections and responses over time to evaluate various project activities
    • Use student data to identify strong practices and practices in need of revision
    • Use gathering / interpreting student data as a model to scaffold how students implement similar processes in their projects
  • Scaffolding HCD Inspiration Steps for Students
    • Use assessments to determine what scaffolding activities and tools are helping students effectively apply inspiration steps
    • Convert high yield tools and practices into standardized tools and routines that students use in several projects
    • Use student reflections to refine tools and practices
    • Use tools such as Ignite by DiscoverSTEAM to create more authentic contexts & to create more access to experts
 
5-relatedstuff

11: Human-Centered Design (HCD)

1-sources


2-what


Screen Shot 2016-05-10 at 12.04.25 PM


  • What is Human-Centered Design? design process + empathy
  • The Design Process Phases:
    • Inspiration: How do I ask questions and stay human-centered? What key constraints can I use to set benchmarks and objectives? How can I balance concrete constraints while staying open to exploration? What research studies can I conduct to identify what my clients truly need?
    • Ideation: How to I interpret what I’ve learned in order to develop concrete ideas and prototypes? How can I keep my mind open to generate many ideas?  How can I evaluate ideas to determine best solutions?
    • Implementation: How can I develop sustainable solutions?  How can I assess whether or not solutions are working? How can I use prototypes to reveal unforeseen consequences and constraints?
  • Design Process Implementation:
    • Phases often overlap
    • Cycling between convergent and divergent thinking is normal
    • Find solutions that relate to needs of community
    • Postive deviance – use positive outliners for inspiration
    • Do not forget to consider distribution systems while designing sustainable solutions
  • Mindsets of a Human-Centered Designer:
    • Learn from failure
    • Make it – tangibility is good
    • Creative confidence – everyone has ideas and the power to implement them
    • Empathy – clients are roadmaps to innovative solutions
    • Embrace ambiguity – not knowing creates opportunities to explore
    • Be optimistic – the solution exists
    • Iterate often – use feedback to revise often


3-sowhat

Human-centered design (HCD) is an approach that can be used to develop projects that engage students AND teach content & 21st Century skills.  This approach is also a problem solving model that can be scaffolded for students to develop better products.  The HCD phases can be used to organize projects into phases – especially projects aimed at designing products for specific clients.  The mindsets of a human-centered designer can be cultivated within teachers and students in order to make them better problem solvers.

4-nowwhat
Preparation Steps
 
  • HCD Applied to Designing & Implementing Projects:
    • Use multiple data sources to identify needs of students
    • Use needs of students to develop criteria/constraints for evaluation of project design
    • Design assessments based on student needs for assessing success of project activities
    • Develop ideas based on constraints for scaffolding content and 21st century skills
  • HCD Applied to Developing Project Scaffolding:
    • Develop scaffolding ideas and empathy by going through HCD cycle first – can apply it to designing and implementing a project
    • Research methods for teaching phases of HCD process.  See Design Process articles for ideas.
    • Develop activities and tools that scaffold student application of HCD phases.  See Design Process articles for ideas.
    • Design activities and tools that focus on HCD mindset(s) that will be honed and applied in upcoming project
    • Develop assessments for determining whether or not students are successfully learning content and applying HCD steps
Early Implementation Steps
 
  • HCD Applied to Designing & Implementing Projects:
    • Implement project and use assessments and constraints to measure success of project and make adjustments as needed
    • Use student input throughout the project to assess project effectiveness and to fine tune project
  • HCD Applied to Developing Project Scaffolding:
    • Implement scaffolding tools and activities that guide students to apply HCD processes
    • Use assessments to determine if HCD is helping students develop better understandings and better products
Advanced Implementation Steps
  • HCD Applied to Designing & Implementing Projects:
    • Uses experiences from implementing HCD to design scaffolding that helps students apply HCD
    • Reuse effective HCD practices to design other projects
  • HCD Applied to Developing Project Scaffolding:
    • Use student input to refine HCD tools and processes
    • Use programs such as Ignite by DiscoverSTEAM to connect students with corporate clients to make HCD applications more relevant
    • Develop routines that give students opportunities to deliberately practice HCD steps
5-relatedstuff