The first week of the 4th-six-weeks grading period was a short one at Cedars International Next Generation High School due to a school holiday on Monday, 1/16, and Benchmark testing on 1/17. The 3 remaining days were still quite dense. In this time, we launched two projects in my two main preps, Algebra 2 and Integrated Physics and Engineering (IPE). This article describes the the first week of the Sports Science Project, an Algebra 2 project on Quadratic Functions. The next article in this series will describe what happened in the first week of the Emerging Technologies (or NSF) project in IPE. To read about the prep that went into preparing for the launches of these two projects, you can read this blog article. To read about later phases in this project, visit this page: A Tale of 2+ Projects.
Repeated Disclaimer: If you don’t want to know about all the details in the PBL sausage, stop reading.
Day 1, Algebra 2 Sports Science Project: LAUNCH!
 On Wednesday, 1/18, we started the Algebra 2 class with a few activities to wrap up the NERFallistics project. In that project students learned about polynomials and applied that knowledge while analyzing the trajectories of NERF gun pellets. These wrap up activities were designed to give students time to reflect and revise their work. To set the right tone and maintain the suspense for the new project a little longer, I used this for my opening agenda slide:
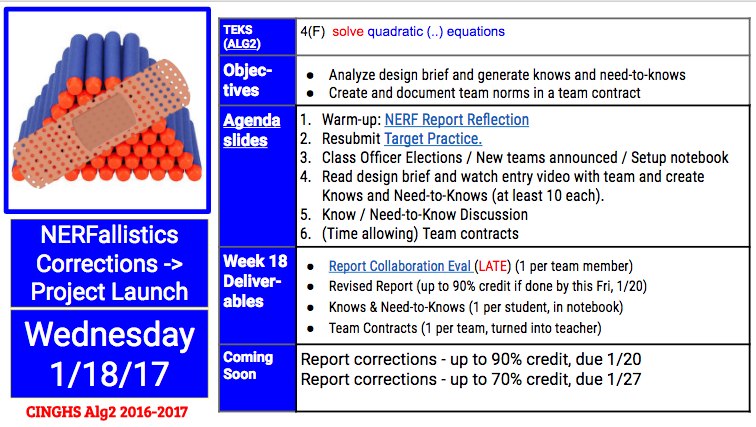
The band-aid is over the project icon for the project we were wrapping up, the NERFallistics project. The icon symbolized the work we were going to do to fix the boo-boos in our last project.
In the NERF Report Reflection warmup, the students read over their report feedback, checked their report grades, and made plans with their NERF teammate to make revisions on the report. In my classes, students always have 2 weeks to re-submit deliverables: after 1 week, they can earn up to a 90% on their resubmitted work; after 2 weeks, they can earn up to a 70% on resubmitted work, and after that, I no longer accept the work. After they completed that reflection, I gave students time to complete a culminating activity from the last project that many teams did not have time to finish during our last class meeting. In the Target Practice activity, students had to solve a regression equation the modeled the trajectories of their NERF guns to in order to hit a table and a small chair in the common room of our school. One team succeeded in hitting the table and the chair shown below from distances of 10+ meters away. They were exuberant to find that sometimes, Math really works!

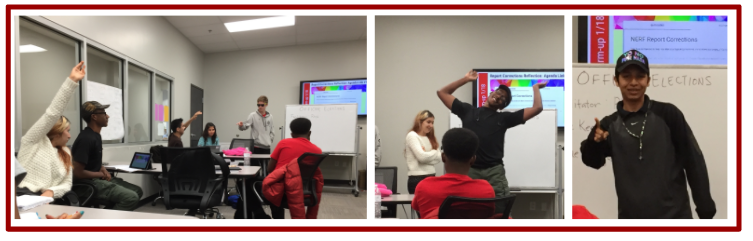
After these wrap-up activities, we started off the six-weeks with our traditional once-a-six-weeks Class Officer Elections. Every six weeks, my students in each period elect 3 class officers: a facilitator, a time manager, and a grade manager. I learned how to integrate and train student leaders in my classes from my friend and mentor from Manor New Tech HS, Ms. Holly Davis. The facilitator starts the the class each day by going over the class agenda with the class. He or she does this while I take care of start of class logistics like taking attendance, refilling my coffee, etc. The time manager keeps track of the time for the class and makes time announcements to alert students and teachers of the time left in class activities and in the class period. The grade manager gathers student work on my grading days (each Friday) and follows up with students who need to submit work late because they missed some due dates. The elections are both playful and quite serious. Candidates give speeches to convince the class that they will be the most effective student at their desired roles.
I let the students take their time with this process because I rely heavily on my class officers to do my job effectively. I’m so used to effective time managers that I don’t know what time some of my classes end. I’m just used to my timekeeper telling me when to wrap things up and move on to the next period. My facilitator acts as my acting sub when I’m absent. When I’m out, the facilitator leads the class through activities while the adult-sub-on-record takes attendance, hangs out, and watches. Sometimes I get so far ahead in my prep that I forget what we’re about to do in class until my facilitator goes over it with the class. My grade managers are amazing! I may not have the best turn in rates on the original due dates, but my 1-week-late turn-in rate is awesome thanks to all the in-person / emailed reminders students receive from my grade managers when they forget to turn in work.
After class officer elections, we announced new teams and set up our notebooks for the next project.

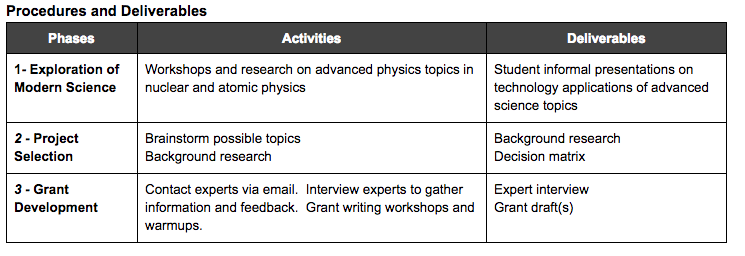
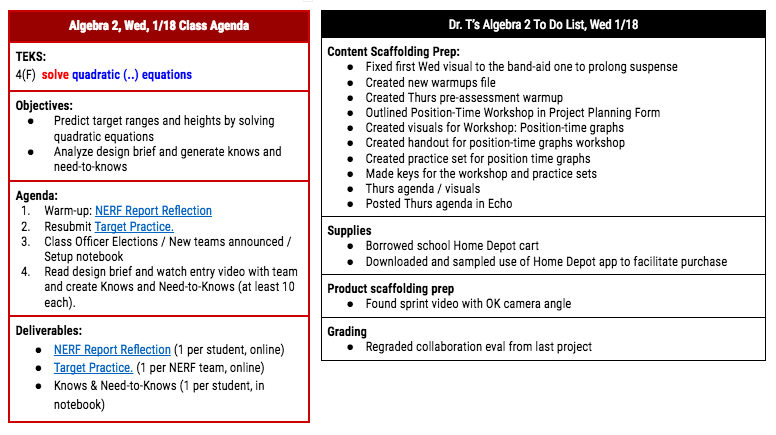
After setting up their table of contents for the new project, the students read over the design brief with their team and came up with at least 10 Knows and 10 Need-to-Knows for the project. They divided these into Content (Algebra 2 related) items and Project (logistics, deadlines, etc) items. The design brief communicated the project’s objectives, purpose, rough timeline and deliverables. In the Sports Science project, students will gather and analyze 100-m dash data to create a sports science video that investigates the question: What separates everyday and world class athletes? In addition to analyzing the Design Brief, we watched a sample ESPN Sport Science video featuring Lebron James. This video provided a sample of their final product and showed them how motion data can be used to make a compelling argument.
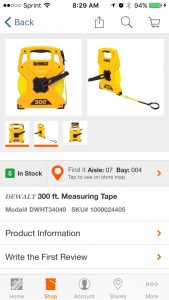 Later that day, I prepared for Days 2 and 3 of the project by preparing a workshop and practice set on position-time graphs and by purchasing a 300-ft long tape measure. My co-teacher, Mr. Fishman, had me download the Home Depot app so I could shop for my tape measure efficiently. When you’re in the store, you can search for products and the app will give you the aisle and section of the store for the product along with a labeled map of the store. It was so sweet. I bought calculator batteries and a crazy long tape measure in record time using the app.
I sometimes joke with my friends that my Algebra 2 class is my Physics-2 class. About half of the students in Algebra 2 are also taking my Integrated Physics and Engineering class. Sometimes our projects in Algebra 2 are situated in Physics contexts because the math fits and I can’t resist because of my physics background. This is why I found myself preparing an activity on Position-Time graphs for my Algebra 2 (not Physics) students. I prepared the lesson because it was in my students’ need-to-knows and because I knew that students needed to be equipped with this knowledge to make sense of the data they were going to gather on their 100-m runs. (On a side note, my students sometimes get confused by all the math they are learning in physics and all the physics they are learning in math; sometimes they write their notes in the wrong notebook and end up writing a weird location in their table of contents for an activity they placed in the wrong notebook.)
I also spent some time search for videos of world class athletes in 100-m races that we could analyze for our comparison cases. It was really challenging to find the perfect video because many distances within the 100-m are not marked. I settled for looking for videos with sideview camera angles and found one video that compiled sideview from several races.
[Spoiler alert] Later in Week 2 of the project I came up with a way to approximately analyze world class run data. Usain Bolt’s stride length is well documented. I was able to analyze his world record 100 meter run by using Coach my Video to find the times associated with each of his strides (exact time that one foot hit the ground) and used his average stride length to determine positions for those times. Later in the project, I provided students with a data table of his world record run so they could analyze it and compare his motion stats to their own run data.
Day 2, Algebra 2 Sports Science Project: Team Contracts / Explore Position-Time Graphs:

We started off Day 2 by completing a warm-up that was a pre-assessment on what students al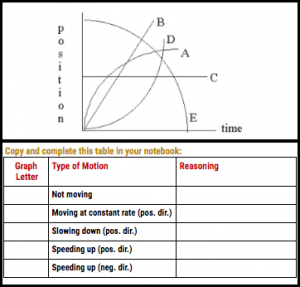 ready knew or could deduce about position-time graphs:
I scanned their notebooks and the results were hit-or-miss. A couple students did it perfectly, many more guessed several wrong, and a couple didn’t know where to start. After the time manager let us know that the warm-up time was over, I told students I was going to break protocol and not go over the warm-up at this time. I did this because we were about to go over position-time graphs and I reused the warm-up problems to make up half of the follow-up practice set to this activity.
After the warm-up, the student facilitator went over the agenda and then led a class discussion to come up with a compiled list of student Knows and Need-to-Knows. Here are the students’ Content Knows and Need-to-Knows:
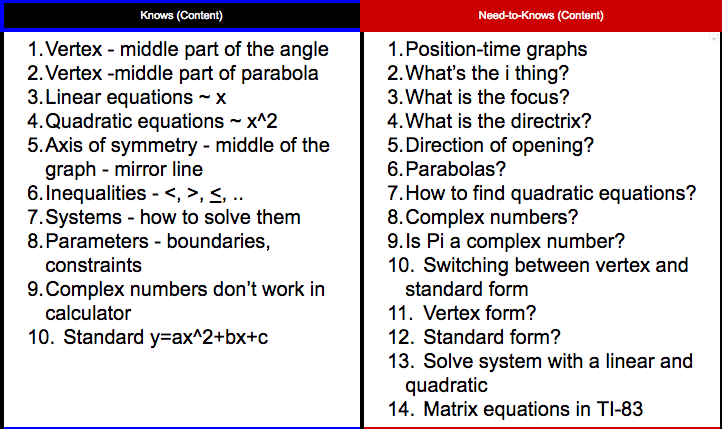
And here are their Project Knows and Need-to-Knows:

I had to play devil’s advocate a bit to get students to elaborate on their Content Knows. They’re pretty good at specifically articulating their Content Need-to-Knows and Project Knows and Need-to-Knows. Over the course of the project, we will revisit and update their Knows and Need-to-Knows as students learn new things and develop more questions.
After the Knows and Need-to-Knows discussion the students set up their team contracts and shared project Google folders. The students completed this Team Contract template and then placed their finished contract in a sheet protector and inside the Team Contract binder. Over the course of the project they will revisit their contract and use the back side of it to document their Work Log goals and agreements. While they prepared their contracts, I linked their Google folder to the Project Rubric Chart:

I’ve streamlined student turn-in processes such that their nearly all their work lives in 2 places: (1) in their notebook and (2) in shared project Google folders. If their work is located in a project Google folder, I link the folder and its key contents to a rubric chart. I use the rubric chart to give students yellow and green stamps on project work that relate to rubric items (see left column). Having the links very close to the rubric makes it easy for me to assess project products against the rubric. Later in the project, students refer to the rubric chart on work days to see which items they have earned full (green stamp) and partial (yellow stamp) credit.
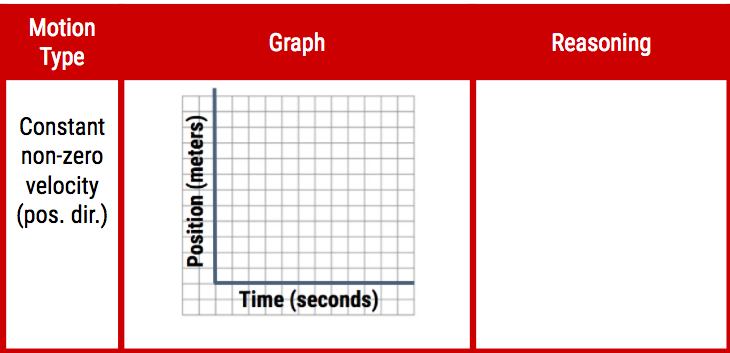
After they set-up their team contracts and team Google folder, we started an activity on Position-Time graphs. I set up the workshop to be interactive. Throughout the workshop, I displayed a prompt on the board and had their teams discuss the prompt while I played Jeopardy music. While the music played, I overheard their discussions and looked at their proposed motion graphs. After the music stopped, I called on the students with interesting insights and went over the correct answers. We did this 10 times. By the end of these cycles we had completed and thoroughly discussed a graphic organizer that showed the shapes for all the types of motion they would need in the project: stopped motion, constant velocity (positive and negative direction), increasing speed (positive and negative direction) and decreasing speed (positive and negative direction).
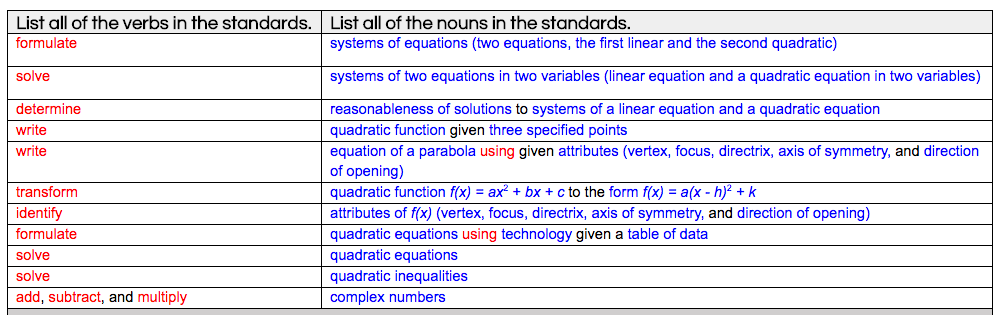
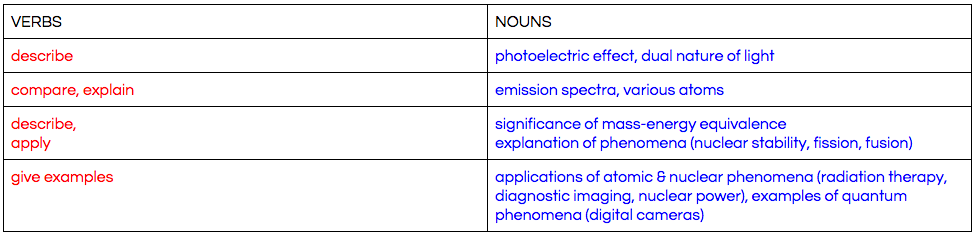
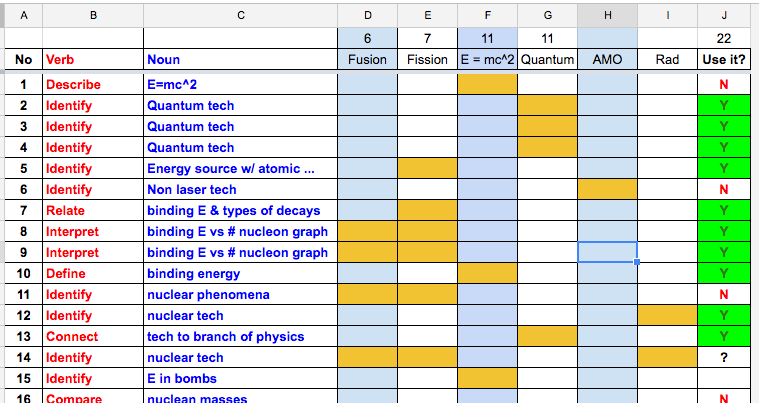
Also, while developing these workshop slides. I came up with a new trick to convey the alignment between state standards and workshop objectives. I color-code the verbs (red) and noun / noun phrases (blue) in both the standards and the objectives to highlight the connections between the two. I now do that in all my workshop objectives slides and in all my daily agenda slides.

After the workshop, students redid the warm-up problems and did a few more practice problems on motion graphs. Nearly every students was able to do the warm-up perfectly on the first try after the workshop.
Later on Day 2, I did some big picture planning of the content scaffolding in the Sports Science project. I looked at the standards again and ranked them from easiest to hardest and grouped them by similarity and developed an outline for a lesson sequence that would cover all the standards. In broad strokes I decided we would start by learning several techniques to formulate quadratic equations (from easy to hard), then learn how to solve quadratic equations, and then learn how to solve systems of linear and quadratic equations.
Day 3, Algebra 2 Sports Science Project: RUN, STUDENTS RUN!!!

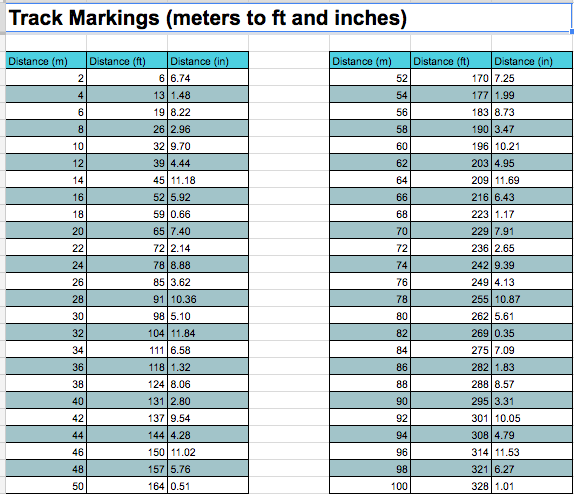
Prior to class on Day 3, I prepped for an exciting Data Collection day by using spreadsheets to create a Track Marking conversion chart (meters to feet and inches):
I also created this visual to convey all the hats students would need to wear in order to ensure a safe, efficient time in the parking lot:

Also at the end of Day 3, I knew I needed to get student work for my grading day, so I created this visual:

This visual shows my Algebra 2 grade manager in the middle of his election speech. He gave me permission to use that pic in visuals reminding students of deadlines. [Spoiler Alert] My grade manager enjoyed this image so much, he had me put it up again in the IPE class where he also got elected into this role.
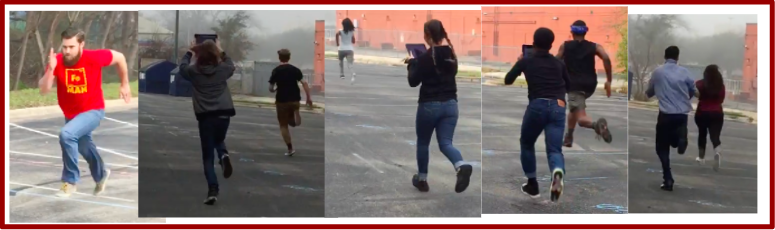
Data Collection day was a blast! The whole class helped to prepare the track on the parking lot behind the school. I put a student in charge of the tape measure and in charge of organizing the team effort to create the track. The students were really smart. They designed the track in a way that made data collection of a tricky data set really simple. They used long lines to mark each 2-meter increment and they marked each line with the total distance from the starting line to that line:

It took them about a half hour to create the track. Then I demonstrated how to properly videotape a run, by taping Mr. Ray while he ran. This involves some back pedaling and some frantic, laughing and chasing while trying to aim the iPad camera in a way that the runner’s feet passing each increment line is captured throughout the 100-meter run. It was really fun to watch students to gather data. By some trick of Murphy’s law, nearly every team had a big height mismatch between their (very tall) runner and their (very short) camera-person. However, the track design that my students came up with, made it possible to get excellent data even when the camera shorts were really dynamic due to the chasing that was occurring.
Mental Note for Future Versions of this Project: Everyone needs to wear running clothes and shoes because the photographers ended up running just as hard as the runner to get good footage.
Here’s a sample data set that came from a video that was really bumpy:
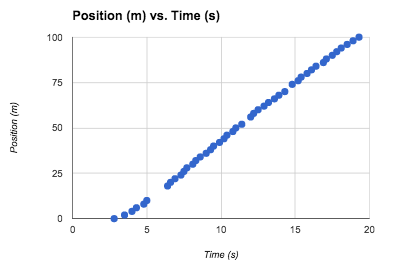
Even though they were unable to see some of the track markings (usually when the photographer transitioned from backpedaling to forward chasing), they still gathered enough data to see clear quadratic and linear regions. Just the thing needed to learn how to solve systems of linear and quadratic equations! Every team was able to get a good data set that made sense. Data Collection day was a surprising success. I was worried that the data would be too hard to get or too dirty to analyze, but everything worked out great.
At the end of Day 3, I did my routine Friday grading of notebooks. After I graded all the notebooks, I used conditional formatting on my Google spreadsheets grade book to create this visual. I cropped out the student names for this post. Red boxes represent missing work and green boxes represent turned-in work. I emailed this visual (the version with the student names) to the grade manager along with a couple links to Google forms associated with a couple of these tasks. My grade manager sent follow-up emails to students missing work and during the following week, he collected late notebooks from students on Tuesday when I decided to follow-up on some late work. By Wednesday the chart was nearly all green except for one student who was out sick for several days. Student Leadership Rocks!
Pre-Week 2 Prep:

Over the weekend, I prepped lessons that showed how to use Desmos to find linear and quadratic regression equations. I also prepared a warmup that had students compare motion equations to linear and quadratic equations in order to relate motion quantities to the parameters in the standard forms of linear and quadratic equations. I also finalized a Shell Science Lab Challenge grant in the hopes of getting more support to design more and higher quality STEM experiences like the ones we had in Week 1 of the Sports Science project.