A Tale of Two Projects: Week 2 IPE Emerging Tech (NSF Project)

This blog entry describes what my students and I did during Week 2 of the Emerging Tech (NSF Grant) project.  The events in this blog entry took place at the same time as the events in this article.  As a pair, these describe what a PBL teacher does while running two projects in two different preps at one time.  To see accounts on earlier or later weeks of these projects, go here.


Week 2, Day 1 IPE Emerging Tech (NSF Project):


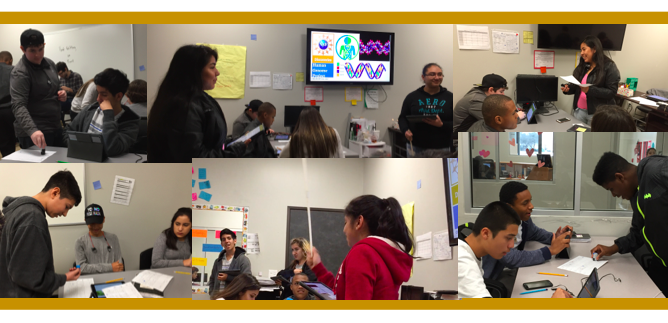
During Day 1, I was not available to work directly with the students because I was at a training related to my responsibilities as Campus Testing Coordinator.  The students started work on informal presentations on physicists who had contributed to our understanding of nuclear phenomena and quantum mechanics.  The students delivered these presentations on Day 4 of this week.

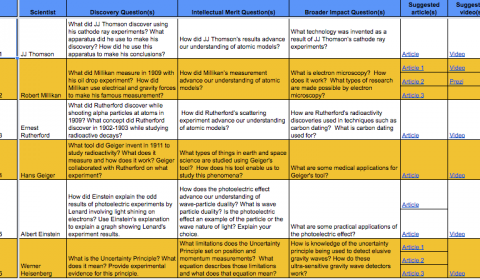
Each team was assigned a different physicist.  To start preparing students for a grant they would write several weeks later, the research questions for each physicist focused on the research of the physicist, its intellectual merit, and its broad impact.  The assigned physicists and related questions for teams 1 to 6 are shown in this linked image.  I provided them with at least 3 age-appropriate and accurate sources to research the questions to streamline their research process.


Each team was also given a template slide deck that limited teams to 3 slides per scientist (see linked template).  The template also constrained students to mostly images and very limited text on the slides.  The bulk of their responses to the research questions were hidden in the slides’ speaker notes sections.


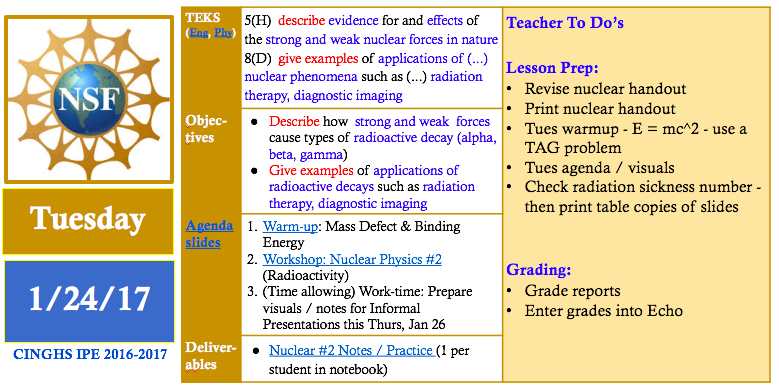
Later on Day 1, I finalized a lesson for Day 2 of this week by analyzing test bank questions related to TEKS on nuclear phenomena and the weak nuclear force.  I found that my workshop needed to focus on types of radiation (alpha, beta, and gamma) and their relationships to nuclear forces (weak and strong) and various technology.  They also needed to introduce half-life and how to use half-life to select appropriate isotopes for different types of technology.  I designed a graphic organizer that included an embedded half-life chart and questions that asked students to interpret the chart to select isotopes for different technology applications – see Day 2 handout.


Week 2, Day 2 IPE Emerging Tech (NSF Project):


Early on Day 2, I made some minor adjustments to my visuals for the upcoming Nuclear Workshop because I needed to look up specific radioactivity values that corresponded to harmless and harmful levels of radiation and their effects.  I typically outline and draft lesson plans and related resources several days ahead of time and then refine them until the day before (or day of) the actual lesson.
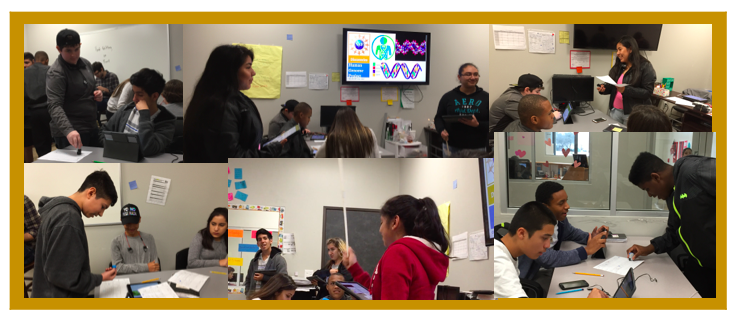
 

Later on Day 2, I facilitated a workshop on Radioactivity with the IPE classes.  In this workshop, we introduced healthy and dangerous levels of radioactivity and used these thresholds to interpret the harmfulness (or harmlessness) of different types of radioactive technology.  We introduced the idea of half life and used specific half lives to discuss whether or not various isotopes were safe (or not) for consumer use.  We also introduced 3 types of radioactive processes (alpha, gamma, and beta) and discussed their connections to nuclear forces and technology applications.  After the workshop, students had time to answer the questions on the graphic organizer and to continue developing their presentations on nuclear / quantum physicists.


Later on Day 2, I finished grading revised reports from the previous IPE project on Rube Goldberg machines.  In this project, students built and tested Rube Goldberg devices in order to investigate conservation of energy and conservation of momentum.


Week 2, Day 3 IPE Emerging Tech (NSF Project):


Day 3 was the final work day that students had to prepare for their informal presentations on nuclear / quantum physicists.  In the warmup, we practiced using the half life chart to select the appropriate isotopes for specific technology applications.  During the warmup discussion, I was able to repeat and model correct thinking relating to interpreting the half lives of isotopes in the context of emerging technology.


While the students worked on their slides, I started contacting potential panelists in order to provide feedback to students during Week 5 of the project when students would draft their grant proposals.  I drafted a recruitment letter that summarized the project logistics and the types of support the student needed.  I linked the recruitment letter to a Google form that gathered information on volunteer panelists’ degrees, areas of expertise, and availability.  By the end of this week, this work yielded 5 panelists, a great number to support 10 student teams.  If you’d like to volunteer to be a panelists at CINGHS, click the linked form above.


Also during student work time, I ordered equipment from the UTeach department that related to an upcoming emission spectra lab.  I thought this equipment was critical to give students hands on experiences related to modern physics and to give students a break from a project featuring lots of online research and very few hands-on research activities.


My co-teacher and I prepared for presentations the following day by setting up Google Forms to gather peer grades on collaboration and oral communication.  I created a set of note sheets for capturing our teacher notes on teams’ presentations on quantum and nuclear physicists.  To prepare for our notebook grading day later that week (Friday, Day 5), we decided what assignments we would grade for that week and how many points we would assign to each assignment in each of our class’s learning outcomes (Oral Communication, Written Communication, Collaboration, Agency, Knowledge & Thinking, Engineering Content, Physics Content).


Week 2, Day 4 IPE Emerging Tech (NSF Project):


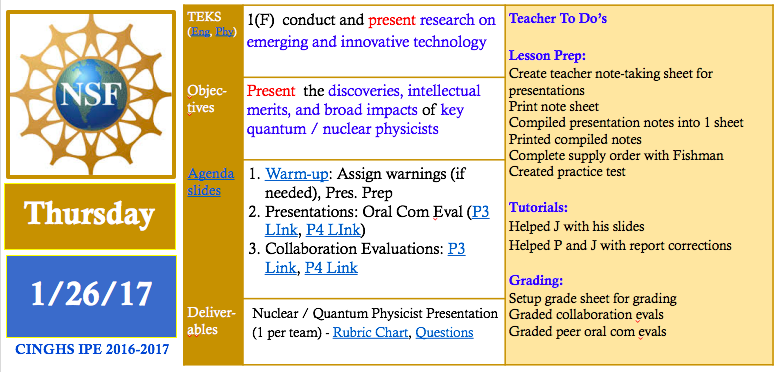
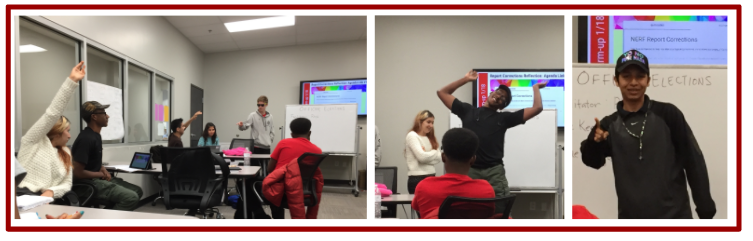
Early on Day 4, I decided to create an experimental tool to keep students in the audience of presentations more engaged.  I created a graphic organizer that students could use to take notes on other teams’ presentations.  I showed this tool to my co-teacher, Mr. Fishman, and shared a related idea: why not let presenting students’ stamp the parts of the graphic organizer related to their presentation so they could get real time feedback on how well they communicated their key points and also hold their peers accountable for taking good notes?  He was willing to try it.


The experiment was a success.  The students seemed to really enjoy stamping their peers.  Also several students insisted on making their peers improve their notes prior to stamping their papers so the level of accountability was kept high throughout the note-taking activity.  In addition to note-taking, students in the audience evaluated the presenters on their oral communication skills.  Meanwhile, my co-teacher and I took notes on their presentations relating to the rubric so we could use our notes to supplement what we would later gather from reviewing their slides and their hidden speaker notes.  Sometimes students say more than they write, so we use both our notes from what they say and what they write to evaluate their presentations and related research.


Later on Day 4, I used pivot tables to analyze data gathered via Google Form to generate peer grades relating to collaboration and oral communication.  I typed out my presentation notes in order to create a graphic organizer that summarized the key points delivered by all teams in both class periods.  I shared these notes with students the following day so they could learn from students in both periods.  See linked notes on tne left.  At the end of Week 4, the students used these notes and other notes to take an open notebook test on nuclear physics, quantum mechanics and biotechnology.


 Week 2, Day 5 IPE Emerging Tech (NSF Project):


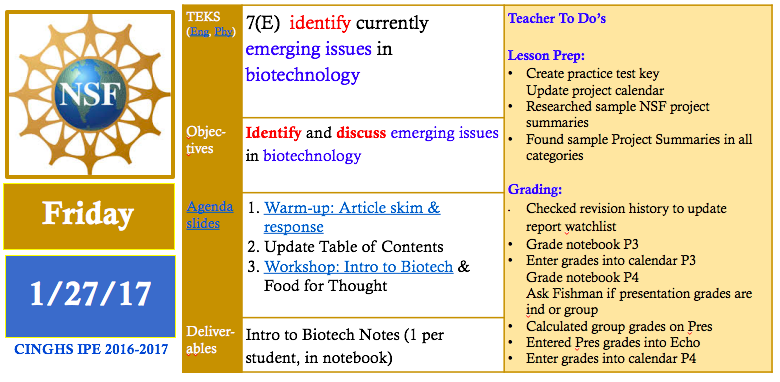
On Day 5, we switched gears by introducing emerging (and ancient) examples of biotechnology.  We opened the class with a discussion on a Washington post article on the creation of pig-human embryonic chimeras.  After this introduction, Mr. Fishman led the class through an introductory workshop / discussion on biotechnology.  Students were so open with their opinions and prior knowledge of biotechnology that the 1-day workshop spilled over into the following day.


Week 2, Day 6-7 IPE Emerging Tech (NSF Project):


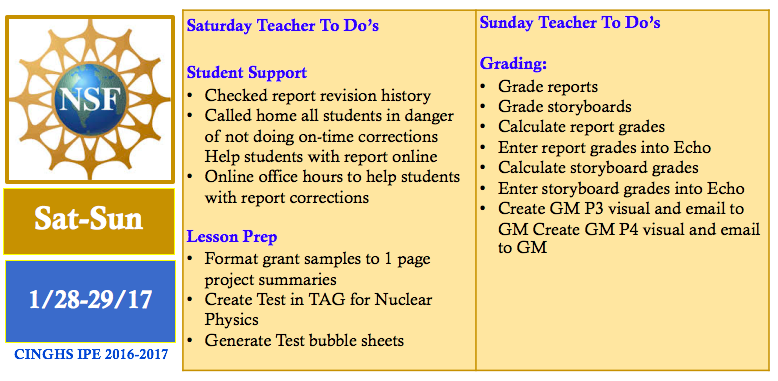
On Saturday morning, I checked the file revision histories of report documents to check which students were in danger of not meeting the final report revisions deadline.  I called the homes of all students who needed extra reminders and parental support to meet this important deadline.  Later on the day, I held online office hours to support students working on their report corrections.  While doing this, I gathered and re-formatted sample grant summaries that students would eventually analyze to learn the style of writing related to their grant proposals.  I also created a test on Nuclear Physics and generated the question sheet and bubble sheets for this test.


On Sunday, I graded the final revised versions of the students’ engineering report from the prior project (the Rube Goldberg project).  I also graded students’ presentations from earlier in the week using my presentation notes and also considering all the written texts and images on students’ slides and their speaker notes.  Using our IPE tool, the rubric chart (see linked Google Sheet), I was able to grade their presentations fairly quickly and 
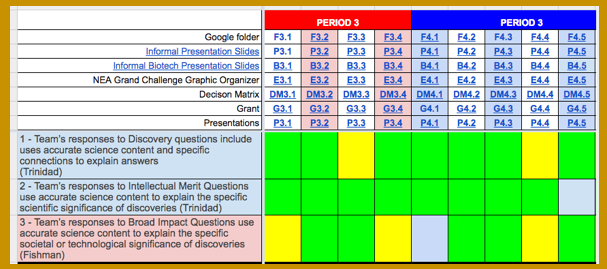
enjoy the rest of my weekend.  The presentations were easy to grade because most of the students had done the assignment perfectly or nearly so.  I think the pre-selected articles, the specific research questions and the verbal feedback on the slides given throughout the week had really helped the students create quality products.


For more grading tricks, go here.  To continue reading  about this project, go here.


A Tale of Two Projects: Week 2 Algebra 2 Sports Science Project

Week 2 of the Sport Science Video Project was jam-packed with content scaffolding on quadratic functions.  It turns out that analyzing the motion of 100-m runners is not a simple task.  To analyze and draw interesting conclusions from 100-m position-time data, one must know how to:

  • formulate quadratic equations from data tables,
  • solve quadratic equations
  • solve systems of linear and quadratic equations
  • interpret motion quantities embedded in linear and quadratic equations

In Week 2, we covered all these skills (and then some) and started applying them to the run data generated by students and by world class athletes (Usain Bolt).  

Note: If you’d like to learn more about this project in its earlier or later phases, go here.


Week 2: Project Day 4: Data Analysis


On Day 2, we started class with a warm-up that had students make connections between the coefficients in quadratic equations and motion quantities such as initial positions, initial velocities and accelerations.

We went over the correct results so that students could start to interpret some of the quadratic functions that fit their run data.  


After this warm-up, the teams used Coach my Video to advance their running videos frame-by-frame and gather time data that went with each 2-m increment marker on the 100-meter track the students created on Day 3.  They entered these times into a Google Sheet that automatically graphed their data on a position-time graph.


Then they used their position-time graph workshop notes to divide up their graph into sections that corresponded to different types of motion.  They started using Desmos to find regression equations that fit their data.  Their recorded their results in a graphic organizer called a Run Data Chart that they copied and stored in their project Google folder.


Later in the day, I prepared for the rest of the week by grading revised reports from the NERFallistics project and by preparing a workshop on formulating quadratic equations from data tables using technology.


Week 2: Project Day 5: Content Scaffolding

On Day 4 of the project, we learned several skills related to quadratic functions.  I also got to check out if students responded well to a new method I had developed for displaying procedural skills.


We started the class by going over how to use Desmos to find regression equations from points in a data table.  We went over a handout with this step-by-step graphic organizer:

We went over the steps for a sample problem together.  Then we set a work timer for 10 minutes to try these steps on 4 other regressions: 3 sample problems and 1 from their own run data sets.


This visual also shows my new method for displaying procedural skills: the left column outlines each step in the procedure and the right column demonstrates each step on a sample problem.


After they had a little time to practice the skill of using Desmos to find regression equations, we moved on to a new mini workshop on the attributes of quadratic functions.  This mini-workshop covered things they already knew (vertex, axis of symmetry, y-intercept, x-intercepts) and introduced new attributes (focus, directrix).  I gave them time to read through the definitions and then we discussed how to label the attributes on a sample quadratic function.


After we had reviewed the forms of quadratic equations and the attributes of quadratic functions, we started going over different ways to use the attributes of quadratic functions to find their equations.  


The first method we covered was how to find the quadratic equation for a function given its roots.  I kept with my new format for presenting new procedures.  The left column outlined each step to find the equation.   On the space on the right, we applied each step to a sample problem.   After we had gone over 1 sample problem, we set a 10 minute timer for the students to practice this new skill on a couple practice problems.  While they practiced, I monitored their work and answered their questions.


Then we learned how to find the quadratic equation of a function given its vertex and one other point.  We learned how to find the equations in vertex and standard forms.  We again worked through a sample problem together and then set aside work time to practice the skill on new problems.  Some students requested that I email them the Notability file containing the workshop problems.  Students always have the option to get a pdf-copy of workshop materials because I use Notability for a majority of workshops – especially ones where I demonstrate how to do various types of calculations.


After we went over this skill, we called it a day because everyone’s heads (mine included)  were hurting by that point.  What a productive day!  I told the students that they were markedly smarter (at least within the specific domain of using quadratic functions) as a result of their hard work during that day.   


Later in the day, I prepped for the remainder of the week by preparing workshops on formulating quadratic equations given any 3 points and on transforming equations from standard to vertex form (completing the square).   I also figured out a way to analyze Usain Bolt’s data.  I used his average stride length (2.44 m) to associate positions with all his footfalls.  I then then paired those positions with times I gathered using Coach my Video.  I also found a storyboard template that my students could use to plan their videos and I uploaded it to the students’ project briefcase.

Week 2: Project Day 6: More Content Scaffolding

On Day 5, we learned 2 more ways to formulate quadratic equations: using a focus and directrix and using any 3 points.  We kept with the format of modeling a practice problem with each new skill in a mini workshop following immediately with practice time to apply the skill to several practice problems.  


The mini workshop on formulating quadratic equations given a focus and directrix was the final workshop in a series dedicated to using the attributes of quadratic functions to formulate quadratic equations.  While making my keys, I noticed how easy it was to mess up this process by substituting the focus (instead of the vertex) into the vertex form for the quadratic equation.  I made a mental note to watch for students making this easy-to–make error and was able to catch it a couple times during the students’ practice work time.


For the next workshop, I used the TI-emulator to show students how to use a scientific calculator to solve systems of linear equations.  To find a quadratic equation from 3 points, one can substitute the 3 points into the standard form of a quadratic equation three times.  The result will be a system of 3 linear equations.  In an earlier project, students had learned how to use Gaussian elimination to find the solutions to systems of 3 linear equations.  Using their prior knowledge, we discussed and demonstrated how to convert the 3 linear equations into an augmented matrix.  Then I introduced them to a new matrix: the reduced row echelon matrix.  I wrote a sample one on the whiteboard and asked them what was the (x,y,z) solution embedded in the matrix.  The students used their prior knowledge of matrices to find the answer quickly and accurately and then they started to appreciate the power of this matrix.  Then I demonstrated how to enter the augmented matrix into the TI-83 and then use it to find the reduced row echelon matrix.  The students were able to do this with some coaching in very little time and then several got pretty emotional.  I think they were remembering the trauma of using Gaussian elimination to solve systems by hand and comparing it to the ease of using the calculator to solve matrix equations.  Some got really happy.  Some were irritated and asked why I taught them Gaussian elimination instead of this method earlier.  I replied because Gaussian elimination is written into the Texas TEKS so I am professionally bound to teach it to you.  We ended the class period on this high / sour note.


Later in the day, one student requested that I change the project logo from the ESPN Sports Science logo to an image of one of the Algebra 2 students running during our data collection day.  I got permission from the running student to make this change and then made it official.


I prepared for the remainder of the week by preparing lessons on solving quadratic equations and solving systems of quadratic and linear equations.  I also prepared a Practice Test on quadratic functions for the following Monday.  I updated the warm-ups in the class version of the Algebra 2 notebook.  I also started setting up my grade sheet and Echo for the tasks I would grade later this week.


Week 2: Project Day 7: Content Scaffolding (Finale)

Day 7 of the project was the final day for introducing new content skills.  The remainder of the workshops in the project would be dedicated to fine tuning those skills to apply them to products.  Prior to introducing students to the quadratic formula, we introduced the discriminant: how to calculate it and how to interpret it.


We used this visual during the workshop to go over how to calculate the discriminant and then how to interpret its value.  After this mini-workshop, students had 10 minutes to practice calculating and interpreting discriminants before we moved on to a mini workshop on the quadratic formulas.


For our mini workshop on using the quadratic formula to solve quadratic equations, I intentionally chose a sample problem with 2 complex roots.  This gave me an opportunity to introduce complex numbers and how to use these to find the solutions of quadratic equations with negative discriminants.  When we got to the step of simplifying the square root part of the equation, I let them plug in the expression into the calculator as is and let them see the errors that the calculator generates.  Then we talked about how to use “i” to resolve this dilemma.  Several of the students had seen “i” before but had never been formally introduced to it.  After we discussed this sample problem, the students asked for 15 minutes of practice time to work through several practice problems.  The practice set included problems with 2 real roots, 1 real root, and 2 complex roots.


In the final workshop of the class period, we went over how to use the quadratic formula to solve systems of linear and quadratic equations.  We practiced setting the equations equal to each other and rearranging the resulting equation into a form that could be resolved by the quadratic formula.   In the remainder of the class period, they practiced using this skill to solve several systems of equations (3 given by me and 1 using equations they had found from their analysis of their run data).


Later in the day, I finished making my Quadratic practice set keys.  Any student can get access to a key on a practice set by showing me their work on the practice set.  As long as they try all problems, I share them on a Google pdf copy of key.  Many students asks for the keys and many have learned to correct their work in different color pencil using the key so that they know what they need to think about to improve their skills.    I also completed my Practice Test key to prepare for Monday’s class.


Week 2: Project Day 8: Full Work Day

After a dense week of content scaffolding, we ended the week with a full work day.  The students used this day to apply the skills they had learned that week to the analysis of their student run data and of Usain Bolt’s run data.  They worked on recording their results in a Run DataChart and in a storyboard for their sports science video.  Some students also used this time to finish and ask for help on practice sets from earlier this week.  Aside from helping them with the warm-up and from answering their questions, I was pretty hands off on this day.  I kept my spidey senses alert to hear what difficulties students were running into while analyzing their data and preparing their storyboards.  I took note of these things to anticipate the types of workshops students might need next week.


This visual shows a sample slide in a student storyboard and the rubric chart I use to show feedback feedback on their work: green squares = full credit and yellow squares = partial credit.  I add comments inside their products that describe how to convert yellow rubric chart squares to green ones.


Later in that day, I prepped for the following week by preparing next week’s warm-ups, agendas, and agenda / activity visuals.  I also got the class notebook up to date with this week’s activity sheets.  Then I graded the students’ notebook activity sheets for this week and entered those grades into Echo.


Week 2 Weekend: Week 3 Prep

Saturday at midnight was the final deadline for NERFallistics report corrections.  Because this grade was so high stakes, I supported the students in 2 ways: parent phone calls and virtual office hours.  Saturday morning I called the parents of all students who had not started report corrections because it was the final day in a 2-week correction period.  During the late afternoon and evening, I made myself available online for students with report corrections.  I ended up using the messaging feature on Google docs to support students with many questions about their report corrections.   


Also on Saturday, I used our test software (DMAC) to create the end-of-project test.  We are required to use DMAC for two assessments per six weeks.  I typically use DMAC for my end-of-project tests and my trimester exams.  


On Sunday, I graded the students storyboard and run charts and realized they needed more time and support so I extended the deadlines on these and modified some of the upcoming warm-ups to cover issues that I was seeing in their products.  I noticed they were struggling to associate the numbers in their spreadsheets and in their regressions with meaningful running statistics.  I created a couple warm-ups to make those connections more explicit.  


After finalizing my grades, I created the Week 20 Task Completion chart.  The image below shows the task completion chart (with student names boxed out).  Red boxes denote missing assignments.  The grade manager uses this visual to provide face-to-face and emailed reminders to students to turn in missing assignments.


A Tale of Two Projects: Week 1 Algebra 2 Sports Science Project

The first week of the 4th-six-weeks grading period was a short one at Cedars International Next Generation High School due to a school holiday on Monday, 1/16, and Benchmark testing on 1/17.  The 3 remaining days were still quite dense.  In this time, we launched two projects in my two main preps, Algebra 2 and Integrated Physics and Engineering (IPE).  This article describes the the first week of the Sports Science Project, an Algebra 2 project on Quadratic Functions.  The next article in this series will describe what happened in the first week of the Emerging Technologies (or NSF) project in IPE. To read about the prep that went into preparing for the launches of these two projects, you can read this blog article.  To read about later phases in this project, visit this page: A Tale of 2+ Projects.


 Repeated Disclaimer: If you don’t want to know about all the details in the PBL sausage, stop reading.  


Day 1, Algebra 2 Sports Science Project: LAUNCH!

On Wednesday, 1/18, we started the Algebra 2 class with a few activities to wrap up the NERFallistics project.  In that project students learned about polynomials and applied that knowledge while analyzing the trajectories of NERF gun pellets.  These wrap up activities were designed to give students time to reflect and revise their work.  To set the right tone and maintain the suspense for the new project a little longer, I used this for my opening agenda slide:

The band-aid is over the project icon for the project we were wrapping up, the NERFallistics  project.  The icon symbolized the work we were going to do to fix the boo-boos in our last project.  

In the NERF Report Reflection warmup, the students read over their report feedback, checked their report grades, and made plans with their NERF teammate to make revisions on the report.  In my classes, students always have 2 weeks to re-submit deliverables: after 1 week, they can earn up to a 90% on their resubmitted work; after 2 weeks, they can earn up to a 70% on resubmitted work, and after that, I no longer accept the work.  After they completed that reflection, I gave students time to complete a culminating activity from the last project that many teams did not have time to finish during our last class meeting.  In the Target Practice activity, students had to solve a regression equation the modeled the trajectories of their NERF guns to in order to hit a table and a small chair in the common room of our school.  One team succeeded in hitting the table and the chair shown below from distances of 10+ meters away.  They were exuberant to find that sometimes, Math really works!

After these wrap-up activities, we started off the six-weeks with our traditional once-a-six-weeks Class Officer Elections.  Every six weeks, my students in each period elect 3 class officers: a facilitator, a time manager, and a grade manager.  I learned how to integrate and train student leaders in my classes from my friend and mentor from Manor New Tech HS, Ms. Holly Davis.  The facilitator starts the the class each day by going over the class agenda with the class.  He or she does this while I take care of start of class logistics like taking attendance, refilling my coffee, etc.  The time manager keeps track of the time for the class and makes time announcements to alert students and teachers of the time left in class activities and in the class period.  The grade manager gathers student work on my grading days (each Friday) and follows up with students who need to submit work late because they missed some due dates.  The elections are both playful and quite serious.  Candidates give speeches to convince the class that they will be the most effective student at their desired roles.  

I let the students take their time with this process because I rely heavily on my class officers to do my job effectively.  I’m so used to effective time managers that I don’t know what time some of my classes end.  I’m just used to my timekeeper telling me when to wrap things up and move on to the next period.  My facilitator acts as my acting sub when I’m absent.  When I’m out, the facilitator leads the class through activities while the adult-sub-on-record takes attendance, hangs out, and watches.  Sometimes I get so far ahead in my prep that I forget what we’re about to do in class until my facilitator goes over it with the class.   My grade managers are amazing!  I may not have the best turn in rates on the original due dates, but my 1-week-late turn-in rate is awesome thanks to all the in-person / emailed reminders students receive from my grade managers when they forget to turn in work.


After class officer elections, we announced new teams and set up our notebooks for the next project.  

After setting up their table of contents for the new project, the students read over the design brief with their team and came up with at least 10 Knows and 10 Need-to-Knows for the project.  They divided these into Content (Algebra 2 related) items and Project (logistics, deadlines, etc) items.  The design brief communicated the project’s objectives, purpose, rough timeline and deliverables.  In the Sports Science project, students will gather and analyze 100-m dash data to create a sports science video that investigates the question: What separates everyday and world class athletes?  In addition to analyzing the Design Brief, we watched a sample ESPN Sport Science video featuring Lebron James.  This video provided a sample of their final product and showed them how motion data can be used to make a compelling argument.


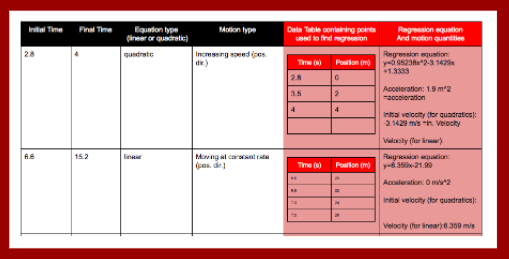
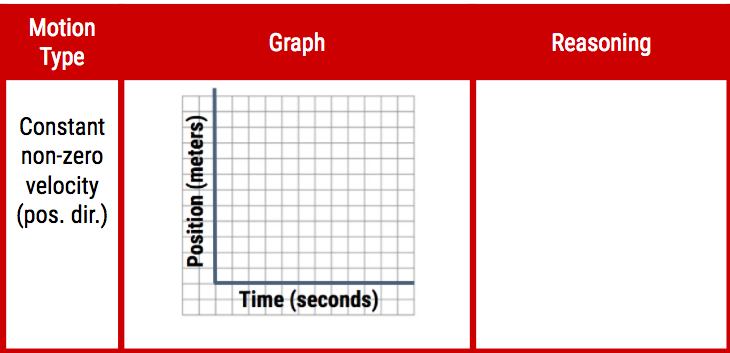
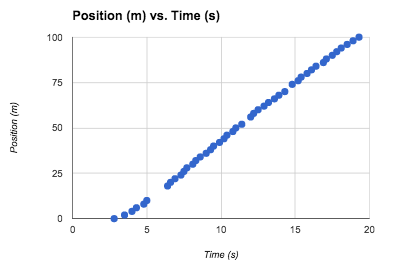
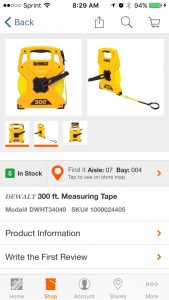
Later that day, I prepared for Days 2 and 3 of the project by preparing a workshop and practice set on position-time graphs and by purchasing a 300-ft long tape measure.  My co-teacher, Mr. Fishman, had me download the Home Depot app so I could shop for my tape measure efficiently.  When you’re in the store, you can search for products and the app will give you the aisle and section of the store for the product along with a labeled map of the store.  It was so sweet.  I bought calculator batteries and a crazy long tape measure in record time using the app.


I sometimes joke with my friends that my Algebra 2 class is my Physics-2 class.  About half of the students in Algebra 2 are also taking my Integrated Physics and Engineering class.  Sometimes our projects in Algebra 2 are situated in Physics contexts because the math fits and I can’t resist because of my physics background.  This is why I found myself preparing an activity on Position-Time graphs for my Algebra 2 (not Physics) students.  I prepared the lesson because it was in my students’ need-to-knows and because I knew that students needed to be equipped with this knowledge to make sense of the data they were going to gather on their 100-m runs.  (On a side note, my students sometimes get confused by all the math they are learning in physics and all the physics they are learning in math; sometimes they write their notes in the wrong notebook and end up writing a weird location in their table of contents for an activity they placed in the wrong notebook.)


I also spent some time search for videos of world class athletes in 100-m races that we could analyze for our comparison cases.  It was really challenging to find the perfect video because many distances within the 100-m are not marked.  I settled for looking for videos with sideview camera angles and found one video that compiled sideview from several races.


[Spoiler alert] Later in Week 2 of the project I came up with a way to approximately analyze world class run data.  Usain Bolt’s stride length is well documented.  I was able to analyze his world record 100 meter run by using Coach my Video to find the times associated with each of his strides (exact time that one foot hit the ground) and used his average stride length to determine positions for those times.  Later in the project, I provided students with a data table of his world record run so they could analyze it and  compare his motion stats to their own run data.


Day 2, Algebra 2 Sports Science Project: Team Contracts / Explore Position-Time Graphs:

We started off Day 2 by completing a warm-up that was a pre-assessment on what students al
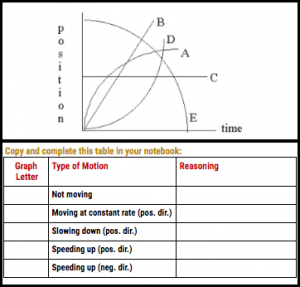
ready knew or could deduce about position-time graphs:


I scanned their notebooks and the results were hit-or-miss.  A couple students did it perfectly, many more guessed several wrong, and a couple didn’t know where to start.  After the time manager let us know that the warm-up time was over, I told students I was going to break protocol and not go over the warm-up at this time.  I did this because we were about to go over position-time graphs and I reused the warm-up problems to make up half of the follow-up practice set to this activity.

After the warm-up, the student facilitator went over the agenda and then led a class discussion to come up with a compiled list of student Knows and Need-to-Knows.  Here are the students’ Content Knows and Need-to-Knows:


And here are their Project Knows and Need-to-Knows:

I had to play devil’s advocate a bit to get students to elaborate on their Content Knows.  They’re pretty good at specifically articulating  their Content Need-to-Knows and Project Knows and Need-to-Knows.  Over the course of the project, we will revisit and update their Knows and Need-to-Knows as students learn new things and develop more questions.

After the Knows and Need-to-Knows discussion the students set up their team contracts and shared project Google folders.  The students completed this Team Contract template and then placed their finished contract in a sheet protector and inside the Team Contract binder.  Over the course of the project they will revisit their contract and use the back side of it to document their Work Log goals and agreements.  While they prepared their contracts, I linked their Google folder to the Project Rubric Chart:


I’ve streamlined student turn-in processes such that their nearly all their work lives in 2 places: (1) in their notebook and (2) in shared project Google folders.  If their work is located in a project Google folder, I link the folder and its key contents to a rubric chart.  I use the rubric chart to give students yellow and green stamps on project work that relate to rubric items (see left column).  Having the links very close to the rubric makes it easy for me to assess project products against the rubric.  Later in the project, students refer to the rubric chart on work days to see which items they have earned full (green stamp) and partial (yellow stamp) credit.  

After they set-up their team contracts and team Google folder, we started an activity on Position-Time graphs.  I set up the workshop to be interactive. Throughout the workshop, I displayed a prompt on the board and had their teams discuss the prompt while I played Jeopardy music. While the music played, I overheard their discussions and looked at their proposed motion graphs.  After the music stopped, I called on the students with interesting insights and went over the correct answers.  We did this 10 times.  By the end of these cycles we had completed and thoroughly discussed a graphic organizer that showed the shapes for all the types of motion they would need in the project: stopped motion, constant velocity (positive and negative direction), increasing speed (positive and negative direction) and decreasing speed (positive and negative direction).

Also, while developing these workshop slides. I came up with a new trick to convey the alignment between state standards and workshop objectives.  I color-code the verbs (red) and noun / noun phrases (blue) in both the standards and the objectives to highlight the connections between the two.  I now do that in all my workshop objectives slides and in all my daily agenda slides.

After the workshop, students redid the warm-up problems and did a few more practice problems on motion graphs.  Nearly every students was able to do the warm-up perfectly on the first try after the workshop.

Later on Day 2, I did some big picture planning of the content scaffolding in the Sports Science project.  I looked at the standards again and ranked them from easiest to hardest and grouped them by similarity and developed an outline for a lesson sequence that would cover all the standards.  In broad strokes I decided we would start by learning several techniques to formulate quadratic equations (from easy to hard), then learn how to solve quadratic equations, and then learn how to solve systems of linear and quadratic equations.  


Day 3, Algebra 2 Sports Science Project: RUN, STUDENTS RUN!!!

Prior to class on Day 3, I prepped for an exciting Data Collection day by using spreadsheets to create a Track Marking conversion chart (meters to feet and inches):

I also created this visual to convey all the hats students would need to wear in order to ensure a safe, efficient time in the parking lot:


Also at the end of Day 3, I knew I needed to get student work for my grading day, so I created this visual:


This visual shows my Algebra 2 grade manager in the middle of his election speech.  He gave me permission to use that pic in visuals reminding students of deadlines.   [Spoiler Alert] My grade manager enjoyed this image so much, he had me put it up again in the IPE class where he also got elected into this role.


Data Collection day was a blast!  The whole class helped to prepare the track on the parking lot behind the school.  I put a student in charge of the tape measure and in charge of organizing the team effort to create the track.  The students were really smart.  They designed the track in a way that made data collection of a tricky data set really simple.  They used long lines to mark each 2-meter increment and they marked each line with the total distance from the starting line to that line:

It took them about a half hour to create the track.  Then I demonstrated how to properly videotape a run, by taping Mr. Ray while he ran.  This involves some back pedaling and some frantic, laughing and chasing while trying to aim the iPad camera in a way that the runner’s feet passing each increment line is captured throughout the 100-meter run.  It was really fun to watch students to gather data.  By some trick of Murphy’s law, nearly every team had a big height mismatch between their (very tall) runner and their (very short) camera-person.  However, the track design that my students came up with, made it possible to get excellent data even when the camera shorts were really dynamic due to the chasing that was occurring.  

Mental Note for Future Versions of this Project:  Everyone needs to wear running clothes and shoes because the photographers ended up running just as hard as the runner to get good footage.


Here’s a sample data set that came from a video that was really bumpy:

Even though they were unable to see some of the track markings (usually when the photographer transitioned from backpedaling to forward chasing), they still gathered enough data to see clear quadratic and linear regions.  Just the thing needed to learn how to solve systems of linear and quadratic equations!  Every team was able to get a good data set that made sense.  Data Collection day was a surprising success.  I was worried that the data would be too hard to get or too dirty to analyze, but everything worked out great.


At the end of Day 3, I did my routine Friday grading of notebooks. 
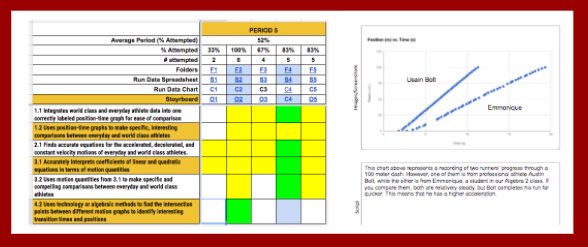
After I graded all the notebooks, I used conditional formatting on my Google spreadsheets grade book to create this visual.  I cropped out the student names for this post.  Red boxes represent missing work and green boxes represent turned-in work.  I emailed this visual (the version with the student names) to the grade manager along with a couple links to Google forms associated with a couple of these tasks.  My grade manager sent follow-up emails to students missing work and during the following week, he collected late notebooks from students on Tuesday when I decided to follow-up on some late work.  By Wednesday the chart was nearly all green except for one student who was out sick for several days.  Student Leadership Rocks!


Pre-Week 2 Prep:


Over the weekend, I prepped lessons that showed how to use Desmos to find linear and quadratic regression equations.  I also prepared a warmup that had students compare motion equations to linear and quadratic equations in order to relate motion quantities to the parameters in the standard forms of linear and quadratic equations.  I also finalized a Shell Science Lab Challenge grant in the hopes of getting more support to design more and higher quality STEM experiences like the ones we had in Week 1 of the Sports Science project.

CINGHS Week 3: September 6-9, 2016

Week 3 School-wide Events:
wk3-gamenight


Week 3 featured our very first Game Night.  About a dozen students stayed after school Friday to play video games, games with foam dart guns, etc.  They enjoyed each other’s company and also pizza.  Game Nights will be a regular event occurring roughly every other Friday at CINGHS.  In addition, our school is starting an eSports club so that students can be a part of a team that plays video games competitively.


Week 3 in Algebra 2:
wk2-alg2


During Week 3, students interviewed Laura Hayden, a graphic designer who works for National Instruments, using FaceTime.  They asked Laura all of their Need-to-Knows related to logo design.  The students had many great questions about the processes graphic designers use to design effective logos.


During the week, I allowed students to use self-pacing to differentiate the class according to students’ individual needs.  Some students completed extra practice on parent functions and their properties (domain, range, axes of symmetry, asymptotes).  Students who were already comfortable with parent functions moved on early to workshops and practice sets dealing with inverse functions.


By the end of the week, the students were introduced to decision matrices so they could use this tool to select the brainstorming sketch that their team would develop into their amusement park logo.


Week 3 in Integrated Physics & Engineering (IPE):
wk3-ipe


In IPE, we continued exploring the Design Process by applying the following steps toward the design of next generation cooking devices: Define the Problem, Specify Requirements, and Identify Solutions.  The students created summary problem statements for the project (Define the Problem).  They analyzed the project design brief and rubric to create lists of project constraint and requirements (Specify Requirements).  They conducted background devices on old and current versions of their team’s cooking device (Identify Solutions).  They compared the old and current devices to identify improvements and to get ideas on new improvements that could be made to create their next generation devices.  They also created several brainstorming sketches in a Quick Draw activity.  Then they elaborated on each other’s favorite sketches in a Carousel Brainstorming activity.


Also, during Week 3, we introduced the Heat Equation and used it to analyze the required heat in several cooking scenarios.  Students voluntarily chose to attend follow-up small group workshop on the Heat Equation when they found practice problems challenging.  I like how students are starting to advocate for themselves by choosing to attend optional workshops to sharpen their skills.  At the end of the week, the students took a 3-color quiz on Heat Transfer mechanisms and the Heat Equation.  They used 3 colors to show what they were able to do with (1) their brains only, (2) with notebook assistance, and (3) with workshop assistance.  Many students were able to excel at the quiz with only 1 or 2 colors.


Week 3 in 8th Grade Math:
wk3-8thgrmath


During Week 3 in 8th grade math, we continued to explore club data using more statistical tools.  We introduced a new spread value: mean deviation.  We practiced calculating it first on small data sets.  Then we started discussing methods for calculating it for large data sets so they would know how to analyze data sets that included the opinions of all the students in our school.  By the end of the week, the classes collaborated to create a survey that was completed by the entire student body that gathered data on students’ interests on a variety of clubs.

194: PBL Tips on Mapping the Project

1-sources


2-what


Screen Shot 2016-05-11 at 10.30.41 PM


Use a mix of instructional strategies based on outcomes you want to achieve:
  • Need to provide instructional resources, kids can’t research everything on their own and shouldn’t have to
  • Decide type of instructional strategy based on learning goals.  For tips on what strategies go with learning outcome types, see this article: Three teacher roles
  • Use direct instruction for basic supportive information
  • Scaffold supporting skills students need to developing products (example: how to research efficiently)
  • PBL is good at teaching habits of mind and central concepts; not as good at teaching algorithms and basic facts
  • Start with the project so that instruction answers project need-to-wknos
Leave wiggle room in project calendars:
  • Set aside a couple days to push back final presentations just in case project expands beyond original intended time frame
Take time and use project templates to design projects:
  • The more people involved in project design, the more time it takes to design the project
  • Record thinking that goes into project design in notebooks and templates
  • Don’t preplan everything, leave room for students to influence the plan
  • Allow enough room for students to struggle and fail forward
  • Design learning experiences that allow students to take on more responsibility for learning the content and applying content outside school
  • For more information on templates, see these articles: Backwards design template & standards and Understanding by design planning forms
Think carefully about when to schedule projects
  • Project should not replace end of grading period exams
  • Teachers should communicate and try not to schedule too many project deadlines on the same day
Use multiple means to communicate the nature and goals of project to parents
  • Can invite parents into school-year project planning meetings to ask for their input and to explain learning goals
  • Hold parent kickoff meetings for parents that introduce project and ask parents for specific resources and support
  • Post projects on school website
  • Invite parents to school Open Houses and present upcoming projects
  • Send project calendars home with major deadlines
  • Share projects on school-wide blog posts and newsletters
  • Invite parents to serve as panelists and resident experts
  • Show evidence of student learning in projects to parents
  • Explain to parents how you design projects to meet standards and to achieve both breadth and depth over time
Use parents and students to find business and community resources for projects
  • Involve parents in serving as community liaisons for possible field sites and experts
  • Parents and students can communicate what school is like to businesses
  • Potential partners need to visit the school and learn more about its vision and strategies
  • Leverage different strengths that different people have to offer
  • Meet expert partners face-to-face to prepare them to make the most of their time with the students.
  • Train students to interact well with community members.
  • Train students how to secure funding for future projects.
  • For more ideas related to this, see this article: Mapping your community
Don’t bring in experts in until students need their expertise to progress.
  • Let students be frustrated before expert comes in to play hero
Cross-curricular projects involved multiple teacher require extensive communication and coordination:
  • Supports for cross-curricular planning: common planning time, structure reflection on project design and student work, teacher research groups, summer planning time, shared office space
  • Helps to share the same students with collaborative teacher
  • Hold meetings to plan schedules, end products, standards, checkpoints, and assessment strategy
  • Use student work to start conversations about future projects
Project will take longer – or be over sooner – than you expect.
  • Use observations of students to make adjustments to deadlines
  • Plan project calendar and prepare for 20% overrun due to unexpected contingencies


3-sowhat
Skillful mapping of project prior to launch is key to successfully implement strong projects.  Involving students and parents in recruiting partner experts and organizations can lead to more authentic projects and project activities.  Building in flexibility into project calendars can allow teachers to make adjustments to scaffolding that better support student learning and development of projects.


4-nowwhat
Preparation Steps
  • Analyze standards and create academic learning targets
  • Plan products and determine supporting 21st century skills and habits of mind that support product development.  Create character learning targets
  • Develop systems for sharing projects with parents – newsletter? blog? etc
  • Plan a rough project calendar – allow up to 20% wiggle room in extending the project just in case
Early Implementation Steps
  • Follow project calendar when it makes sense; make revisions to project calendar that improve student learning
  • Use learning modes that match different types of learning targets.  For tips on that, read Three teacher roles
Advanced Implementation Steps
  • Invite and prep industry experts to teach lessons that match student need-to-knows
  • Time expert visits and field trips to fit just-in-time teaching moments
  • Recruit parents and students to secure community partner organizations and experts


5-relatedstuff

191: 3 PBL Student Briefs

1-sources


2-what


Screen Shot 2016-05-11 at 3.47.40 PM


The following briefs can be used to help students self-manage their project tasks:
Student Planning Brief
  • The overall challenge that defines this project is …
  • I / we intend to investigate:
  • I need to complete the following activities:
    • What will I / we do?
    • How will I / we do it?
    • Date due
  • I / we need the following resources and support:
  • At the end of the project, I / we will demonstrate learning by:
    • What?
    • How?
    • Who and where?
 
Student Product Brief
  • What product do I / we want to construct?
  • What research do I / we need to conduct?
  • What are my / our responsibilities for this product?
  • I / we expect to learn the following from working on this product:
  • I / we will demonstrate what we’ve learned by:
  • I / we wil complete the product by:
 
Student Presentation Brief
  • What will the audience learn from my presentation?
  • What part am I responsible for?
  • My plan to make a successful presentation:
  • I expect to learn the following from making this presentation:
  • Specific skills I plan to work on are:
  • I need the following technology / equipment for my presentation:
  • I need the following visuals for my presentation:


1-sources
The student briefs in this article help students plan out their tasks related to project, products, and presentations.  They also help students reflect on the learning goals related to these tasks.  Using one or more of these briefs can help teachers provide feedback to students on their project / product / presentation plans, check that their learning goals match the intended learning targets, and address students problems and concerns in a timely manner


3-sowhat
Preparation Steps
  • Set character learning targets for students that specific describe effective behaviors related to good project management
  • Select and adapt the design brief that most closely supports your selected  learning targets.
  • Develop an exemplar version of the student brief you plan to implement
Early Implementation Steps
  • Model how to use student brief using think aloud protocol and exemplar.
  • Set aside class time for students to complete the briefs and for teachers to provide face-to-face feedback on the briefs.
Advanced Implementation Steps
  • Incorporate selected student brief into classroom routines
  • Use student feedback to refine student brief prompts and formatting
  • Analyze trends in student briefs to identify students’ strengths and gaps.  Design scaffolding related to gaps.
5-relatedstuff

188: Manage the Process

1-sources

.

2-what


Screen Shot 2016-05-08 at 8.05.49 PM


Anticipating Your Role:  Critical tasks include:
  • Orient students into project at the beginning and throughout the project
    • Remind students of project goals and expectations (using Driving Question)
    • Track and coach students to progress through projects
    • Communicate next steps
    • Remind students of the time and effort needed to be successful
  • Form students into appropriate groups for appropriate tasks
    • Teach students collaboration skills needed to collaborate effectively
  • Organize project on a daily basis by narrowing scope of inquiry and suggesting ways to approach problems
    • Setting and enforcing deadlines
    • Providing timely formative feedback to students that they can use to improve understandings and products
  • Clarify learning goals and high priority tasks
  • Monitor and regular student behavior
    • Train students how to work effectively with less supervision
    • Help students manage projects with deadlines, daily log sheets, etc
  • Manage the work flow
    • Facilitate “just in time” instruction
    • Monitor student progress on products
  • Evaluate the success of the project
    • Help students realize what they have learned (and not) during project
Key Steps
  1. Share Project Goals with Students
    • Share project goals and how they relate to students’ lives “now” and in the future
    • Use student feedback to improve project vision
  2. Use Problem-Solving Tools
    • Know and Need-to-Know List
      • Aim to be very inclusive
      • Complete list of related students students understand (Knows)
      • Complete list of investigations needed to complete project (Need-to-Knows)
    • Learning Logs
      • Daily journal that describe students learning, processes and frustrations
    • Planning, investigation and product briefs
      • Graphic organizers that focus students on key information and processes
  3. Use Checkpoints and Milestones
    • Ask group leaders to give informal briefings on team progress
    • Use quick writes to assess students understandings and questions
    • Interview randomly selected students
    • Survey students
    • Schedule regular reflection sessions
    • Review checklists of project process steps
    • Examine team work logs
    • Observe teams to monitor their progress
    • Conduct debriefing sessions after activities
    • Things to notice:
      • problems in carrying out activities
      • team accomplishments
      • motivation and participation of students
      • problems and successes of specific activities
      • unexpected accomplishments
      • student needs for instructional support
  4. Plan for Evaluation and Reflection
    • Guide students to analyze what they learned and how they learned it
    • Guide students to reflect on how they can apply what they know to new contexts
    • Questions to ask during project debriefs:
      • What did we learn in this project?
      • Did we collaborate effectively?
      • What skills did we learn?
      • What skills did we get to practice?
      • What was the quality of our work?
      • How can we improve?
    • Share results of debrief with students
    • Formats for project debriefs
      • whole class debriefing session
        • use prescribed debrief questions and a student facilitator
      • fishbowl discussion
        • half the class discusses in center of room
        • other half observes and takes notes and occasionally takes turns being in the inner discussion circle
      • surveys
        • don’t forget to summarize survey data and share results with students
      • self evaluations
      • for more ideas, see this article: Alternate question response formats and Teaching students how to generate questions
    • Celebrate
      • help students to acknowledge what they accomplished
      • includes parents and other project stakeholders


3-sowhat
Teachers need to skillfully wear many hats while successfully facilitating a project.  In addition to teaching content, teachers need to model, teach, and guide students in project management skills, collaboration skills and problem solving skills.  The roles and tasks described in the articles describes some of the key things teachers need to do to successfully implement a standards-based project.


4-nowwhat
Preparation Steps
  • Create a checklist of teacher tasks that go with key roles: coach, instructor, project manager, collaboration coach, problem solving coach, etc.  See list above for ideas.
  • Plot project facilitator tasks on project calendar
Early Implementation Steps
  • Implement scaffolding and assessment activities in project calendar
  • Regularly get students to become aware of project goals and their progress toward these
  • Regularly let students reflect on what they learning in the project, how they are learning, and what more they need to learn to make progress
  • Regularly provide formative feedback that students can use to improve their understandings, skills, and products
Advanced Implementation Steps
  • Create a master list of tasks that go with the many hats of an excellent project facilitator.  Make them into a laminated checklist board that can be referred to throughout the progress to make sure key tasks are implemented
  • Build in key tasks that student reflections have proven to be effective into routines


5-relatedstuff

187: Map the Project

1-sources


2-what


Screen Shot 2016-05-08 at 7.08.16 PM


  1. Organize Tasks and Activities:
    • Divide up project products into key sub-tasks
    • Categorize sub-tasks into things students know how to do and don’t know how to do
    • Set aside time to scaffold tasks students don’t know how to do
  2. Decide How to Launch the Project
    • Examples of entry events: class discussion, field trip, article, guest lecturer, activity, video
    • Entry documents
      • outlines scenario and related problem
      • specifies students’ roles and audience
      • defines key tasks and deliverables
      • describes expectations
  3. Gather resources
    • Resources to gather:
      • Websites
      • Project forms
      • Equipment
      • Panelists and experts
      • Books
      • Materials to make products
    • (If needed) Allocate time to scaffold how to use resources
    • Be wary with technology.  Make sure it enhances not distracts away from learning objectives.
    • Select resources that:
      • increase efficiency of project tasks
      • increase information available to students
      • allow students to analyze information more thoroughly, meaningfully or realistically
  4. Draw a “storyboard”
    • Sketch out main activities in a scoreboard or on a calendar
    • Storyboard or project calendar should include
      • project launch
      • academic scaffolding and assessments
      • preparation time for products
      • due dates for drafts or rehearsals
      • due dates for projects
      • exams
      • homework assignments
      • reflection and review


3-sowhat
Developing a preliminary project plan is critical to successfully implementing and facilitating a project.  Project calendars need to be created in advance to ensure that all skills that are assessed have time set aside for related scaffolding activities.  Having a preliminary plan in place frees up teacher time and resources during the project run to make adjustments that improve the project and make it accessible to ALL students regardless of interest and readiness levels.


4-nowwhat

Preparation Steps
  • Unpack standards and habits of mind associated with products in an upcoming project.
  • Create a list of activities and assessments needed to adequately prepare students to create great products and to learn and apply academic learning outcomes.
  • Create a preliminary project calendar that includes key scaffolding activities and assessments
  • Plan project launch and presentation.
Early Implementation Steps
  • Implement activities and tasks on project calendar.
  • Use formative assessments to make needed adjustments to the project calendar.
Advanced Implementation Steps
  • Recruit outside experts and audience members to support students at project launch, during the project middle, and on presentation day.
  • Use student project reflections to refine future iterations of projects and improve strategies in future projects.
  • Use the Assessments data base to create a varied portfolio of assessments that measure the progress and mastery of academic and character learning targets


5-relatedstuff

127: Differentiated Curriculum Charts

2-what


Screen Shot 2016-05-09 at 12.05.47 PM


Offer students choices for learning learning targets by creating Differentiated Curriculum Charts:
  • The chart provides learning mode & extension activities for each learning target.  See below for example.
  • Students get to choose which activity to perform to explore learning target
  • For extension ideas, see the Analysis, Evaluation, & Synthesis products & trigger words in this article.
  • For learning mode ideas, see below.
chart
  1. Auditory Products 
    • audio recording, autobiography, commentary, crossword puzzle, debate, dialogue, documentary, editorial, experiment, fact file, finding patterns, glossary, interview, journal, newspaper, oral report, petition, position paper, reading, scavenger hunt, simulation game, song lyrics, speech, story, survey, teach a lesson, video, written report
  2. Visual Products 
    • advertisement, art piece, brochure, collage, comic strip, diagram, diorama, drawing, filmstrip, flow chart, graphic organizer, greeting card, multimedia presentations, illustrated manual, magazine, map, photo essay, picture dictionary, poster, slide show, video, website
  3. Tactile – Kinesthetic Products
    • acting things out, activity plan, animated movie, dance, demonstration, dramatization, experiment, field experience, flip chart, game show, how-to book, jigsaw puzzle, manipulative, mobile, model, museum exhibit, play or skit, rap, scale drawing, sculpture, simulation game, survey, TV broadcast, video


3-sowhat
Differentiated curriculum charts create options for students that fit their learning styles and readiness levels.  Charts like these can be used as tools to create scaffolding that fits the needs of diverse groups of students.


4-nowwhat
Preparation Steps
  • Recruit teacher team to help gather all the scaffolding.
  • Analyze standards and rewrite in terms of long term and supporting learning targets
  • Develop activities for each learning target that go with each learning mode – see above for example.  Use suggested products above and here for ideas.
  • Create learning centers to house the activities for the different learning modes.  If many resources are posted online, this can be as simple as different wall segments (1 per learning mode) that house QR codes to activities.
  • Create a grading system for crediting students’ different choices – a simple way to do this is to require 1 activity per learning target and assign a daily grade to each
Early Implementation Steps
  • During scaffolding days, allow students to select 1 activity per targeted learning target.  Explain how to get to resources and how to get feedback on work.
  • Provide a lot of formative feedback on the work and (if possible) grade student work in class in conjunction with formative discussions with students.
  • Use other formative assessments to ensure that ALL students are developing an understanding of learning targets.
Advanced Implementation Steps
  • Develop a bank of short rubrics for assessing various types of products that appear frequently in differentiated curriculum charts.
  • Use formative feedback data to determine which learning activities are the most engaging and effective and incorporate similar activities into upcoming differentiated scaffolding
5-relatedstuff

124: Teaching Students To Generate Questions

1-sources


2-what
Reasons Why Students Struggle to Generate & Share Own Questions:
  1. Relationship between perceived (and actual) academic ability & question asking
    • the more students need help, the more reluctant they are to ask for it
    • the more competent students are, the more likely they are to ask for help when needed
    • the lower the achievement scores, the less likely the student is to ask questions
  2. Relationship between students’ grade level in school & question asking
    • as students advance in their careers, the trends above get worse or better creating a wider and wider achievement gap in asking questions
    • low achieving students ask even less questions
    • high achievement students learn to ask better questions and direct them to the right people
  3. Relationship between student value on asking question & question asking
    • when students like asking questions and find them helpful to learning, they tend to ask questions
  4. Relationship between teacher relatedness with student & question asking
    • teachers ask more questions of those they feel more connected to
Strategies to Meet Challenges of Question Asking
  1. Create safe environment that values & leverages mistakes
  2. Engage students in question: Do the benefits of asking questions outweigh the costs?
  3. Provide instruction on how to ask questions
  4. Use cooperative learning strategies to encourage students to ask for help from peers
  5. Structure classroom to value intrinsic motivation & rewards over extrinsic motivate & rewards
  6. Develop good caring relationships with all students
Elements of Effective Instruction in Question Generation:
  1. Provide procedural prompts specific to strategy being taught.
    • Examples: question stems, signal words.
  2. Provide models of appropriate responses.
    • Model how to use question stems and how to give appropriate responses to questions.
  3. Anticipate potential difficulties.
    • Use prior knowledge of students to predict potential pitfalls and constructive responses to these.
  4. Regulate difficulty of material.
    • Start formulating question from short passages and then lengthen passages and deepen their complexity over time.
  5. Provide a cue card.
    • Use cue cards or cue posters that relate to questioning framework in use – e.g. Bloom taxonomy.
  6. Guide student practice.
    • Practice in multiple modes: with teacher, reciprocal teaching, in small groups.
  7. Provide feedback and corrections.
    • Give opportunities for teacher and peer feedback structure by feedback protocols such as Critical Friends.
  8. Provide and teach a checklist.
    • Teacher age-appropriate checklist that describes good questions.
  9. Assess student mastery.
    • Set aside multiple practice opportunities described over time for students to develop the skill of formulating good questions.  Assess their ability to formulate good questions and provide more practice opportunities and feedback as needed.
 
Stages to Teach Students for Designing Questions:
  1. Planning phase – students experience things and ask questions
  2. Implementation phase – student pursue and refine questions
  3. Assessing phase – students assess effectiveness of questions
Student Question-Generation Formats
  1. Reciprocal Teaching
    • What – Students and teachers use dialogue to draw meaning from text
    • Why – Improve comprehension & metacognition
    • How – Teacher selects a text selection and assigns to students to read.  Student summarize what they have read and generate questions about the text.  Teacher assigns one student to role play as teacher and ask students questions about the text.  Teacher asks as a coach who helps students ask good questions.  Students not playing the teacher are encouraged to answer questions and ask clarifying questions.
  2. Pair Problem Solving
    • What – Students solve problems while interviewing each other in pairs
    • Why – Promote metacognition and analytical thinking
    • How – Students assigned problems and paired up.  One person in pair solves problem by thinking aloud.  Partner records approach, asks clarifying questions to learn specific of problem solving steps and does NOT intervene if he or she perceived errors in thinking.  Partners take turns being in the think aloud and listening roles.
  3. Metacognitive Anchoring
    • What – Students ask metacognitive questions of themselves while reading texts
    • Why –  Improve comprehension & metacognition
    • How – Student ask themselves questions while reading a text and write in their responses in margins or on sticky notes.  After reading and annotating the text, students can transfer their response to a metacognition chart which these columns:  Type of Questions I asked during Reading, Type of Thinking in Questions, Why I asked that Questions.  Questions include:
      • What does this remind me of?
      • Why dd this happen?
      • What evidence supports this?
      • Is this ethical?  How can I evaluate this?
      • Is write trying to persuade me? Do I believe this?
      • What point of view is guiding the reading?
  4. Role-play Questioning
    • What – Students ask questions about a problem while role playing as investigators of a problem.
    • Why – Promote engagement & higher-level thinking
    • How – Students are organized in teams with one recorder.  Teacher poses a potential problem.  Students posing as investigators of problem ask questions about the problem.  They may brainstorm some answers related to questions.  Then ask more questions related to this brainstorming.  After question sessions, teams meet to compare questions and decide which might be the most effective questions to investigate to solve the problem.
  5. Press Conference
    • What – Students ask questions of a visiting expert.
    • Why – Stimulate curiosity & practice active listening
    • How – Students work in pairs to brainstorm questions in advance.  Pairs compile a master class list.  Students prioritize and categorize questions.  Students select a reasonable number of related questions to ask visiting expert.
  6. Textbook Question Analysis
    • What – Students analyze textbook questions to determine their cognitive values and assign them values
    • Why – Promote analysis & review content
    • How – Teach students first about the different cognitive levels of questions and their purposes.  Students record textbook questions in a question form that has students determine the cognitive level of question, consequence of question (what would student learn), and assign value to the question
  7. Question Review
    • What – Students in peers provide feedback on research questions that can be used to refine them
    • Why – Promote critical thinking
    • How – Students individually brainstorm potential questions and approaches for investigating these questions.  Students pair.  Students take turns presenting questions and giving presenter warm and cool feedback about questions.  After review session, students summarize feedback and revise questions.
  8. Round-Robin Questioning
    • What – Students create questions and answers and take turns asking questions of other students and giving feedback.  Cooperative groups ponder questions with uncertain responses
    • Why – Review & promote key ideas
    • How – Teacher directs students to generate 7 questions – 6 they know the answer and 1 they are curious about but are uncertain of the answer.  Students take time to record questions and answers.  Teacher called on 1st student.  1st student calls on another student and asks one of her questions.  He responds while she cues and probes as needed.  Teacher only intervenes to clear up misconceptions and to coach questioners to give appropriate wait times and to ask probing questions.  Student who responded to the first question calls on the next student and asks a question.  This pattern continues until all students have taken a turn to ask a question or until activity time expires.  Then students are divided into cooperative teams.  They discuss their questions with uncertain responses and try to brainstorm responses.  They select their favorite question to share with the whole class.
  9. Twenty Questions
    • What – Students ask 20 yes/no questions in an attempt to guess a person, place or thing related to a given topic
    • Why – Practice reasoning & problem solving & how to ask relevant questions
    • How – Divide students into play groups (whole class or down to groups of 5).  Announce a topic. One person thinks of a person, place, or thing related to the topic.  The rest of the students take turns asking yes/no questions in an attempt to funnel down to the correct person, place, or thing.  Students can take a guess (in place of a question) if they think they know the answers.  Teams can take up to 3 guesses to get the right answer.
  10. Actor, Actor
    • What – Students practice responding to questions from the perspective of a key person
    • Why – Promote retention & engagement
    • How – Divide students into teams of 4.  Select a topic.  Students select an important person related to the topic.  One person in the topic role plays as the chosen person.  The remaining team mates ask that person questions that the chosen person could answer in a distinctive way.
  11. Question / Question
    • What – Students interact using only questions
    • Why – practice active listening & thinking
    • How –  Group students in pairs.  Announce a topic.  Students discuss the topic for as long as they can using only questions.
  12. Answer/ Question
    • What –  Students develop questions that go with given stimuli (like Jeopardy)
    • Why – promote retention & higher level thinking
    • How – Select stimuli (text excerpts, diagrams, charts, etc.).  Challenge students to come up with as many questions as possible that could go with the stimuli.
  13. Talk Show
    • What – Students practice conversing about a topic using the roles of actor and interviewer
    • Why – apply knowledge, stimulate higher level thinking
    • How – Divide students into pairs.  Assign students roles – one role is a key character or person related to a current topic in class and one role is a news reporter.  The students role-play the interview while acting in character.


3-sowhat
Students who ask questions are more likely to be plugged into the learning that is occurring in class.  Teaching them how to ask questions helps them approach learning more actively and more critically.  Using varied protocols to encourage student questioning can give students multiple opportunities to formulate, analyze and use their questions.


4-nowwhat
Preparation Steps
  • Develop criteria for good questions and for types of questions.  Example – question stems based on Bloom’s taxonomy
  • Teach students how to use criteria to generate good questions
  • Analyze standards and products in upcoming products.
  • Brainstorm which types of interactions with question will help enhance students’ learning of specific standards and development of specific products.
  • Select activities (see above and also here) that provide ALL students with opportunities to create, use, and respond to questions.
Early Implementation Steps
  • Practice using one of the alternate question response (or formulating) activities with students.
  • Have students reflect on what they learned as a result of the activity.
  • Use feedback from students to fine tune activities.
Advanced Implementation Steps
  • Give students feedback on the quality of their questions.  Give students opportunities to use that feedback to improve their questions.
  • Ask students for feedback on questioning activities.  Use their feedback to improve activities and to decide which activities to incorporate into class routines.


5-relatedstuff