
Grader Smarter (Not Harder) Context:
Who is Dr. T and why does she value grading smarter?
- I’m a physicist by training who loves to gather, analyze, and leverage data.
- I’m a human being who NEEDS to have a life and can’t be bothered with grading all weekend.
4 Guiding principles for Designing Smart Grading Systems:
- Sustainability – Grading systems should NOT overtax teachers or students. See #2 above,
- Feedback cycles – Students need to experience multiple feedback cycles to grow. Students need to receive specific, timely, high quality feedback and use that feedback to improve their understandings and their deliverables.
- Mastery – Grades need to reflect student mastery of content OVER TIME.
- Flexibility – Grades need to honor the fact that different students require different amounts of work to develop content mastery.
8+ Grade Smarter (Not Harder) Tips:
METHOD 1: Maintain / ingrain simple turn-in procedures
My students turn in work in only 2 ways. These 2 ways have been practiced since the start of the school year so my students earn very few zeroes due to missing work.
- Interactive Notebooks – Most informal work is glued into their notebook and annotated in their notebook table of contents to that each item is easy for teachers and students to find.

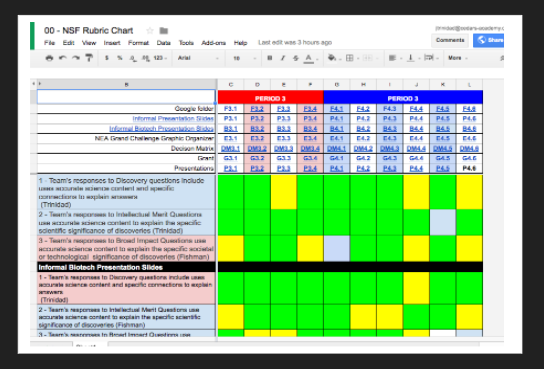
- Google Docs / Folders – Students create a team Google folder for each project. All their electronic products are stored in there. I link all their folders and all their key electronic deliverables to a header of a rubric chart (see linked image below). Having all the links in one place minimizes the time I spend looking for student work.
METHOD 2: Recruit / train student leaders to help with follow-up logistics
One of my class officers in each class period is a grade manager. He or she uses weekly task completion charts to personally follow-up with students who are following behind on assignments. Students are more comfortable getting grading reminders from their peers. I’m more comfortable not doing it.
METHOD 3: Make / maintain feedback visuals
I have found that my students respond well to colorful visuals that give them a sense of how far they are to completing assignments. When possible, I create visual cues related to assessment feedback such as:
- Stamping notebooks: Teenagers will do anything for a stamp. If you tell them they need 8 stamps on a lab by the end of the class period to earn 100%, they will complete the work early and hound you until you surrender and give them 12 stamps.

- Rubric charts: Big project deliverables are graded using rubrics. I create rubric charts (see linked example below) to chart student progress. Each column represents a team. Each row represents a rubric item. Yellow squares = partial credit; Green squares = full credit.
METHOD 4: Put computers to work
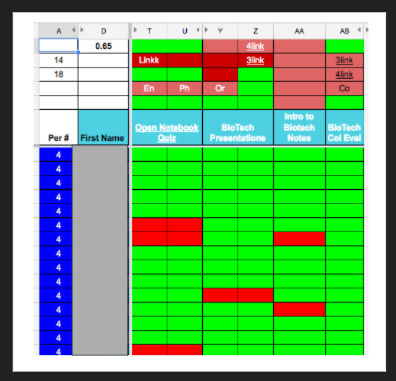
- Rubric scoring sheets: The yellow / green squares in my rubric charts are numbers between 0 and 10 disguised by Conditional Formatting. I use Rubric Scoring Sheets (see linked example) to convert those stamp scores into the actual grading scores. I can’t be bothered with all the tedious arithmetic associated with this – especially because schools in the New Tech Network grade students on 5+ learning outcomes. I let the spreadsheets do the arithmetic heavy lifting.

- Auto grading in Google Sheets: Conditional statements can be programmed into Google sheets to assign scores to multiple choice responses that are gathered from students using Google Forms. If you don’t know how to write conditional statements, you can use Flubaroo.
METHOD 5: Promote student self-assessment
- 3 Color Practice Quizzes: Prior to tests, my students take 3 color practice quizzes. They take the test in testing conditions (independently, silently) using 1 color that represents what they can do with their brains only. Then they open their notebooks and add more to the practice quiz using a second color. Then they request a key and update their practice quiz using a third color. By the end of this exercise students know what they need to study (and not) to prepare for the real test.

- Access to Keys: Students who finish practice sets early can request a key. Then they can use a second color to fix their solutions using the key. I give them perfect credit if they correct their own work with the key because students learn a lot when they compare their work to model work.
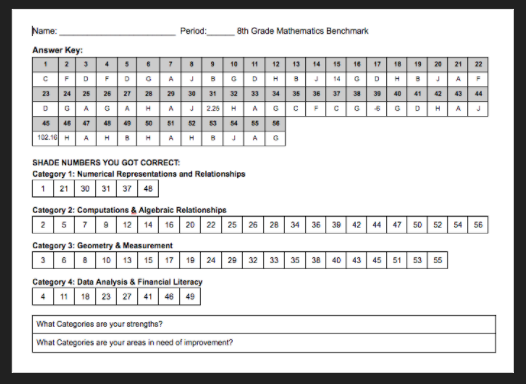
- Heat Maps: Students analyze major assessments using heat maps (see linked example). They color squares that represent questions they got right. The squares are organized into categories. Students can use the patterns in the categories to identify their strengths and gaps.
METHOD 6: Provide feedback in class, in person
I have found that students respond better to real time, verbal feedback than to written feedback given after deadlines. I set aside time during project work days to meet with each team and give them verbal feedback on their products. Students almost always improve their products in response to this real time feedback.
METHOD 7: Set aside 1 day per week for updating grades – no more, no less
Throughout the week, I give students multiple modes of quality feedback (stamped work, verbal feedback, Q&A, rubric charts, access to keys). All this feedback is provided during class time. ONCE a week I collect all notebooks and convert all those stamps into grades. On days other than my grading day (Friday afternoons), I give students feedback and then request that they send me reminder emails to update their grades on my grading day. Grading once a week means students have time to bring their notebooks up to speed over the course of one school week. Once a week grading also means that I don’t get hounded by daily requests to update grades and that I only need to do my least favorite thing in teaching once per week.
(Note: If you grade less than once per week, you risk losing the favor and support of some of your most formidable and helpful allies – helicopter parents. The weekly updates provide them with just enough feedback to support their students to meet their family’s standards of greatness.)
METHOD 8: Cascade the Grades!
When students take my tests, they know that they can earn a grading miracle. If they pass the test, I replace all related assignment grades (including ZEROES) with the grade they got on the test. This rewards students who need lots of time to develop mastery because I allow retakes on tests until the end of the grading period. The grade cascade creates a backdoor for these students to earn a grade that reflects the mastery they gained LATER than their peers. This policy also rewards students who know they only need to complete parts of the practice sets to learn all the material.
Because my tests are the only deliverables students complete without support from me and their peers, I value these grades as the ones that reflect individual content mastery the most. This is why I have no qualms cascading these grades down to related assignments. This grading policy motivates my students to study very hard for my tests and encourages them to come in for after school tutorials to prepare for test retakes. This policy also limits the amount of late work I need to grade to update students’ grades.
BONUS TIP: Recruit help
For my grant writing project on emerging technology, I recruited the following panelists to review my students’ first drafts of their grant proposals.

And wow, the quality and the quantity of feedback that each team received was REALLY UPPED A NOTCH. I’m excited to see how my students respond to this feedback.
During their work days, I posted the visual above on the board to inspire my students to work harder. I also did not forward their drafts to the panelists until the teams tried everything in the project rubric to avoid wasting panelists’ time. The students responded well to the requests for more work in order to impress their panelists.
Related Reading:
This book is great. 
Here are my notes on this book: 10: Grading smarter, not harder