201: Teaching Multiple Perspectives (Bonus March of 1932)

1-sources


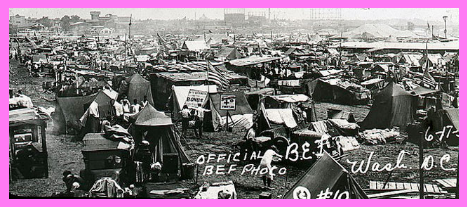
Official BEF Photo. Digital image. Radio Diaries. Radio Diaries, n.d. Web. 14 May 2016.


2-what


bonuswar


Revising History:
  • Examples:
    • Pluto lost its planet status in 2004
    • Deepening understanding of role of women in American Revolution due to work of Carol Berkin, Mary Beth Norton, Kathryn Sklar, Linda Kerber, Nancy Cott, Carol Dubois
  • Why this occurs:
    • New evidence uncovered
    • Old evidence investigated by new questions
  • Math / Science connections
    • Understanding of concepts and techniques change as
      • new evidence is uncovered
      • new techniques are tools are invented
Multiple Perspectives:
  • Multiple perspectives versus Historical interpretations
    • former deals with evidence created by people in close proximity to the focus events
    • latter deals with sources created by people who are not participants in the focus events – wrote about the event later in time
  • Tips about teaching multiple perspectives to teenagers
    • do not use too many perspectives at once
    • use a variety of one-dimensional sources that as a collection represent multiple perspectives
    • subtext and context of sources is important to understanding perspectives of pieces
Why the Bonus Army?  
  • Stories of participants humanize the Great Depression
  • July 1932 – 20,000 Americans stages a peaceful protest in Washington, D. C.
  • Context: Adjusted Compensation Act of 1924:
    • 1.00 / day for domestic service; 1.25 / day for overseas service
    • Compensation made available through:
      • Bonus certificates redeemable in 1945 for pay over $50
      • Less than $50 – immediate cash
  • Bonus Army and related events:
    • led by WW1 veteran Walter Waters
    • army of unemployed veterans conducted an 18-day march from Portland, Oregon to Washington, D. C.
    • due to news coverage, gained followers from Texas, Louisiana, New York, Pennsylvania, Ohio, etc
    • protesting late payments of bonuses
    • lobby in favor of bill sponsored by Congressman Wright Patman of Texas for immediate pay of bonus in 1924
      • considered fiscally responsible because it exceeded federal budget
    • a D. C. police chi and WW1 veteran Pelham Glassford aided protestors by organizing sites and buildings for them to lay camp and working to provide them with food and water
      • partly provided aid to make protesters more malleable to local laws
    • Walter Waters responded to police aid with military style discipline
      • forbade freeloading, drinking and radical talk
      • military police patrolled the campgrounds
      • opposed Communist and radical elements within their camps
        • at one point D. C. police had to prevent them from beating Communists caught within their camps
    • June 7 – 8,000 marched down Pennsylvania Avenue
    • Government concerns
      • afraid protests were a threat to reelection of Herbert Hoover
      • afraid lobbying exceed scope of passing the Patman bill
      • afraid of possible connection between B.E.F. and the Community Party who was constantly trying to take credit for the march despite Waters’ protests
    • June 17 – Patman bill rejected by U. S. Senate vote
    • Many protesters left – trains home paid for by $100,000 train assistance provided by Hoover administration
    • 10,000-15,000 protesters remained in D. C.
      • frustration increased due to time, poor food, summer heat, waterborne diseases
    • July 28 – police tried to move protestors from Federal Triangle buildings to Anacostia Flats – protestors responded by throwing bricks at the police
    • Hoover ordered the U. S. Army to move the protestors under command of MacArthur, Eisenhower, and Patton
      • army moved protestors to Anacostia Flats using tear gas, bayonets and physical force
      • MacArthur disobeyed President’s orders to not enter Bonus Army’s camps – entered the camp and routed the veterans.
    • Diverse reactions to veteran treatment
      • some perceived it as evidence of President Hoover’s callousness
      • some perceived it as necessary action to protect country from a Communist plot
    • Hoover made a public announcement that the “Communist threat” was defeated
      • investigations failed to reveal a connection between the Communist party and the Bonus Army
  • Varying historians’ interpretations of the events:
    • evidence of President Hoover’s lack of caring for veterans and the unemployed (Walter Water’s and Police Chief Glassford’s perspective)
    • President Hoover acted to protect country from Communist Party (Cold War perspective)
    • evidence from release of Hoover’s personal papers in 1966, squared blame on MacArthur (Hoover perspective)
  • Students who investigate the Bonus Army investigate multiple perspectives to develop and defend an answer to the question: Why was the Bonus Army forced out of D. C. and who should bear responsibility for this decision?
From Idea to Historical Investigation:
  • Refining driving question
    • Focusing on the why instead of the what of the events helps students to dig deeper into the evidence
  • Limiting number of sources
    • Limited number of sources to 8 to avoid overwhelming students
Teaching the Lesson:
  • Students listen to song: “Brother, Can You Spare a Dime?”
    • provide info on the Depression and plight of WW1 veterans
    • relates to homework reading on these topics
  • Students read about Bonus Army for homework
  • Debrief homework using series of images of Bonus War events.
  • Introduce driving question: Why were the marchers forcibly removed and who should take responsibility for the decision?
  • Students provided 1 of 8 sources.
    • Provide students with Who’s Who list of people involved in the Bonus Army events
  • Students grouped into teams that have experts on each of the 8 sources.
    • students share their findings from their sources – present content, context and subtext in their sources (teacher monitoring supports this critical sharing of
    • after sharing, students complete the following sentence stems:
      • We believe that the Bonus Army was forcibly removed from Washington D. C. because …
      • We believe that ________ was / were responsible for the decision to remove the Bonus Marchers because …
    • students debate within their teams while trying to come to an agreement on how to complete the above sentence stems.  Remind student to preface their arguments with According to Source #, ____________
  • After students have interpretations, one final piece of evidence is released, a memoir from Hoover written 30 years later that contradicts many of their interpretations
  • Students’ reactions
    • Students seemed to be more suspicious of sources written long after the events EXCEPT for Hoover’s memoirs.  They seem to give him credit for revealing the truth at a time when the truth is less likely to damage his or other’s reputations.
  • Students learn how to
    • use multiple perspectives to realize a more nuanced view of history
    • question historical sources
    • formulate, define and defend historical arguments
    • how science is created
 
Science connections:
  • A multiple perspectives treatment of science can be used to consider multi-faceted evidence around once or still controversial issues in science such as:
    • the theory of evolution
    • global warming
    • development of string theories and related theories
    • the development of electromagnetic theory
    • development of theory of gravity
  • While considering different pieces of evidence focused on one of these topics, students can consider:
    • what model is constructed to describe the phenomena
    • what are the strengths of the model
      • what type of phenomena are described well by the phenomena. Why?
    • what are the limitations of the model
      • what type of phenomena are not well described by the model.  Why?
    • who supports the model? why?
    • who does not support the model? why?
  • Caveat –
    • At some point teachers need to emphasize accepted theories to avoid sowing wrong information and misconceptions into students’ minds
    • Teacher may need to explicitly teach how scientists and scientific communities confer validity to some types of information and not others
3-sowhat
Having students investigate and interpret sources that represent multiple perspectives helps students develop a more nuanced understanding of how knowledge is created.  Students who engage in using evidence to create, defend, and refine interpretations are more likely to remember the information they investigated.  This is because they are building knowledge frameworks to connect and challenge the information.


4-nowwhat
Note:  This is written for Science teachers.  For tips for history teachers, read the book or the summary of the book chapter in the WHAT? section of this article above.


Preparation Steps
  • Identify what concepts are the enduring understandings of your particular course
  • Research to determine if any of the enduring understandings either have a controversial origin or are applied in a current controversial issue
  • Research to find several sources that:
    • focus on one controversial issue
    • offer a collection of perspectives towards the controversial issue
    • use multiple methodologies to investigate the issue – different experimental studies, different theoretical models, etc.
    • are accessible to students with some vocabulary scaffolding support
  • Develop a driving question that can be investigated by all the sources – It could be something like:
    •  Why is the model of ________________ evolving?  Who posed the most valid description(s) of ________________ and what makes their description(s) most valid?
  • Develop thinking sheets for each of the sources that ask students to consider:
    • what model is constructed to describe the phenomena?
    • what are the strengths of the model?
      • what type of phenomena are described well by the phenomena. Why?
    • what are the limitations of the model
      • what type of phenomena are not well described by the model.  Why?
    • who supports the model? why?
    • who does not support the model? why?
  • Decide which sources will serve as the launch source and the final piece of evidence source:
    • the launch source should hook students into the debate and transition well to the driving question
    • the final released piece of evidence source should
      • contradict some of the previously released emphasis
      • might help to have it connect with the most accepted view of the phenomena since people tend to remember best the sources they are shown last
  • Design a project calendar with following phase:
    • launch – initial investigation and initial impression gathering phase
    • investigate individual sources individually
    • in groups share evidence to form consensus interpretations of evidence considered as a whole that address the driving question
    • release final piece of evidence
    • students refine their conclusions
    • debrief discussion that shares current accepted views of the phenomena and how the science community came to agreement on that model
Early Implementation Steps
  • Implement project calendar described above
  • Monitor students during individual investigation phase to make sure they are questioning and accurately describing he strengths and limitations of the models in their sources
  • Monitor students while they debate and formulate interpretations in their teams – make sure they are using evidence from their sources in their arguments
  • During debrief discussions, probe for questions, understandings and misconceptions
Advanced Implementation Steps
  • Get students to investigate a debate that is still ongoing and to predict how the debate  will end in the future and the types of evidence that will be required to end the debate
5-relatedstuff

200: Teaching Chronological Thinking and Causality (Rail Strike of 1877)

1-sources


2-what


Screen Shot 2016-05-14 at 12.02.31 AM


Chronological Thinking
  • Beyond sequencing events in temporal order
  • Examining sources to determine how events relate to each other
  • Looking for causes of events and consequences of events
  • Understanding the difference between causal and correlational relationships
  • National Standards for History (related to chronology):
    • Identify in historical narratives the temporal structure of a historical narrative or story
    • Measure and calculate calendar time
    • Interpret data presented in time lines
    • Reconstruct patterns of historical succession and duration
    • Establish temporal order in constructing historical narratives of their own
  • Chronological thinking needs to be taught alongside causality
  • Math / Science Connections:
    • Scientists / mathematicians are more likely to say that two variable are correlated than causally related because the latter is harder to prove
    • The relationships among things is emphasized throughout the disciplines, it is the basis of functions and functions are a main ingredient in mathematical / scientific models and the predictions that emerge from the models
Causality
  • Standards related to causality:
    • explain causes in analyzing historical actions
    • grasp the complexity of historical causation, respect particularity, and avoid excessively abstract generalizations
  • Debates surrounding causes of events / eras can make history more real and engaging to students
  • While introducing this concept, select sources that require students to form a chronological narrative – NOT multiple causes, perspectives, or other types of historical thinking – isolate chronological / causal thinking
Why the Railway Strike of 1877?
  • images involve buildings that are local and recognizable to Baltimore students
  • Background info:
    • economic recession and racial tensions during the Reconstruction
    • 1873 Wall Street panic negatively affected nationwide economy
    • 1874 6,000 businesses close
    • railroads hit really hard
    • railroads engaged in a rate war to minimize effects of the depression
    • lower rates led to lower labor costs
      • paid workers less
      • workers hired for less hours
      • workers had to pay for travel home when work took them to distant cities
    • railroads ended rate wars in favor of an agreement to lower workers’ hourly wave
      • workers striked
        • sometimes destroyed railroad property
        • involved 100,000 workers nationwide
      • strike ended due to
        • federal trop deployment
        • lack of central workers’ org
    • Impacts:
      • stirred fear in the public
      • some reforms:
        • created Employees Relief Association – provide some medical services and death benefits to employees (1880
        • 1884 companies setup pensions for workers
      • momentum for Workingmen’s political party and labor movement
      • highlighted problems of industrialization
Implementing the Lesson
  • Display image from strike that shoes building on fire and ask students to identify elements in the image that aid in understanding artist’s viewpoint
  • Introduce Driving question: What event does the image depict and what is the artist’s message about the event?
  • Four sources:
    1. letter advertising Gatling gun to owner of B&O Railroad
    2. broadside announcing lowering of worker wages
    3. letter from president of B&O to President Hayes asking for federal troops
    4. insurance document listing damages caused by worker
  • These four sources can help students’ determine causal relationship among events of the strike
  • Cursive note: can provide typed copies of cursive sources just in case students struggle to read the handwriting
  • Jigsaw analysis
    • Students analyze different sources within a team of 4 with the help of thinking sheets that use question prompts to guide students to notice and interpret key features of the sources and formulate hypotheses
    • As a group, students use collection of sources to create a chronological account that generate original artist’s image at project launch
  • Alternative to group analysis
    • Each group analyzes the same source and presents their finding to the whole class
    • The whole class tries to process and arrange the sources in chronological order
  • Note about the sources and lessons learned:
    • the dates on sources do not necessarily correspond to the actual dates of the events they describe
    • this fact requires students to use causality to correctly order the sources
    • students learn that dates alone do not order sources / events; determinations about the relationships about the information within the sources influence the chronology
    • history is more than a random aggregation of information – there is an organization to the information due to causal relationships
  • Concluding the lesson:
    • Is the launch image pro- or anti- labor?
      • after discussing this question, teacher reveals caption of image: The Frenzy and What Came of It”
 
Leveraging these Lesson in the Future
  • Lessons learned by students:
    • Challenges misconception – sources created close in time to the event are more valid
      • sometimes sources created farther in time from the event have useful things to say because they are written from a broader perspective with access to more corroborating evidence
    • Moving beyond timelines – students learn to interpret sources and their relationships to each other to develop chronological frameworks that connect the sources
    • Students learn to view history narratives as jigsaw puzzles that can be solved
      • students were more engaged by “creating” time line than simply memorizing it – led to better retention
      • caveats – students may read too much or too little into sources and develop chronologies with logic flaws; promoting discussing among discussion may helps students to catch logic flaws
  • Teaching tip:
    • Many historical tools can be used to analyze and interpret sources
    • While scaffolding these tools, it’s helpful to emphasize one over the others
Math / Science Connections:
  • This style of lesson can be used to design lessons that show:
    • chronology of events that led to expanding understanding of a concept or the development of a currently well established math / science model (often called a theory)
      • examples:
        • development of quantum mechanics – happened very quickly and may have a lot of sources with dates that don’t necessarily match the exact discovery dates – (can also remove dates from source until after students have a hypothesis about the chronology). Within quantum mechanics – there are several concepts that can be focused on such as:
          • development of model for an atom
          • development for model of behavior of light
          • development for model for atomic nuclei
        • development of understanding of models to describe electricity and magnetis
        • development of model to understand gravity
        • with biology – the development of the theory of evolution
    •  can open with quote or a cartoon inspired by model being studied and ask students to describe what they notice and answer the driving question – What does this image depict and what is the artist’s message about the contents?
    • teaching students to logically link the development of models can help them to learn how mathematicians / scientists incrementally create new knowledge using more and more sophisticated models (or sometimes simpler models) to understand phenomena


3-sowhat
Teaching students how to create their own chronological frameworks by interpreting and connecting primary sources teaches students that history is not just an random aggregate of facts and events.  Creating their own timelines as opposed to simply memorizing ones can involve students in an engaging jigsaw puzzle that makes the resulting sequence more memorable.  This type of lesson can be applied in science / math lessons that investigate the development of now accepted models for describing phenomena.


4-nowwhat
Note:  This sequence will be written for science teachers.  If you’re looking for advice on how to prepare and implement lessons related to historical lessons on chronology, read the WHAT? summary above.


Preparation Steps
  • Research the unfolding of discoveries that advanced the development of models that describe a specific phenomena.
  • Find student friendly, engaging sources that represent different models that describe the same phenomena.
  • Select sources whose dates don’t necessarily relate to the dates of the origin of the models OR expunge the dates from the sources.
  • Developing thinking sheets with several question prompts that guide students to analyze each source and its relationship to the anchor image.
  • Find an anchor image to launch the project that shows the model in an interesting way that hints at its origins and implications.
  • Create a driving question that requires students to investigate the sources to chronologically relate the models depicted in them to the model depicted in the anchor image?
Early Implementation Steps
  • Introduce anchor image and driving question.  Hold preliminary discussions to share and record what is initially notices and initial hypotheses
  • Have different teams investigate different sources with the help of thinking sheets.
  • Have each team present their findings to the class.
  • Use teams’ presentations to have a discussion aimed at sequencing the models
  • After models are sequenced, reconsider the anchor image and re-address the driving question
Advanced Implementation Steps
  • Lesson could have models that relate to concepts that are still in flux and have students predict future expressions of the model


5-relatedstuff

199: Text, Subtext and Context (Theodore Roosevelt & the Panama Canal)

1-sources


2-what


Screen Shot 2016-05-13 at 2.56.54 PM


A Common Language for Investigating the Part:
  • Using content, context and sub-text to summarize and evaluate historical sources can work for all units
  • Need to repeatedly use content, context and sub-text reflections to build up student skills
  • For guided questions related to content, context and sub-text, go this article: Making historical thinking a reality
Criteria for Selecting Sources
  1. Do not use more than 4 to 6 sources.  Especially in the beginning.
  2. Read the sources ahead of time and check for:
    • can lead to discussion related to driving question
    • accessible to students
  3. Vary types of sources
    • examples: cartoons, artwork, pictures, text, pop culture sources, maps, data tables, graphs, etc
  4. Aid students with:
    • academic vocabulary
    • contextualizing sources
    • providing legible copies of sources (if they are originally in cursive)
  5. Make sources of comparable length if you are using the jigsaw strategy to distribute / share sources.
Initiating the Investigation
  • Investigate sources and look for:
    • lies,
    • half-truths
    • exaggerations
    • rationalizations
    • obfuscations
    • Math / Science adaptations:
      • Look at strategies or concepts and identify
        • Always true
        • Sometimes true
        • Always false
        • Sometimes false
  • Students read excerpt from Theodore Roosevelt’s autobiography about the Panama Canal and ponder the Driving Question
    • What is Roosevelt doing in his autobiography (lying, telling a half-truth, exaggerating, rationalizing or obfuscating)?
    • What role did the US play in the acquisition of the territory used to construct the Panama Canal?
    • Math / Science adaptations:
      • Could present or develop circle axioms (or other conjecture types) and ask:
        • are these always, never or sometimes true?
        • In what situations are they true?
Digging Deeper
  • Students in teams are given one historical source and asked to answer questions related to the content, context and subtext of the source
    • source represent a cross section of view about the Panama Canal
    • 2 short guide questions:
      • What role did US play in the Panamanian Revolution?
      • Is there any info in this source that challenges assertions in Theodore Roosevelt’s autobiographical excerpts?
  • Students in teams discuss their sources.
    • Each team member read and analyzed different source
    • Discuss different sources citing specific examples and quotes from their sources
  • Alternatives to jigsaw approach:
    • One person reads all sources – very time consuming
    • Each group of 3 or 4 analyzes the same source and presents their findings to the class so whole class is exposed to all sources
    • Math /  Science Connection
      • Jigsaw approach – Each person in the team examine a different piece of evidence and share interpretations, observations with whole team (all evidence relates to the same concept)
      • Non-jigsaw approach – All students in same team of 2-3 solve the same problem – challenge students to develop multiple approaches to the same problem and use visuals to represent different approaches
Doing Source Work:
  • Wineburg, Historical Thinking Matters Framework
    • sourcing
    • contextualizing
    • close reading
    • corroborating
  • Hicks, et al. SCIM-C Strategy Framework
    • summarizing
    • contextualizing
    • inferring
    • monitoring
    • corroborating
  • In both approaches:
    • students need to move beyond a single source
    • examine relationships provided by each piece of evidence
    • Corroboration phase -> legitimate interpretations of historical questions
  • Math / Science connections:
    • Math framework
      • Asking questions
      • Making models to answer questions
      • Computations
      • Relating model results back to real life to check if they apply
    • Science framework
      • Making observations
      • Asking questions and hypotheses based on observations
      • Designing data procedures
      • Gathering, organizing, analyzing data
      • Drawing conclusions
    • Corroboration connections:
      • In Math – verifying that multiple approaches led to the same solution
      • In Science – verifying that different tests yield the same results
Complicating the Investigation
  • Students corroborate their evidence by completing the following sentence stem:
    • The various types of sources used to determine the purpose of Roosevelt’s autobiography created problems because …
    • Math connections
      • The various ways of representing the problem reveal different facets of the problem including …
      • The various ways of solving the problem are good for different purposes including …
    • Science connections
      • The various data sources yield different conclusions because …
      • The various data sources create problems because …
  • Types of student responses:
    • unreliable due to biased subtexts
    • sources only try to portray their own biased viewpoints
    • hard to know which source to believe
    • contradicting viewpoints, hard to tell what really happened
  • Student difficulties:
    • Students struggle to make connections among content, context and subtext
  • Another question that guides student corroboration of various sources: The subtext of the various documents was important to consider because …
    • Math / Science connection
      • The contexts / subtexts of the data are important to consider because …
    • Student responses:
      • explains why the source was written
      • explain variety of opinions
      • explains variety of evidence used by sources
      • helped convey reliability of sources
      • insights into intentions of authors
      • helped to tease out truth in sources
      • helped show biased in sources
  • Overall when trying to interpret events from the past, you need to …”
    • Math / Science connection
      • Overall, when trying to interpret data, you need to …
    • Student responses
      • consider sources with different viewpoints
      • research background info that reveals subtexts of sources
      • compare information from different sources
    • Student difficulties
      • believe that bias negates validity of a source (mathematical approach to history)
Student Interpretations – Transition Quick Write
  • Transition quick write at end of day one: Attempt to answer the driving question
    • Look fors in student quick writes:
      • evidence from sources
      • perspectives from multiple sources
    • Math / Science connection
      • Use driving question as quick write prompt
    • Student difficulties
      • Using evidence
      • Bridging content, context, and subtext in interpretations
      • Mathematical approach to history (problematic approach)
        • require consensus among sources
        • require lack of bias in sources
Returning to the Investigation:
  • End analysis by revealing most controversial and faceted source to students
  • Math / Science connection
    • Could reserve most nuanced and controversial piece of data for release near middle or end of project
Conclusions:
  • Analyzing sources’ content, context and subtext can help student investigate the past rather than just memorize and regurgitate text excerpts
  • Teacher resistance
    • kids can’t do this work
      • responses
        • studies have shown that this type of work can be done by elementary school students
        • teacher perseverance helps students acquire student skills
        • historical investigations make history more interesting
        • prepares students with skills they can use in any career
3-sowhat
Finding the right evidence and fashioning the right driving question can make boring topics interesting to students.  Releasing evidence at various points in the project can start and reinvigorate conversations related to the driving question.  Using content, context and subtext to analyze evidence can teach students how to investigate, question and interpret evidence.


4-nowwhat
Preparation Steps
  • Collect evidence (data, sources, etc) that students can use to explore content by investigating a driving question
  • Design driving question
  • Design thinking sheets that help students examine content, context and subtext of sources
  • Design prompts to facilitate conversations that corroborate evidence – see above for examples.
Early Implementation Steps
  • Use a controversial or provocative source to introduce a driving question
  • Assign sources (various) to students working in teams
  • Individually assign students to examine the content, context, and subtext to different sources within a team.
  • Get students to answer prompts as a team that get them to corroborate their sources and formulate interpretations that address the driving question
Advanced Implementation Steps
  • Gather evidence and sources that uncovers current problems that relate to central concepts in your course. Design project and driving questions around that set of sources.


5-relatedstuff

198: Introducing Historical Thinking Through Nat Turner’s Rebelion

1-sources


2-what


Screen Shot 2016-05-13 at 12.26.07 PM


Historical Background:
  • Aug 1831, Nat Turner led a brutal slave rebellion against his owner and other slave owners in Southampton, Virginia
  • Largest slave rebellion in US history
  • Nat Turner was inspired by visions from God
  • Eventually defeated, tried, hanged and skilled
  • Made Virginian legislators became more afraid of rebellion and less concerned of humanitarian concerns associated with slavery
Why Nat Turner?
  • Intriguing figure in history
  • Unlike typical victorious narrative in US History textbooks, Turner was defeated
  • Often left out of textbooks
  • Jarring juxtaposition of violence and deep religious faith
  • Can find a lot of primary sources that show intriguing displays of Nat Turner and the rebellion
Math / Science Connection
  • Research and identify a scientist / mathematician (concept) who (that) is little known and / or controversial
  • Select someone that has done work that can be examined to practice critical process skills
  • Collect primary resources related to selected scientist / mathematician / concept
Lesson Plan Goals:
Students will learn:
  • history is a discipline centered around questions
  • history applies information to generate interpretations that can answer questions
  • how to question their sources – identify text, context, and subtext of sources
  • historical interpretations are dynamic and debatable
Math / Science Connections
  • Identify process skills that can be taught by examining work of mathematician / scientist or examining evidence related to a controversial topics / concept.  Some examples include:
    • How to ask generative, testable questions and develop associated hypotheses
    • How to build models that can answer real world questions
    • How to design procedures to gather data that can be analyzed and interpreted to test hypotheses, answer questions with data-backed conclusions
    • How to analyze models – strengths, limitations, connections to real worlds
    • How to differentiate between hypotheses and theories
    • How does mathematics / scientific community assign validity to findings
Implementing the lesson (2 days)
  • Students view a variety of engaging images of Nat Turner and asked to:
    • describe actions described in the image
    • speculate about Turner’s personality and emotional state
    • compare / constrast depictions of Turner – height, skin coloration, facial features, clothing, interactions with other people in image, etc
  • Students realize after several images that images show the same person
    • ask students, why would they get such different impressions of the same person?
    • students might start to naturally ask, who created images and when were they created?
    • ask students, why does origin and intention of artist matter?
  • Driving question: How do we remember the actions of an enslaved man who lead an ultimately unsuccessful rebellion of slaves?
  • Students worked in teams are asked to develop a narrative for a historical marker that could be a part of Turner’s 1831 rebellion. In addition,
    • assess their own thinking
    • describe how sources they presented influenced their interpretations of the past
  • Students working in teams examine other primary sources that share the following characteristics
    • author’s presence is overt
    • as a collection, the relationship with the rebellion of the cited sources evolves
  • Students working in groups in 6 jigsaw read / examine 6 sources.
  • Students converse / share info related to their sources within their teams (each individual in the team read a different source)
  • Students discuss how Nat Turner should be remembered. (2-3 min)
  • Share their findings with the whole class.
  • Interesting observations of students:
    • Since 9/11, the word “terrorist” comes up often to describe Turner
    • Students have trouble separating figurative and literal descriptions of the events
  • Use literal interpretations of historical language as an entry point for teaching students how to interpret, questions and attack historical evidence.  Do this by sharing info about the context and sub-text of each historical source.
    • Present background info on all sources
    • Ask students if their opinions of the info in the sources change as a result of the background info
      • Combats natural habit due to traditional teaching / learning to accept all texts as true without questions
  • Introduce Text, Context and Subtext questions.  See this article for these questions: Making historical thinking a reality
    • Answering these questions and using these responses to reformulate interpretations gets students to realize there is “no one right answer”
    • Student reactions:
      • some struggle to reconcile conflicting viewpoints for different sources
      • struggle to face problems that arise from acknowledge context and subtext of sources
      • some are unsure how to handle questions raised by context and subtext information – can lead to bland, fact-laden responses = textbook responses
      • some interpret Turner as a religious figure
      • some try to tease out all the bias in the sources because they have come to think of history as a subject without bias
      • some formulated a conclusion by finding commonality in interpretations of the different sources -> Turner as brave freedom fighter
      • all these student reactions are first steps in developing historical thinking because students have made first attempts to
        • question sources
        • consider implications of context and subtext of sources
        • work to solve conflicting viewpoints from sources
        • start to use context and subtext to analyze comparative validity of sources
  • Respond to students’ first attempts at historical thinking with praise and reminders that this work is difficult and sometimes uncomfortable
Math / Science Connections:
  • Use Frontloading with Images strategy to launch a project
    • Select images that are different but describe the same concept and / or person (could be visuals, charts, graphs)
      • Examples:  different images that were used to prove or disprove evolution, different images that explain different understandings of gravity forces
  • When students start to connect images, ask students:
    • How are the images connected?
    • Why do the images vary?
  • Introduce driving question.  Could have the form:
    • How might this ___insert person or concept___ be taught or applied or celebrated or remembered?
  • Introduce deliverable. Could be
    • An artifact that represents the person / concept and written commentary that explain how the artifact answers the driving question
  • Group students and assign them different sources (jigsaw style)
  • Have students share findings from different sources within their teams and come to team interpretations of sources and artifacts
  • Have students share findings with the whole class (could do this in a discussion or a gallery)
  • Share background information related to the sources and ask if it changes their interpretation of the sources
  • Let students re-examine sources using Content, Content, and Sub-Context questions.  See this article for these questions: Making historical thinking a reality
  • Let students reformulate their interpretations and then work on their deliverables.
  • Ask students what processes they used i this project and what these processes taught them about science / math.
 
Questions Raised by this Lesson Format:
  • How to cover all material on standardized tests?
  • Are student-centered approaches to necessary to teach effectively?
  • How to balance historical process and historical content?
Related Math / Science Questions:
  • All of the above and:
  • What math / science processes are critical to scaffold?
  • How to present controversy in subjects that are associated with hard facts?
  • How to scaffold problem solving in ways that mimic real, transferable processes?


 3-sowhat
Developing a starter lesson to introduce students to critical processes used by historians (scientists, mathematicians, etc) is a first step in guiding students to use content processes effectively to solve problems.  These primer lessons are especially important when the processes introduced are contrary to ways the subject has been primary been represented to students in their prior educational careers.  Lessons that get students to be aware of the strengths and limitations of their sources and to let these considerations influence their interpretations of these sources prepares students to be savvy consumers / interpreters / users of information.


4-nowwhat
Preparation Steps
  • Research and collect images that can challenge students to question how knowledge is created within a discipline and that relate to the curriculum –
    • examples – images that depict different understandings of electricity or  gravity or evolution
  • Research and collect sources that deal with a concept or event whose interpretations evolved over time
  • Develop a provocative driving questions that relates to curriculum, images, and sources
  • Prepare thinking sheets that have questions that guide students to analyze content, context, and subtext of sources.  See this article for these questions: Making historical thinking a reality
  • Gather background (context and subtext) information for images and sources and combine into a background research presentation
Early Implementation Steps
  • Implement history or science / math sequence described above.
  • Monitor students as they work in order to learn the just-in-time moments to transition students to next step in the lesson sequence
  • Gather evidence of student thinking as they project unfolds
  • Provide formative feedback on student thinking as they work through phases of the lessons – this feedback could be mostly in the form of questions that guide students to develop more layered, deeper understanding of their sources and to question their interpretations
Advanced Implementation Steps
  • Over time, collect images, cartoons, and sources that present core concepts in different ways to be used in design of similar lessons
  • Take students on field trips to get a close look at primary sources – example the Harry Ransom Center at the University of Texas at Austin has first edition copies of Galileo’s Starry Messenger, Newton’s Principe, etc.
5-relatedstuff

197: Facilitating a Historical Investigation

1-sources


2-what


Screen Shot 2016-05-12 at 10.19.53 PM


  1. Develop driving question that will focus student inquiry:
    • Question should be provocative
    • Question encourages investigation and discussion
    • Question should align to central concepts / skills in standards
    • Question should deepen students’ knowledge of history as an interpretative discipline
    • Question should emphasize disciplinary concepts such as:
      • causality
      • chronology
      • multiple perspectives
      • contingency
      • empathy
      • change and continuity over time
      • influence / significance / effect
      • contrasting interpretations
      • intent / motivation
  2. Initiate the investigation
    • Access prior knowledge by co-examining a primary source such as: poem, journal entry, map, broadside, political cartoon, etc.
    • Hook students’ attention and introduce context for event / person being studied
  3. Conduct the investigation
    • Expose students to relevant and conflicting historical sources that allow students to investigate all aspects of the event
    • Analyze one document individually
      • annotate information
      • extract who, what, when, where, why
      • determine answers about
        • context
          • what was going on during the time period?
          • what background info helps explain info in the source?
        • subtext
          • who created the source and what do we know about that person?
          • for whom was the source created?
          • why was this source produced when it was?
        • how do these answers affect central question
      • Group individual students so that all documents are represented in a group.  Help them use their documents and annotations to :
        • generate and share interpretations of documents based on focus question
        • cite evidence to support interpretations
        • not all group members need to accept all interpretations at this point
  4. Report interpretations and class discussion
    • Share interpretations and discuss sources that most influenced their decisions and why
    • Discuss and compare / contrast interpretations
  5. Debrief student investigations
    • Facilitate a teacher-driven discussion that solidifies basic historical facts and clarifies reasons for varying interpretations
  6. Assess student comprehension of content of the past and historical thinking
    • Assess students’ understanding of history content and process
3-sowhat
The structure of this historical investigation project sequence resembles the “You do, We do, I do” sequence promoted by Jo Baoler for math lessons.  Giving students opportunities to read sources while trying to answer provocative questions can make students more critical and careful with the sources they read and examine.  Letting students formulate and defend historical hypotheses and conclusions based on cited evidence teachers students historical content and process.


4-nowwhat
Preparation Steps
  • Analyze standards and identify enduring understandings, key skills and supporting knowledge.  Develop learning targets targets based on these.
  • Develop a provocative driving question that relates to learning targets.
  • Gather a variety of conflicting sources.
  • Develop thinking sheets that guide students to analyze sources.
Early Implementation Steps
  • Launch project and present driving question.  Examine engaging compelling sources to formulate initial hypotheses
  • Examine sources individually using thinking sheets
  • Form jigsaw teams and develop interpretations of sources within the teams
  • Facilitate discussion that have students share and compare / contrast interpretations
  • Facilitate a debrief discussion that highlights key historical information and explains variety of competing interpretations
Advanced Implementation Steps
  • After students are familiar with this process, let them find their own primary sources to test their hypotheses.
  • Scaffold a historical writing piece that documents students’ hypotheses, questions, conclusions and cited evidence
5-relatedstuff

196: Making Historical Thinking a Reality

1-sources


2-what


Screen Shot 2016-05-12 at 9.30.52 PM


Features of Traditional Method of Teaching History:
  • History textbook is the core instrument
  • Teaching / learning processes:
    • reading textbook
    • lectures, movies
    • memorization, fact retention
    • unanalyzed consumption of facts provided by an expert
    • providing evidence of mastery = regurgitating textbook
    • learning linear narrative of history provided by experts
    • assessments:
      • textbook questions
      • true / false statements
      • crossword puzzles
      • tests based on textbook
    • aim to present history as an engaging subject – not necessarily as a dynamic subject
Features of Historical Thinking Method of Teaching History:
  • Examines different types of sources
  • Teaching / Learning processes
    • debate
    • investigation
    • analyzing evidence
    • interpreting evidence
  • Aim to present history as a useful, living subject
Inspiration from Other Subjects:
  • In Math, students learn:
    • concepts and how to apply them
    • how to “show their work”
    • tools and habits of mind and how to use them
  • In Science, students learn:
    • scientific method and how to document it in lab reports
    • how to draw conclusions based on observations and data
    • how to use tools used by scientists
  • In English, students learn:
    • learn literacy devices and how to analyze them in books and utilize them in writing
    • how to question the text
    • connect author’s biography with their work
    • place stories within their historical context so they can be understood as products of their time and place
  • Application to history teaching:
    • What’s missing from traditional history teaching:
      • explicit teaching on how history knowledge is created (instead focus on making known facts engaging
      • process is cut out to create more room to cover a lot of content in a superficial way
Content vs Process:
  • Striking a balance:
    • Too much process – might become hands on, but not minds on
    • Too much content – may bore students with too many facts
  • History standards encode too much content and not a lot of process
  • Content can not be an end in itself because content that is not used is easily forgotten.
  • Historical laboratory (Phil Nicolosi & Nike Walsh)
    • students confront information (experiment)
    • students draw conclusions (analyze data)
    • students defend their hypotheses (lab write-ups)
Connections to Past Research
  • Foci of History Ed Research:
    • how historians create and represent historical knowledge
    • whether or not students can replicate processes of historians in a classroom
  • Misconceptions of History Education
    • it’s about learning / teaching a lot of historical trivia
    • need to learn a lot of background knowledge before one can know enough to investigate historical driving questions
  • The Importance of Questions
    • driving questions frame the learning
    • teacher needs to explicitly teach process skills related to historical thinking
    • purpose of essential questions
      • engage students by presenting history as a mystery or controversy
      • provide a purpose for learning new information = gathering evidence to investigate the question
      • draw students into exploring the past
Formulating and Articulating Questions
  • Thinking like a Historian: Rethinking History Instruction focus historical categories around 5 categories:
    1. Cause and effect
    2. Change and continuity
    3. Turning points
    4. Using the points
    5. Through their eyes
  • Using these 5 categories allows for spiraling and building of a common language for examining the past
  • Other categories:
    • multiple perspectives
    • historical contingency
    • empathy
    • influence / significance / impact
    • contrasting interpretations of the past
    • intent / motivation
  • 7 criteria for effective historical driving questions:
    1. Does the question represent an important issue to historical and contemporary issues?
    2. Is the question debatable?
    3. Does the question represent a reasonable amount of content?
    4. Will the question sustain the interest of students?
    5. Is the question appropriate to available materials?
    6. Is the question challenging for your students?
    7. What organizing concepts will be emphasized?
How Historians Work:
  • Historians ask questions – see above
  • Historians gather a variety of sources and ask questions of those sources:
    • investigate sources to formulate tenable interpretations about events, personalities and ideas about the past (hypotheses)
    • be aware variety and pitfalls of primary sources
    • interrogate the sources
    • use sources to answer historical questions
    • compare, contrast and apply sources to questions
    • Questions students can ask of sources:
      • Text:
        • What information is provided by the source?
      • Context:
        • What was going on during the time period?
        • What background info helps explain the information found in the source?
      • Subtext:
        • What is between the lines?
          • Author: Who wrote the piece and what do we know about that person?
          • Audience: For whom was the source created?
          • Reason: Why was this source produced when it was?
  • Historians develop, defend and revise interpretations: 
    • history is about multiple interpretations – no one right answer
      • who, what, when, where – can be non-debatable
      • why, how and impact – debatable
    • judgement – building and evaluating interpretations grounded in evidence
    • interpretations are living – change as context, eyes, and evidence change
    • debate and interpret historical evidence
    • develop, define and revise evidence-based historical interpretations
For a model for how to conduct a historical investigation with students, go to this article:  Facilitating a historical investigation.


2-what
Teaching a curriculum in ways that balance content and process is key to teaching students in ways that are memorable and transferable.  The 7 criteria for driving questions can be used to improve historical driving questions and driving questions in other subjects.   The questions students can ask of texts can be used or adapted for courses other than history to help students examine the contents, contexts, and subtexts in the sources.


3-sowhat
Preparation Steps
  • Analyze standards to identify enduring understandings, key skills and supporting knowledge.  Develop learning targets based on this analysis.
  • Develop a driving question for the project.  Use the 7 criteria for driving questions about to evaluate and improve driving question.
  • Find primary sources that students can use to investigate the driving questions.
  • Adapt questions students can use to analyze sources (see above)
Early Implementation Steps
  • Launch project with driving question
  • Coach students to investigate driving questions using a variety of sources.  Use source analysis questions to help students examine sources closely.
  • Guide students as they formulate and test their hypotheses.
  • Guide and challenge students as they formulate conclusions based on evidence.
Advanced Implementation Steps
  • Research and scaffold how to read and write genres that are important to  historians.  Explicitly teach these skills to students.


     5-relatedstuff

195: PBL Tips on Managing the Process

1-sources


2-what


Screen Shot 2016-05-12 at 11.34.02 AM


At project start, make sure students are on the right track:
  • Help students brainstorm next steps (such as research plans) prior to beginning those processes
  • Hold early private meetings with teams while the rest work on other assignments (ex: background reading assignment) to vet and give feedback on their next steps and research questions
  • Require deliverables with early work sessions to make sure students are making progress and gaining momentum
  • Provide milestones, benchmarks and templates to support students in managing projects
Tailor grouping strategies to project needs:
  • Vary out grouping methods: student choice, teacher choice, random draw, etc
  • Aim for heterogeneous groups that team up students who are advanced with students who struggle
  • Grouping friends together works well with projects that require a lot of work outside class time
  • If a project requires a lot of different skills, may aim to form teams that include students who have those skills as a whole when combined in teams
  • Mixed method – students choose pairs and then teacher chooses which pairs to combine into teams of 4
  • Make grouping appear random even when it is actually very deliberate
  • Expert -> jigsaw teams – expert teams become very verses in 1 topic and then jigsaw teams are formed to include one of each type of expert
  • Use knowledge of students to create balanced teams
  • Sometimes when students choose their own teams end up with several strong teams and several unfocused teams
  • Could make students apply to be on teams
  • Have students conduct a team inventory of their skills and compare that to the skills needed to complete the project – if there is a mismatch they can lobby to switch team members to better align their team’s skills to the project
  • Fake Autonomy – group all students into 3-4 colors.  Students who should not work together share the same color.  Ask students to form teams that include one student of each color
  • Can have students submit 1st and 2nd choice for partners and try to honor their requires while forming balanced teams
  • Can have students rank their interests from a list of topics and form teams based on common interests
Plan how to accommodate the needs of diverse students
  • Plan in remediation time for students who don’t get it the first couple times
  • Have students develop a portfolio that crosses projects so they can access resources throughout the year
  • Use knowledge of students to provide different types / levels of support to different students
  • Students can get help from teachers, other students, the library, the internet, etc.
  • Try to allow for time for students to work with their friends or work on a topic they are interested in
  • For more on differentiating for various needs, see this article: Clustering student needs for more efficient planning
Intervene with students who are not carrying their own weight:
  • Sometimes let teams go through the firing process and then the student needs to work alone.  Or that students can produce a body of work and apply for a rehire from another team.
  • For teams that complain about team members not working, facilitate a meeting to renegotiate and tighten timelines.  Add more details to timelines including action item descriptions, action item owners, and specific deadlines.
  • Inform parents when their child is missing checkpoints and brainstorm together how to improve students’ project and self management skills.
  • Have individuals and teams reflect on group processes so they can become more aware and communicate to each other and the teacher about their group concerns and problems.
  • Brainstorm with teams who are stuck or off task on ways to become more motivated and focused.
Keep track of each group’s progress
  • Move a lot! Use the proximity effect (location matters more than content) to coach students working in teams
  • Set clear benchmarks and deadlines and have quick touch-in meetings to check on teams’ progress and answer questions and concerns
  • Let students complete a project planning form and then have a review meeting around that form.
  • Use checklists or 3×5 cards to record group observations
  • Instruct teams to maintain group folders that include all their logs and product artifacts.
Make sure groups keep track of their own progress
  • Instruct groups to meet and record who attended the meeting, what was accomplished, the meeting agenda, data, location
Keep public records of group progress:
  • Maintain a public accountability chart that shoes what benchmarks teams have completed – make this a graphic display that everyone can see
  • Allow time at the start and end of work days to set and track team goals
The Internet is only one information resources.  Students often need help to use it efficiently
  • Use school librarian as a project partner
  • Provide students with a starter list of helpful websites
  • Teach students how to analyze the content of websites and evaluate whether or not they possess the prerequisite knowledge to understanding the web content
  • Teach students how to evaluate the validity and quality of web sources
Technology can be a powerful tool; it can also crash and burn.
  • Trial and troubleshoot tech before using it in a project
  • Identify people who can help you troubleshoot technology
Don’t use tech blindly.  Select tech that enhances student learning
  • Select tech that addresses the meat of the project effectively
  • Before using a tool ask: What can be accomplished by this tool?  Can we do this using simpler tools?
  • Allow time to train students how to use selected technology.
  • Use tech only when it is appropriate and enhances student learning.
Don’t be afraid to make mistake
  • When mistakes are made, model how to fail forward by brainstorming solutions with students
Don’t be afraid of making mid project corrections
  • When students are missing essential info, let students know how / when class will get together to fill in the gap
  • Rethink timelines if you realize that students can’t meet the original timeline or are ready and willing to do more
  • When problems arise, hold a class meeting to debrief the situation and brainstorm and select solutions
  • Renegotiate expectations with teams that run into unexpected obstacles – focus new expectations on what’s critical to learn
Debrief project with your class and ask for project feedback
  • 2 questions:
    • What is of lasting value to the learner as a result of completing this project?
    • What is of lasting value to the community as a result of completing this project?
  • Show students models of good reflection before they start generating reflective comments.
  • Ask students
    • what didn’t work and why and possible alternatives?
    • what the fell they did well in the project?
    • what they feel didn’t go well?
    • what grade do they deserve and why?
    • are you proud of your end product?
    • how could end product be better?
  • Could gather feedback on overall project and specific end products on sticky notes
  • Keep student and teacher notes on project improvements in a secure place
  • Processing time is well worthwhile – set aside time for it
Reflecting on the Driving Question
  • Reflect on the driving question to review content and hopefully make long lasting learning connections


3-sowhat
Effective (poor) project management can make (break) a project.  Students need support developing skills related to self- and project-management.  Setting aside time to scaffold these skills and using templates to reinforce / guides these skills will make students more effective at learning within PBL projects.


4-nowwhat
Preparation Steps
  • Analyze standards and create related list of academic learning targets.
  • Create project products and expectations.  Create an inventory of skills students need to have to be successful in the project.
  • Create character learning targets that are skills in the inventory that students may not have yet.
  • Design scaffolding and templates for character learning targets.
  • Select and troubleshoot technology that advances learning
Early Implementation Steps
  • Set aside time in projects to scaffold character learning targets.
  • Provide feedback on templates that scaffold project and self management process in touch-in meetings
  • Provide opportunities for students to set and track their goals throughout the project
  • Facilitate a post-project reflection discussion to gather feedback on what worked and alternatives to problems
  • Use variety of grouping methods that enhance project goals
  • Select and use technology that advances student learning; scaffold the tech
  • Intervene / support teams / individual students who are struggling
Advanced Implementation Steps
  • Ask upperclassmen to coach / mentor students in project management skills
  • Ask experienced students to design their own project planning forms
  • Use tech to update group accountability charts in real time
5-relatedstuff

194: PBL Tips on Mapping the Project

1-sources


2-what


Screen Shot 2016-05-11 at 10.30.41 PM


Use a mix of instructional strategies based on outcomes you want to achieve:
  • Need to provide instructional resources, kids can’t research everything on their own and shouldn’t have to
  • Decide type of instructional strategy based on learning goals.  For tips on what strategies go with learning outcome types, see this article: Three teacher roles
  • Use direct instruction for basic supportive information
  • Scaffold supporting skills students need to developing products (example: how to research efficiently)
  • PBL is good at teaching habits of mind and central concepts; not as good at teaching algorithms and basic facts
  • Start with the project so that instruction answers project need-to-wknos
Leave wiggle room in project calendars:
  • Set aside a couple days to push back final presentations just in case project expands beyond original intended time frame
Take time and use project templates to design projects:
  • The more people involved in project design, the more time it takes to design the project
  • Record thinking that goes into project design in notebooks and templates
  • Don’t preplan everything, leave room for students to influence the plan
  • Allow enough room for students to struggle and fail forward
  • Design learning experiences that allow students to take on more responsibility for learning the content and applying content outside school
  • For more information on templates, see these articles: Backwards design template & standards and Understanding by design planning forms
Think carefully about when to schedule projects
  • Project should not replace end of grading period exams
  • Teachers should communicate and try not to schedule too many project deadlines on the same day
Use multiple means to communicate the nature and goals of project to parents
  • Can invite parents into school-year project planning meetings to ask for their input and to explain learning goals
  • Hold parent kickoff meetings for parents that introduce project and ask parents for specific resources and support
  • Post projects on school website
  • Invite parents to school Open Houses and present upcoming projects
  • Send project calendars home with major deadlines
  • Share projects on school-wide blog posts and newsletters
  • Invite parents to serve as panelists and resident experts
  • Show evidence of student learning in projects to parents
  • Explain to parents how you design projects to meet standards and to achieve both breadth and depth over time
Use parents and students to find business and community resources for projects
  • Involve parents in serving as community liaisons for possible field sites and experts
  • Parents and students can communicate what school is like to businesses
  • Potential partners need to visit the school and learn more about its vision and strategies
  • Leverage different strengths that different people have to offer
  • Meet expert partners face-to-face to prepare them to make the most of their time with the students.
  • Train students to interact well with community members.
  • Train students how to secure funding for future projects.
  • For more ideas related to this, see this article: Mapping your community
Don’t bring in experts in until students need their expertise to progress.
  • Let students be frustrated before expert comes in to play hero
Cross-curricular projects involved multiple teacher require extensive communication and coordination:
  • Supports for cross-curricular planning: common planning time, structure reflection on project design and student work, teacher research groups, summer planning time, shared office space
  • Helps to share the same students with collaborative teacher
  • Hold meetings to plan schedules, end products, standards, checkpoints, and assessment strategy
  • Use student work to start conversations about future projects
Project will take longer – or be over sooner – than you expect.
  • Use observations of students to make adjustments to deadlines
  • Plan project calendar and prepare for 20% overrun due to unexpected contingencies


3-sowhat
Skillful mapping of project prior to launch is key to successfully implement strong projects.  Involving students and parents in recruiting partner experts and organizations can lead to more authentic projects and project activities.  Building in flexibility into project calendars can allow teachers to make adjustments to scaffolding that better support student learning and development of projects.


4-nowwhat
Preparation Steps
  • Analyze standards and create academic learning targets
  • Plan products and determine supporting 21st century skills and habits of mind that support product development.  Create character learning targets
  • Develop systems for sharing projects with parents – newsletter? blog? etc
  • Plan a rough project calendar – allow up to 20% wiggle room in extending the project just in case
Early Implementation Steps
  • Follow project calendar when it makes sense; make revisions to project calendar that improve student learning
  • Use learning modes that match different types of learning targets.  For tips on that, read Three teacher roles
Advanced Implementation Steps
  • Invite and prep industry experts to teach lessons that match student need-to-knows
  • Time expert visits and field trips to fit just-in-time teaching moments
  • Recruit parents and students to secure community partner organizations and experts


5-relatedstuff

193: PBL Tips on Planning Assessments

1-sources


2-what


Screen Shot 2016-05-11 at 9.42.21 PM


Design projects that align with standards.
  • Align projects to standards, not textbooks.
  • Keep standards accessible to teachers and students.
  • Plan assessments based on standards at the start of the project.
  • Projects go deep.  Focus project on essential standards and important topics.
  • Consider standards and SCANS skills and Habits of Mind while designing projects
  • Prioritize standards that students need to understand for projects
Include students in project and assessment designs:
To read more about involving students in assessment and rubric design, see these articles: Teaching students how to generate questionsModels, critique & descriptive feedback, and Engaging students with data
  • Plan a rough outline of project and involve students in filling in the details of that outline
  • Processes for involving students in project design
    • communicate learning targets that project must cover
    • brainstorm how to approach learning targets? supporting skills?
    • brainstorm roles needed for project
    • make contractual agreements related to learning and collaboration
    • ask how will we know if the project is a success -> rubrics.  For more ideas on how to involve students in rubric writing, see this article: Models, critique & descriptive feedback
    • as year progresses, invite students into more decisions on project design
    • use student expert groups to investigate how well project topics could address  learning targets
Set clear expectations for students:
  • Make rubrics available early in the project
  • Involve students in creating and refining rubrics
  • Make sure students can explain rubric criteria in their own words
  • Have discussions around the criteria that make expectations more transparent
  • Set high expectations (higher order thinking) with rubrics
  • For more on rubric design, see: Rubric design & implementation
Use models to show examples of excellent work
  • Use previous student work or real professional samples to show students model work
  • Use models to trigger new ideas for products
  • For more on the use of model, see: Models, critique & descriptive feedback
Determine a fair method for weighing individual and group grades:
  • Favor individual grades over group grades
    • 75% individual, 25% group
    • use individual assessments for the individual grade
  • Could weigh group and work equally (50% individual, 50% group) to encourage students to create high quality group products
  • For more on fair grading practices, see Effective grading and reporting and Grading smarter, not harder


3-sowhat
Assessment design is key to designing standards-based projects.  Assessments should be designed before / early in the project in order to develop a clear picture of what evidence students need to create to show mastery of learning targets aligned to standards.  Once a clear, layered picture of student evidence of understanding is determined, it is easier to design scaffolding that supports student learning of learning targets.  Involving students in designing assessments can create buy-in in assessment practices.  Using models to help students understand and develop assessment criteria can increase motivation and quality of products.


4-nowwhat
Preparation Steps
  • Analyze standards and develop product ideas that relate to key concepts in standards.
  • Brainstorm what SCANS skills and Habits of Mind would best support student success in learning the standards
  • Develop academic and character learning targets that align with standards, SCANS skills, and Habits of Mind
  • Develop assessments that make students generate evidence of mastery of  academic and character learning targets
  • Gather models of products
Early Implementation Steps
  • .Facilitate discussions about assessment that involve students in the collections of assessments that will be used to assess project’s academic and character learning targets
  • Facilitate discussions that revolve around models of products and generate rubric criteria based on noticing what works in the models
Advanced Implementation Steps
  • Involve students in progressively more elements of project design as the group progresses: learning activity ideas -> rubric design -> project context
  • Have students create their own assessments that they can produce to demonstrate mastery of learning targets


5-relatedstuff

192: PBL Tips on Beginning on the End in Mind

1-sources
2-what


Screen Shot 2016-05-11 at 6.20.28 PM


Ways to start the year:
  • Seniors paired with juniors on a mini-project that has seniors teaching juniors how to work effectively within projects
  • Start with mini-units that teach students collaboration and self-monitoring skills prior to launching first project with students unfamiliar with PBL
  • Don’t expect the world out of first project.  Treat it like an ice breaker.
 
Pre-assess students’ skills and knowledge so you can tailor projects to their needs:
  • Pre-assess students’ abilities and interests prior to project launch
  • Prepare activities for students who are bound to move faster than other students
  • Use knowledge of students to bridge project relevance to their prior knowledge and interests
  • Be open to multiple formats of products for students to express their content knowledge, especially for students who struggle
Getting started? Either teachers or students:
  • Start small. Don’t try to tackle everything at once.
  • Start with small projects and analyze how they work in order to learn lessons that can be applied to future projects
  • Aim to design and implement one project really well
  • Don’t integrate projects on first project – get experience with logistics first before expanding scope and complexity of logistics by integrating in another teacher / content
  • Start by tweaking a student-centered assignment you’ve already done.  For more entry points, read this article: Project design: multiple entry points
Plan projects that take place outside the classroom:
  • Look for opportunities to tie curriculum to current events and sites outside the classroom
Get kids excited about a new project:
  • Prior to launch, leak details of project to get students to start thinking about it
  • Make project launches into “events” – example: for a school-wide project had a school-wide assembly where staff members put on a funny project-related skits
Establish a culture that stresses students self-management and self-direction
  • Maintain a dialogue with students about learning goals – what kind of person do you want to be? what’s required for college? what curriculum is needed to prepare for desired careers / college majors/
  • Teach research and learning skills
  • Teach students how to manage their time
  • Make the focus about the thinking, not just about the content
  • Reframe teacher role from stage on the stage to guide on the side
    • bring problems to students to solve instead of brining solutions
    • make project design part of the curriculum
    • create opportunities for students to make decisions about their learning
  • Transition from teacher-directed to student-directed
    • start with students depending on students at the start of the year
    • end year with teachers depending on students
  • Learn how to answer questions with more questions, not answers
Create a physical environment that will facilitate project work:
  • Create spaces for materials and project storage
  • Create spaces for group work and workshop work
Craft the driving question:
  • Use driving questions as a launchpad to related student-created specific project questions.  Vet these questions before students commit a lot of work time to them.
  • Do NOT answer the essential question for the students.
  • Design driving questions that elicit multiple responses, can be viewed from multiple perspectives, and engage diverse group of students
  • Refer to driving question often during the project
Following these tips can help teachers design projects that prepare students new to project-based learning (PBL) for the challenges unique to PBL.  Pre-assessing students can lead to project designs that account for a broad range of student interests, learning modes, and readiness levels.  Developing projects and scaffolding activities that scaffold students’ self management and project management skills can help students be more successful.  Creating spaces that accommodate PBL work can help students store products in a way that is orderly and inviting.  Crafting and implement activities focused around engaging and provocative driving questions can stimulate higher-order thinking throughout the project.


4-nowwhat
Preparation Steps
Early Implementation Steps
  • Implement projects framed by driving questions
  • Refer to driving questions throughout the project
  • Fill briefcases with resources that provide learning opportunities for students at a broad range of readiness levels
Advanced Implementation Steps
  • Be open to changing rubrics and product formats in response to student feedback as long as their suggestions do not steer too far from learning targets
  • After you and your students are experienced with PBL logistics, collaborate with other teachers to design and implement projects that integrate courses or school-wide courses
 5-relatedstuff