In this blog mini-series, I will reveal how the Project-Based Learning (PBL) sausage is made. I will describe week-by-week how two projects evolved in my two main preps (Algebra 2 and Integrated Physics / Engineering). The series begins one week before project launch to show how projects are designed and how project launches are prepared. The series ends one week after project presentations to show how reflections help students and teachers improve. If you prefer to not know how much work goes into PBL, stop reading now. If you’d like to learn about the nitty gritty details that go into running projects, read on. To read about later phases in these two projects, visit this page: A Tale of 2+ Projects.
Week 0: Overview
When you work at school that champions PBL, preparation for upcoming projects NEVER occurs in a vacuum. In the week leading up to the project launches featured in this series, it was the final week of the 3rd six weeks and two projects were wrapping up in Algebra 2 and IPE. While preparing for the upcoming project launches, I was also doing a number of “other” things including: grading tests, calling parents, tutoring students, grading presentations, grading reports, grading notebooks, meeting with parents, etc.
Here is my summary of the numbers of items on my task lists in the 8 days leading up the project launches:
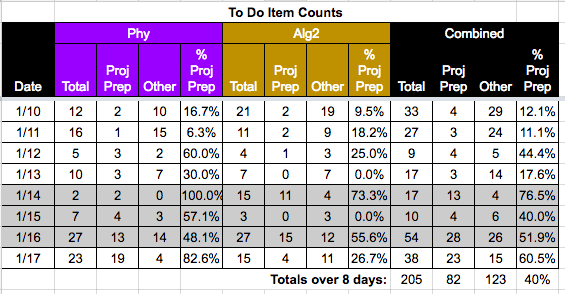
The gray region was a 3-day weekend. Less than half of the tasks I completed in the 8 days leading to the new projects were related to new project prep. So how did I get ready in time?
Several years of PBL experience have taught me how to design projects while managing many other things. I have learned what are the essential things needed to launch a project and what things are nice, but not so important. I have learned to respect the number of things needed to launch successful projects enough to begin chipping away at the list at least one week ahead of launch (earlier if possible).
The agenda below summarizes the goals, main task phases (agenda items), and deliverables we produced during Week 0, the critical final week prior to project launch.
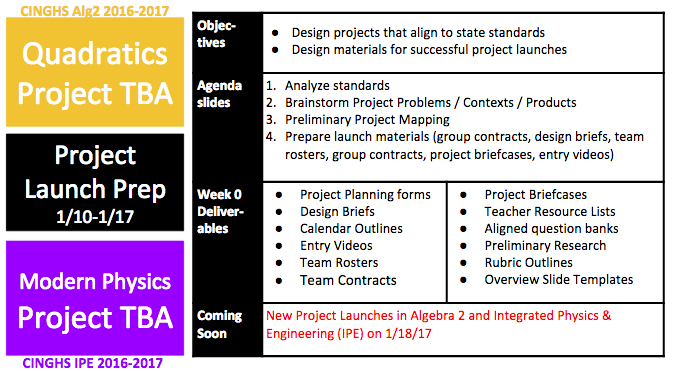
#1 Analyze Standards: Days 1-2
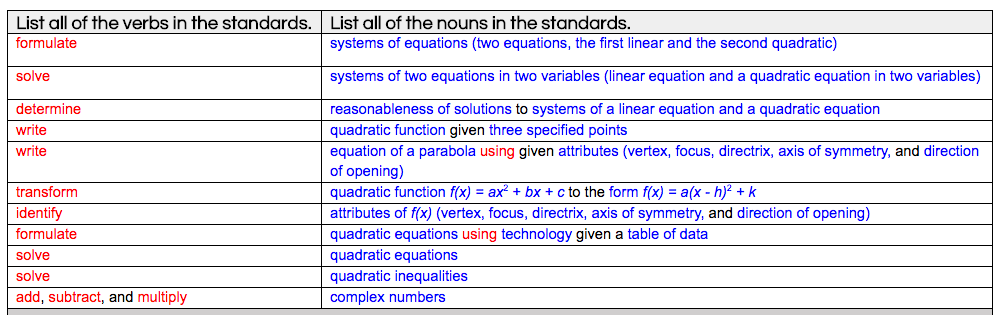
Before I even begin brainstorming a single idea related to a project, I do several things to make sure I have a really good understanding of the standards my students need to master in the project. The first thing I do is analyze the nouns and verbs in all the standards tied to the project.
Here is my noun and verb breakdown for my Quadratics Unit in Algebra 2:
Here is my noun and verb breakdown for my Modern Physics Unit in IPE:
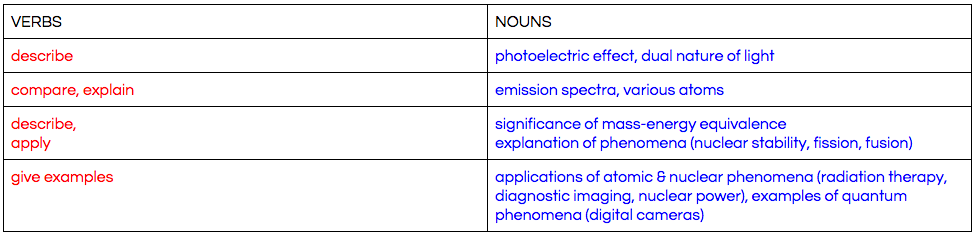
I analyzed the nouns (verbs) in the standards to determine the concepts (skills) my students will learn in the upcoming projects if I succeed in developing an aligned context that provides students with many opportunities to explore the standards.
To create an even more clear picture of what students will learn, I use software (DMAC Solutions) to generate test banks for all the standards in the upcoming projects. Then, I scan through the questions to check that my interpretations of the standards are fully aligned to what students will see in formal assessments.
Analysis of the standards was especially critical in my IPE class because I have not taught modern physics since I was a grad student. The upcoming modern physics project will mark the first time I will teach modern physics topics to high school age students. The last time I taught modern physics, I was a teacher’s assistant for an Honors Physics seminar course at UT Austin. It’s unlikely that the college physics I taught then was at the same rigor level as the physics I need to teach my highs school freshmen and juniors.
To make sure I really understood the contexts and rigor levels of the modern physics standards, I did a noun-verb-topic analysis of the test bank questions in a spreadsheet that looked like this:
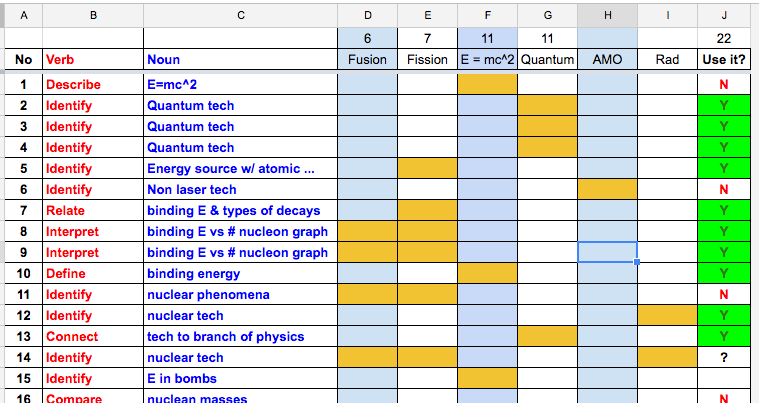
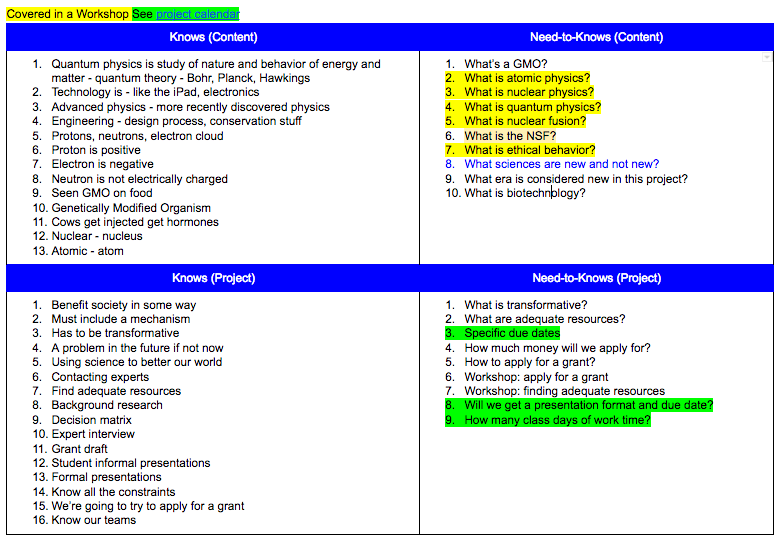
This analysis showed me that students needed to be exposed to a wide array of technologies and needed to use principles in nuclear and quantum physics to explain how those technologies work. I added many notes in the content scaffolding section of my project planning form about the types of technologies that needed to be featured in upcoming lessons.
The analysis also helped me to the understand the role of binding energy and mass defect in the standard relating mass-energy equivalence (E = mc^2) to nuclear phenomena such as fission and fusion. Binding energy and mass defect were not directly mentioned in the standard. Through research, I learned that the sizes of the binding energies and the mass defects in fusion and fission interactions could be calculated using E = mc^2. Had I not done the test bank analysis I might not have learned this connection in time to teach it to my students. This analysis was so helpful that I converted my analysis spreadsheet into a template file and saved it to my Templates folder so I could use this tool for all my future projects.
A similar analysis of the quadratic functions test bank really hit home the variety of techniques students needed to apply to find and solve quadratic equations. I also noticed that a majority of the word problems dealt with some form of accelerated motion so I made a mental note that a project problem involving accelerated motion would nicely align to the quadratic functions standards.
#2 Brainstorm Project Products & Roles: Days 2-3
After (!!) I have developed a deep understanding of my target standards, I let my brain loose on brainstorming real world problems that go with those standards. In my early years as a PBL facilitator, I made the mistake a couple times of brainstorming projects prior to analyzing the standards and ended up with projects only partially aligned to the standards. Partially aligned or unaligned projects are a tremendous waste of class time. Students can get really engaged by project contexts; creating fully aligned and engaging project contexts can get students excited about learning the right stuff and applying it to things they care about.
I have an engineering co-teacher in IPE so we chose our project contexts and products together after we had both analyzed our standards. Mr. Fishman’s target standards dealt with ethics in the workplace, science / tech / engineering careers, impacts of emerging technology on society, and biotech. We brainstormed over the course of a couple days during our conference period, breakfast, lunch, and at random moments in class when students were working independently. In addition to our standards, our thinking was influenced by a book we were both reading called Physics for Future Presidents and the upcoming Presidential inauguration.
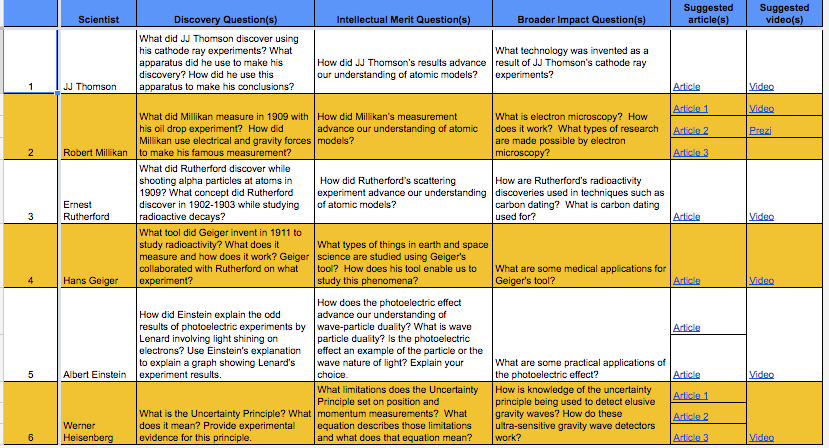
We finally landed on NSF grants. We wanted our students to pose as teams of engineers and scientists applying for NSF grants. The National Science Foundation grants are assessed in two major criteria that tie well with all our standards: (1) intellectual merit and (2) broader impact. Intellectual merit is the extent to which projects have the potential to advance and transform scientific and engineering knowledge. Broader impact describes how projects can benefit society. Due to our time constraints, we decided our final product would be the first page of an NSF grant, the Project Summary. This one-page document describes the project’s major logistics (target problem, methods, and anticipated results), its intellectual merit and its broader impact.
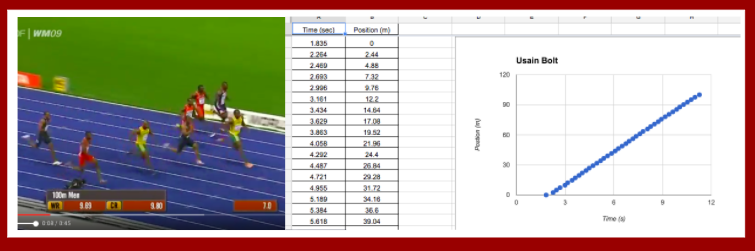
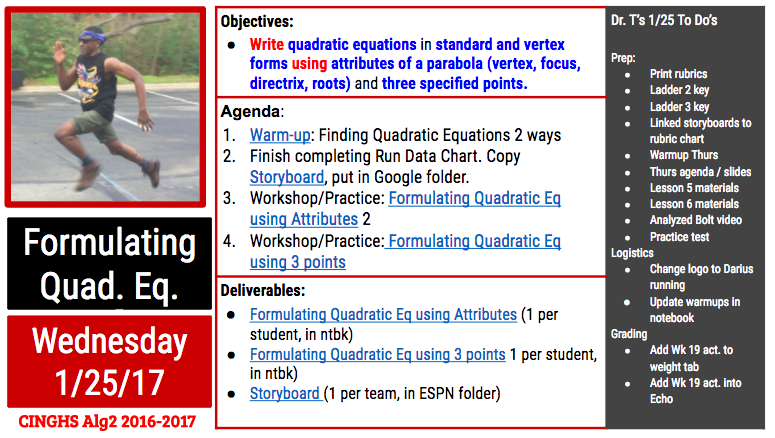
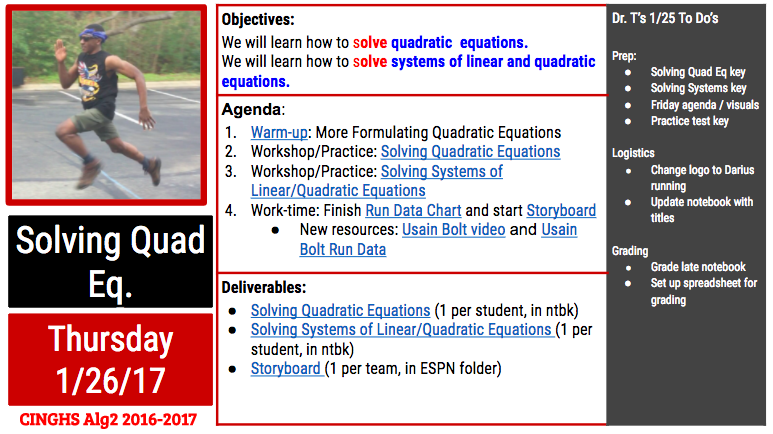
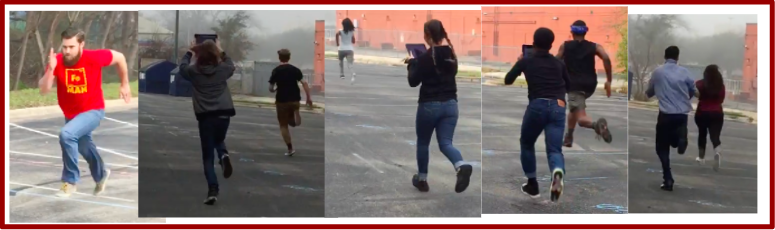
For my Algebra 2 class, my analysis of the standards-based test banks had already suggested some problem involving acceleration. I couldn’t do projectiles because we had just analyzed NERF gun data in our polynomial equations unit. At first I thought we could use accelerated motion to design movie stunts. But I wasn’t thrilled with that context because the means for gathering data were either dangerous or overly complicated. My second idea was to analyze running data. After more thought, I realized that running data would be a nice fit for the quadratics standards and also the standards on systems of linear and quadratic equations because these equation types correspond to the position-time graphs of constant velocity and constant acceleration motion. Once that clicked, my brain was off to the races …
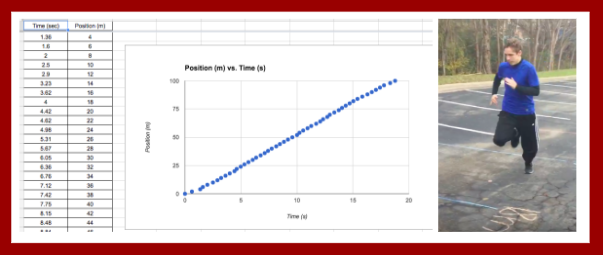
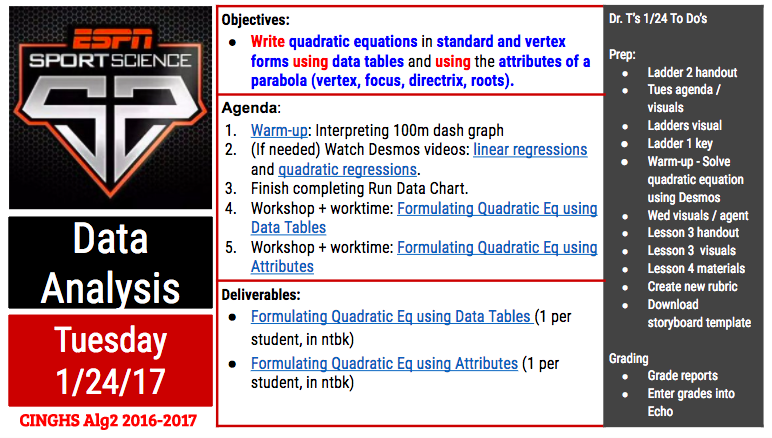
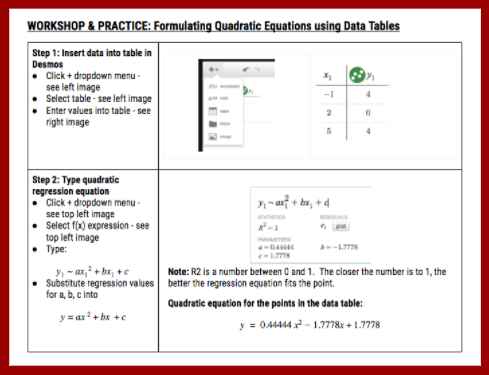
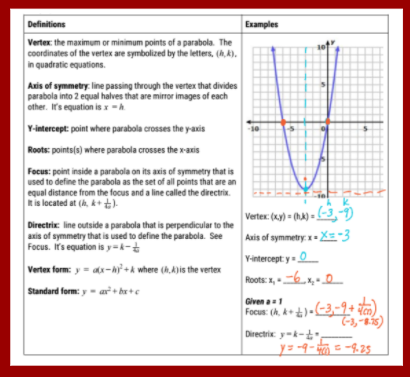
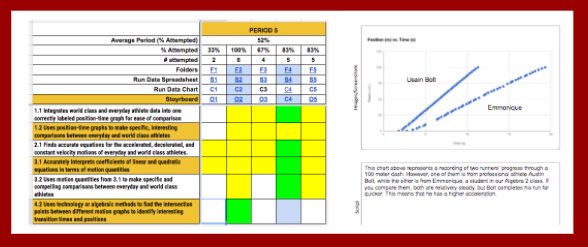
I brainstormed people who would actually analyze running data. People who do this include: track coaches, sports fans, and sports analysts. One of my favorite science things on TV are the ESPN Sports Science clips. So, I decided to pose students as analysts working for ESPN charged with making a Sports Science clip that investigated the question: What separates everyday and world class athletes? To address this question, students will gather position-time data on everyday runners (themselves) and world class track athletes. They will use various methods to find, solve, and interpret the systems of quadratic and linear equations that model the motion of the different runners. They will feature their conclusions and their data collection / analysis methods in their own ESPN Sports Science clip. They will post that clip to our school’s YouTube channel and tweet the link to ESPN Sports Science Twitter page.
#3 Preliminary Project Mapping: Days 4 on …
One section of my project planning form is a project calendar that is a living document. I tweak it throughout the project based on the unique twists and turns that occur during the course of project. Prior to launch, I think it’s important to mainly know what are major phases in the project, what are the project deliverables associated with those phases, and what types of scaffolding are needed to support students creating those deliverables.
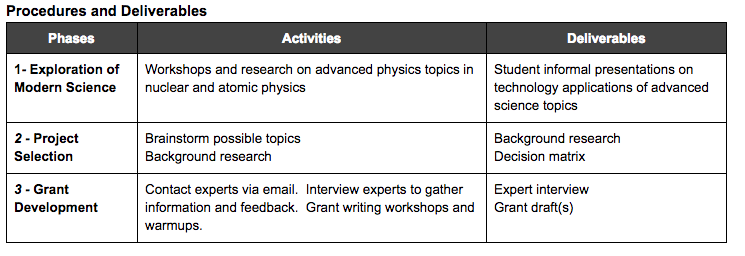
In the past I have made 2 opposite errors. Error 1 is to not map the project at all prior to launch and hope for the best. Error 2 is to plan out every day in the entire project prior to launch. Error 1 led to projects with muddy schedules that took more than they should mainly because I didn’t know enough to lead students along a coherent path to success. Error 2 can make teachers less receptive to flexibly responding to their students need-to-knows. So the happy medium I now strive for looks like this for the NSF project in IPE:
and like this in the ESPN Sports Science Project in Algebra 2:
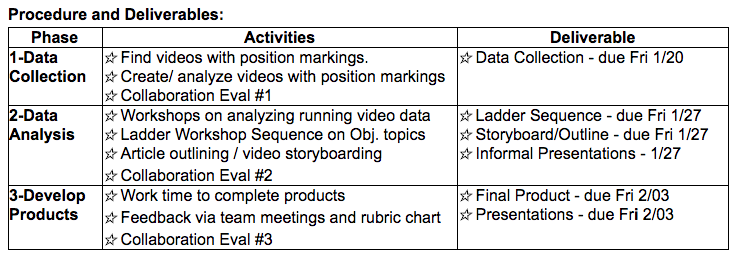
These preliminary project maps are shared with the students as parts of their project design briefs. These maps provide a bird’s-eye view of the major phases, activities and deliverables in the project. When it’s possible to put down due dates, I include those. I included due dates in the Algebra 2 project because this project has a tighter time frame than the IPE project. The Algebra 2 project will last 3 weeks while the IPE project will last 5 weeks.
Over the course of the project, I develop more detailed project calendars and share these with students in time for them to have at least one week on minor project deliverables and at least two weeks on major project deliverables. Prior to launch, it’s OK to not have these all these details nailed down because students are used to requesting these deadlines when they analyze launch materials and develop their lists of knows and need-to-knows.
#3 Prepare Launch Materials: Days 4-8
Design Briefs: The first thing I create to prepare for launch is a design brief that outlines the project objectives, purpose, constraints, procedures, and deliverables. This is the main document my students use to generate their knows and need-to-knows. To help them prepare detailed and rich lists, I make sure that the design brief includes all the academic vocabulary in my standards and lots of details related to project logistics.
The objectives section of the design brief summarizes what students will learn in the project. The purpose provides an overview of the project context and why it’s important. The project constraints are used in IPE to select the final solution that students will develop from a number of brainstormed solutions. These constraints are input into a decision matrix that is used to evaluate possible solutions and determine the best one. In Algebra 2, the constraints provide a summary of the criteria that will be used to evaluate their products. These criteria are further unpacked in the rubric. To see examples of design briefs, see these links: NSF Design Brief and ESPN Sports Science Design Brief.
Entry Videos: To support the design brief, I either make or select a supporting video that gives students more info related to their project and/or provides a model for their final product. For the ESPN Sports Science Project, I selected an ESPN Sports Science clip that featured LeBron James. I chose this clip because it mentioned a lot of motion data and used it to explain why James’s block of a fast break lay-up was so impressive.
In IPE, Mr. Fishman and I wanted to choose a video that showed students a wide variety of projects or problems that were NSF worthy so we found a video featuring all the NEA Grand Challenges for Engineering. This video provided students with an overview of several problems they could possibly investigate in this project.
Rubrics: I’m going to write something that may scandalize my colleagues: I don’t believe it’s always necessary to present students with a rubric on launch day. Sometimes I withhold rubrics on purpose. This occurs in projects that are so heavily dependent on content skills that they can’t begin one item in the rubric without some content scaffolding first. In that case, I withhold the rubric until they have passed assessments that show they are ready to begin tackling things in the rubric.
Sometimes I withhold rubrics, because I just don’t have time to finalize one prior to launch. I don’t feel too bad because the design brief is so densely written that students can already start generating project knows, need-to-knows and next steps based on this document alone. In the case of the NSF and Sports Science projects, the rubrics were not ready in time to release them on launch day and we launched anyway.
Overview Slide Deck: Now it’s time to discuss the secret sauce. To avoid wasting time on selecting slide formats and to give all project slides a single cohesive (branding) look, I create a slide template file that has all the main slides I need to build daily project visuals.
Here’s my template slide deck for the NSF Project:
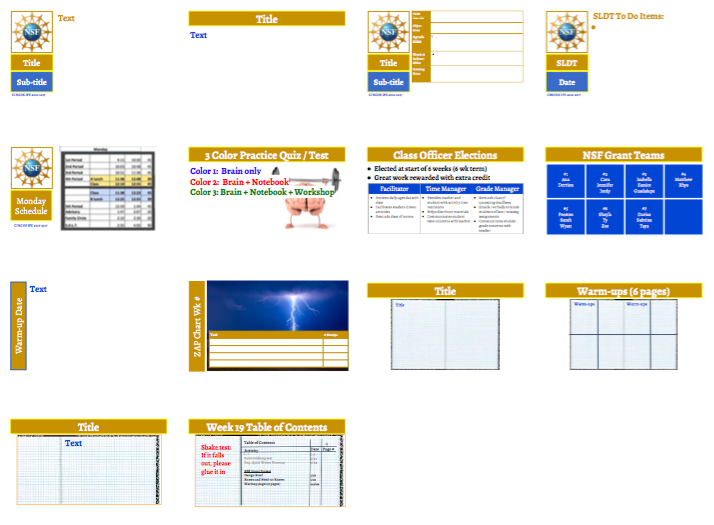
Here’s its counterpart in the ESPN Project:
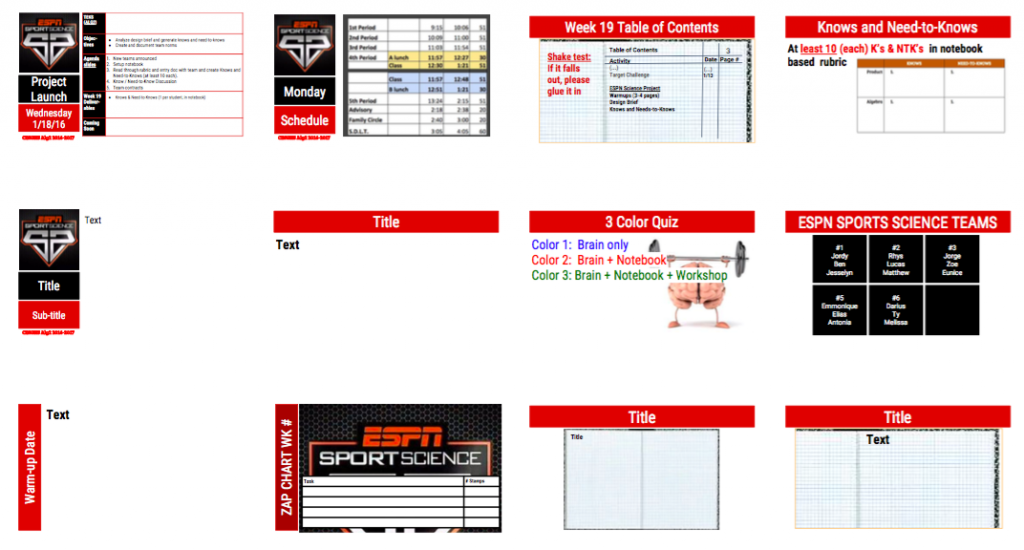
I make copies of the Template files and create project overview files. These are living documents that include ALL the daily agendas and supporting visuals for the entire project. The reason I don’t just build the overview files from the template is because I make copies of the Template file to generate other slide decks needed for content and product scaffolding activities. To see the project overview files, go to these links: NSF Overview and ESPN Overview.
Team Rosters: There are so many ways to make teams. For these projects, we did it randomly but die rolls. When students completed their final collaboration evaluations in the past projects, one question in the evals asked them to roll a die and record the number. The students completed evals for each member of their team. I gathered their eval responses using Google forms. I used pivot tables to find their average die rolls. Then I sequenced the students in ascending order using their average die rolls. Then I grouped students into teams by the order the appeared in this list. The only exceptions occurred when the die rolls placed students in teams that included partners from their last project. In that case, I switched them with another student to ensure new team members for all.
Team Contracts: For this project, I selected a shorter version of my team contract template that features one side of questions related to setting common goals and norms and one side for setting up a daily work log. I chose this template because I wanted students to use the work log to make their work division agreements visible to all team members and teachers. I included a detailed firing process instead of letting students make up their own process this time so we could practice reasonable warning practices. In this contract, students are required to document warnings in emails that describe the behavior associated with the warning; these emails are sent to the teacher(s) and all the team members. I had to specify this requirement because in our last project some students assigned warnings via email that just said warning and did not specify the reason for the warnings. It created a lot of confusion and frustration.
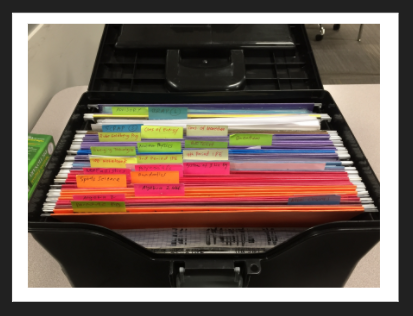
Project Briefcases: I have two project briefcases per project: the public briefcase students see in Echo and a private planning version that is housed in Google drive. Both briefcases have the sub-folders: (1) Launch, (2) Product Resources and Scaffolding, (3) Content Resources and Scaffolding, (4) Tests and Reviews. The Google drive version also has a sub-folder called (0) Teacher Resources. Prior to the launch, we populate the Launch folder of the Echo briefcase with the design brief, the entry video, knows and needs-to-knows lists, and the group contracts.
Warmup file: For every project, I create a warm-up file that is home to all the warm-ups in the project. It has a hyperlinked table of contents that includes for each warm-up: its date, its title, and a hyperlink to the actual warmup. Here are the links to the NSF and ESPN warm-up files. There is a warm-up everyday except on test days and practice test days. We use warm-ups to scaffold project logistics, content knowledge and skills, and product knowledge and skills.
Teacher resource lists: In my project planning forms is a teacher resource section where I store a list of hyperlinks to sources I need for product resources / scaffolding and content resources / scaffolding. I use this list a lot over the duration of the project. This list grows as I encounter more helpful resources while developing materials for the project.
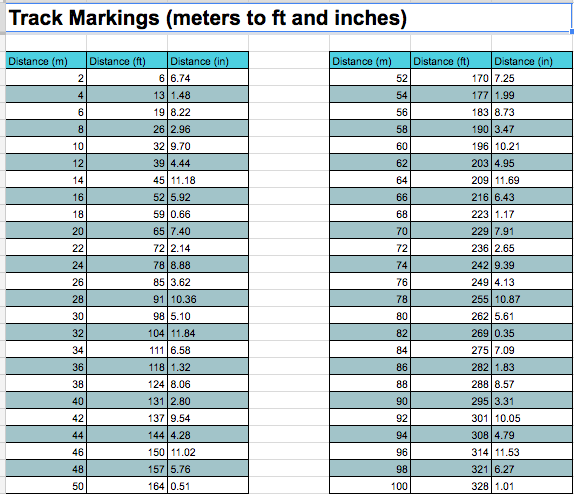
Materials lists: I started thinking about the equipment I needed to order to ensure that students are successful in the project. In the ESPN project I researched really long tape measures because I knew that I wanted students to collaborate as a class to create a 100-m track with line markings every 2 meters in order to gather video analysis data on their 100-m runs. For both the ESPN and NSF projects, I researched and downloaded a TI-83 emulator so I could demonstrate on the Apple TV via my laptop how to perform tricky calculations using special features in the TI-83. I was able to acquire both resources in time to use them at the right places in the projects.
My test bank analysis of the physics standards also led me to contact UTeach to see if we can borrow emission spectra equipment (spectroscopes, discharge tubes, spectral charts). These are expensive pieces of equipment that are not yet in our science inventory. They are too costly to purchase on short notice so we will need to borrow the equipment from the UTeach inventory (if they will let us, crossing fingers and toes) .
While earning my teacher certification through the UTeach program, I TA’d a Research Methods course that provided me with many opportunities to sample the many items in their extensive math / science lab inventory. If their inventory is still similar to what I saw in 2004-2007, they have all the emission spectra equipment we need to teach that topic effectively.
Thus concludes Week 0 of a Tale of Two Projects. Stay tuned for the Week 1 entry where we will look at Project Launches and Early Project Scaffolding activities.


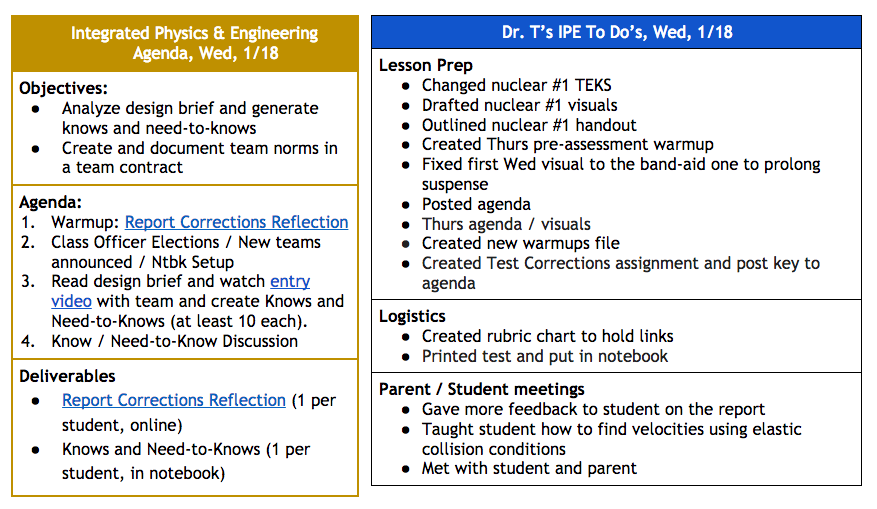
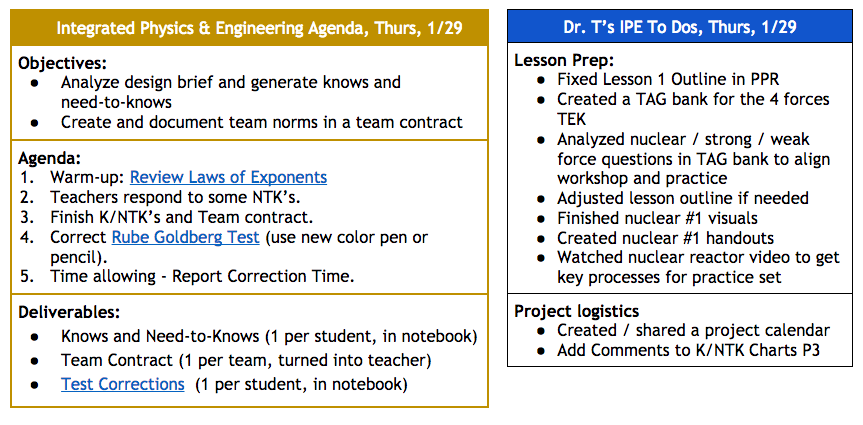
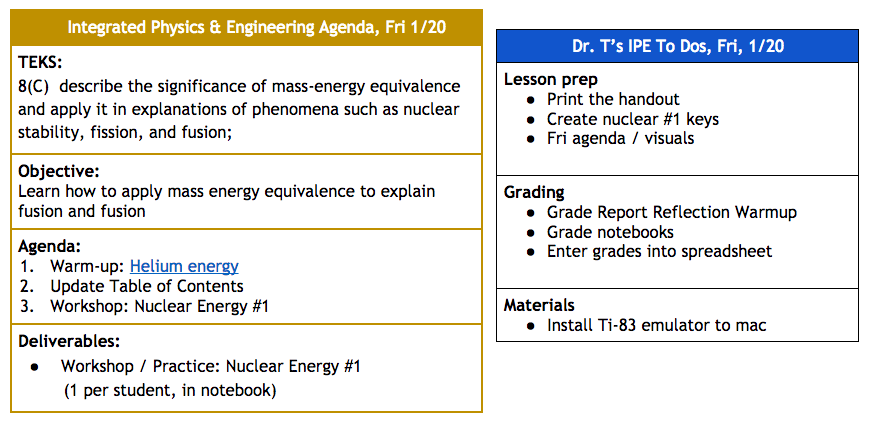
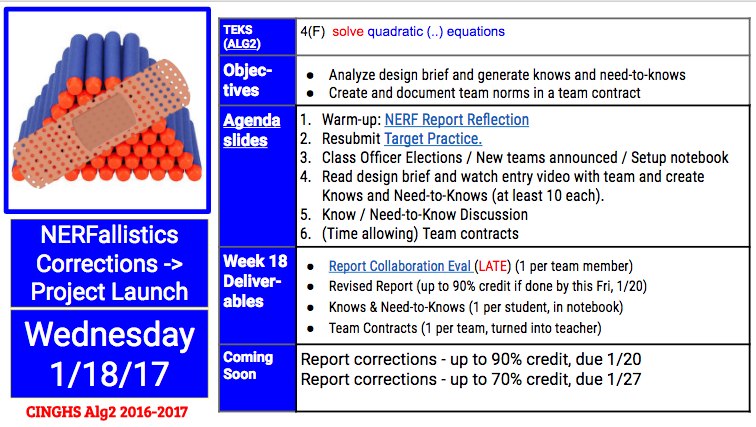
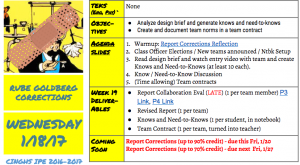 Students in IPE were greeted with this visual when they arrived in class in Day 1 of the Emerging Tech project. The branding on this agenda slide shows the icon from the previous project with a bandaid over it. This reinforced the warmup for the day which was a reflection on their past report scores and their plans to use report feedback to raise their scores that week. In the IPE class, student work is graded once a week: notebooks are graded on Friday’s and major products submitted online are graded on Sundays. Students have up to 2 weeks to revise their work: after 1 week, they can earn up to a 90% on late or resubmitted work and after 2 weeks, they can earn up to 70% on this work. After 2 weeks, my co-teacher and I no longer accept the work.

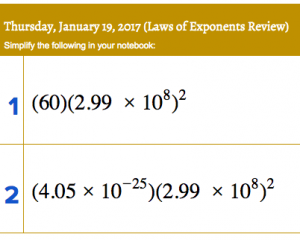 On day 2 of the NSF project, students did a warmup that reviewed Laws of Exponents. I designed the warm-up problems to take on the same form as the energy-mass equivalence (E = mc^2) problems we would introduce the following day. This warm-up gave us the opportunity to review laws of exponents and putting final results into scientific notation.


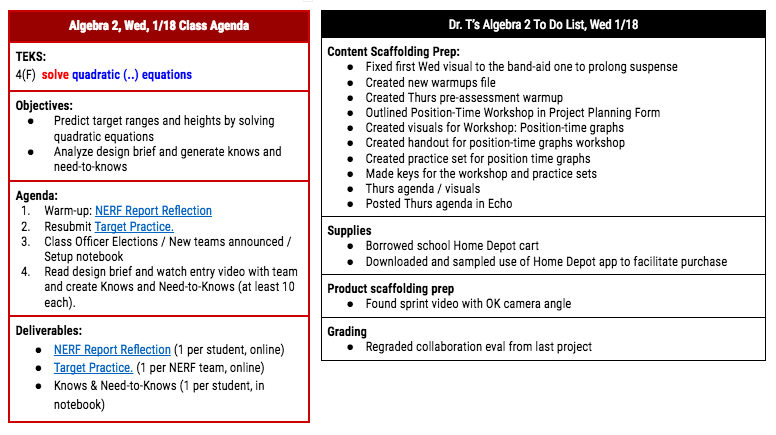


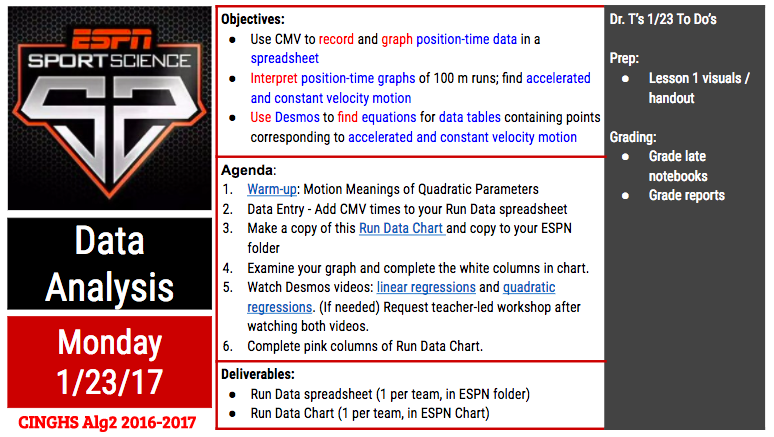
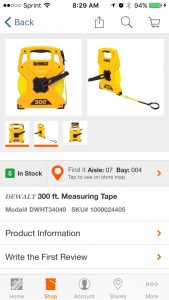 Later that day, I prepared for Days 2 and 3 of the project by preparing a workshop and practice set on position-time graphs and by purchasing a 300-ft long tape measure. My co-teacher, Mr. Fishman, had me download the Home Depot app so I could shop for my tape measure efficiently. When you’re in the store, you can search for products and the app will give you the aisle and section of the store for the product along with a labeled map of the store. It was so sweet. I bought calculator batteries and a crazy long tape measure in record time using the app.
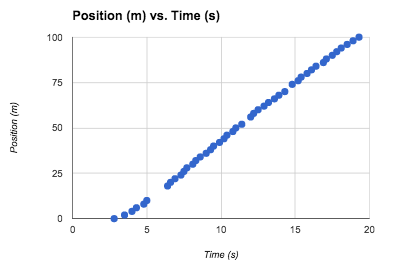
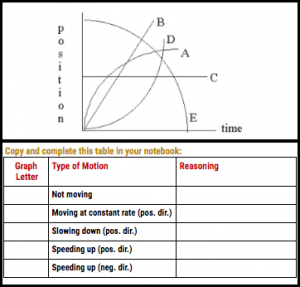 ready knew or could deduce about position-time graphs:
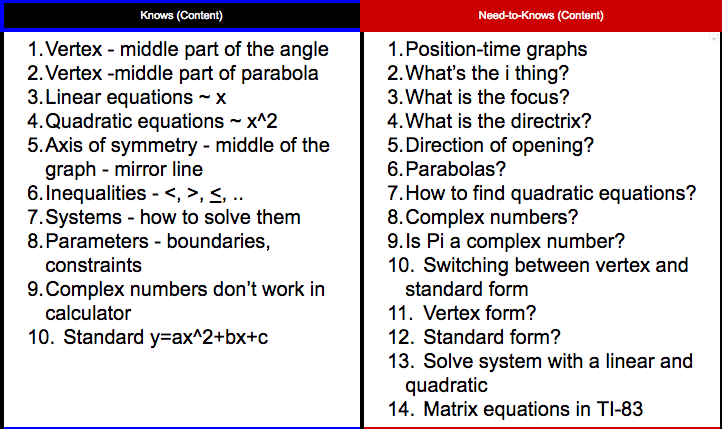


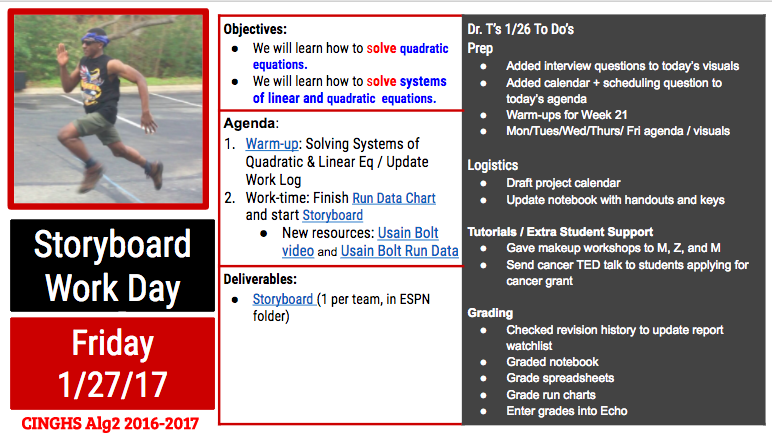
 After I graded all the notebooks, I used conditional formatting on my Google spreadsheets grade book to create this visual. I cropped out the student names for this post. Red boxes represent missing work and green boxes represent turned-in work. I emailed this visual (the version with the student names) to the grade manager along with a couple links to Google forms associated with a couple of these tasks. My grade manager sent follow-up emails to students missing work and during the following week, he collected late notebooks from students on Tuesday when I decided to follow-up on some late work. By Wednesday the chart was nearly all green except for one student who was out sick for several days. Student Leadership Rocks!


 Chapter 7 from


